Sharp AR-M162E AR-M162E AR-M207E Operation Manual Suite - Page 105
Driver] button., Sharpdesk] button, or the [PC-FAX
 |
View all Sharp AR-M162E manuals
Add to My Manuals
Save this manual to your list of manuals |
Page 105 highlights
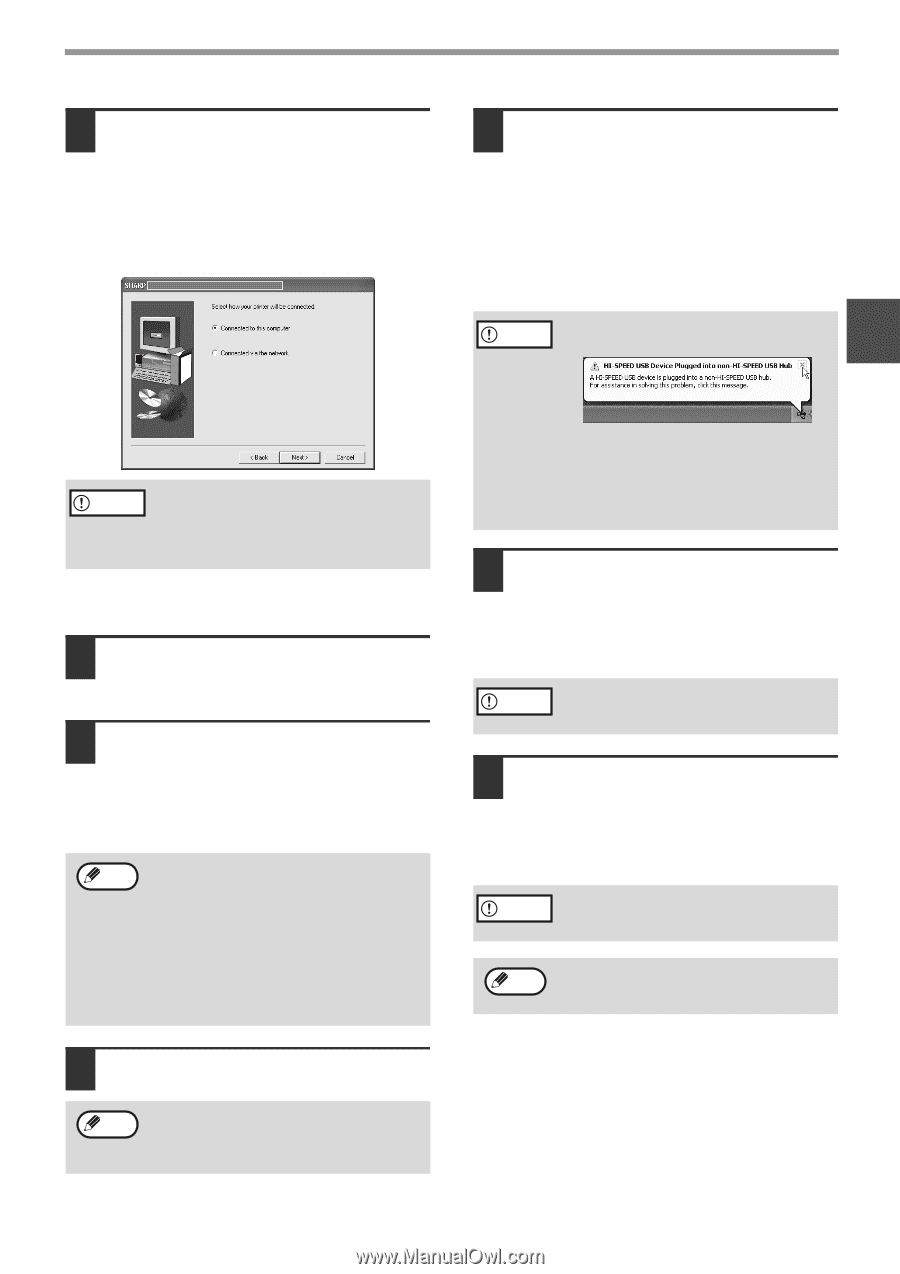
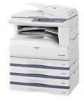
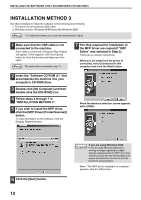
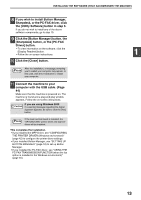
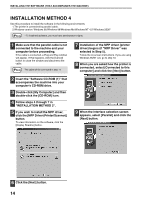
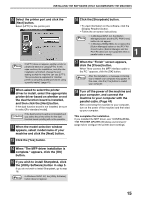
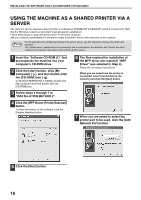
INSTALLING THE SOFTWARE (THAT ACCOMPANIES THE MACHINE) 10 The files required for installation of the MFP driver are copied (if "MFP Driver" was selected in Step 8). Follow the on-screen instructions. When you are asked how the printer is connected, select [Connected to this computer] and click the [Next] button. 14 Connect the machine to your computer with the interface cable. (Page 44) • If you are using a USB cable, make sure the machine power is turned on and then connect the cable. • If you are using a parallel cable, turn off both the machine power and the computer power and then connect the cable. Turn the machine power on first and then turn on your computer. The machine is found and a plug and play window appears. If you are using a parallel cable, go to step 16. If the following message appears on Caution your computer screen, close it. 1 Caution If a warning message regarding the Windows logo test appears while the MFP driver files are being copied (the warning message may appear several times), be sure to click the [Continue Anyway] button. When "The installation of the SHARP software is complete" appears, click the [OK] button. 11 If you wish to install Button Manager, Sharpdesk, or the PC-FAX driver, click the [Utility Software] button in step 8. 12 Click the [Button Manager] button, the [Sharpdesk] button, or the [PC-FAX Driver] button. To view information on the software, click the [Display Readme] button. Follow the on-screen instructions. Note • If you are using a parallel cable, do not select "Button Manager" or "PC-FAX Driver". These features are not supported when a parallel cable is used. • When a message appears prompting you to connect the USB cable, click the [OK] button. For the software that can be installed, see "INSTALLATION ENVIRONMENT AND USEABLE SOFTWARE" (page 7). 13 Click the [Close] button. Note After the installation, a message prompting you to restart your computer may appear. In this case, click the [Yes] button to restart your computer. A window regarding "HI-SPEED USB Device" will then appear. Close the window. This message appears when the machine's USB mode is not set to "Hi-Speed" mode. For information on switching the USB 2.0 mode, see the "Key operator's guide". 15 Installation of the scanner driver begins. (only when using a USB cable). "SHARP AR-XXXX" will appear in the "Found New Hardware Wizard" dialog box. Select [Install the software automatically (Recommended)], click the [Next] button, and follow the on-screen instructions. If a warning window appears regarding the Caution "Windows logo test", be sure to click the [Continue Anyway] button. 16 Installation of the printer driver begins. "SHARP AR-XXXX" will appear in the "Found New Hardware Wizard" dialog box. Select [Install the software automatically (Recommended)], click the [Next] button, and follow the on-screen instructions. If a warning window appears regarding the Caution "Windows logo test", be sure to click the [Continue Anyway] button. Note If the dual function board is installed, the "AR-XXXX (EB)" printer driver and scanner driver will be installed. This completes the installation. • If you installed the MFP Driver, see "CONFIGURING THE PRINTER DRIVER (Windows environment)" (page 42) to configure the printer driver settings. • If you installed Button Manager, see "SETTING UP BUTTON MANAGER" (page 18) to set up Button Manager. • If you installed the PC-FAX driver, see "USING THE PC-FAX TRANSMISSION FUNCTION (when the fax option is installed in the Windows environment)" (page 45). 11
-
 1
1 -
2
-
3
-
4
-
5
-
6
-
7
-
8
-
9
-
10
-
11
-
12
-
13
-
14
-
15
-
16
-
17
-
18
-
19
-
20
-
21
-
22
-
23
-
24
-
25
-
26
-
27
-
28
-
29
-
30
-
31
-
32
-
33
-
34
-
35
-
36
-
37
-
38
-
39
-
40
-
41
-
42
-
43
-
44
-
45
-
46
-
47
-
48
-
49
-
50
-
51
-
52
-
53
-
54
-
55
-
56
-
57
-
58
-
59
-
60
-
61
-
62
-
63
-
64
-
65
-
66
-
67
-
68
-
69
-
70
-
71
-
72
-
73
-
74
-
75
-
76
-
77
-
78
-
79
-
80
-
81
-
82
-
83
-
84
-
85
-
86
-
87
-
88
-
89
-
90
-
91
-
92
-
93
-
94
-
95
-
96
-
97
-
98
-
99
-
 100
100 -
 101
101 -
 102
102 -
 103
103 -
 104
104 -
 105
105 -
 106
106 -
 107
107 -
 108
108 -
 109
109 -
 110
110 -
111
-
112
-
113
-
114
-
115
-
116
-
117
-
118
-
119
-
120
-
121
-
122
-
123
-
124
-
125
-
126
-
127
-
128
-
129
-
130
-
131
-
132
-
133
-
134
-
135
-
136
-
137
-
138
-
139
-
140
-
141
-
142
-
143
-
144
-
145
-
146
-
147
-
148
-
149
-
150
-
151
-
152
-
153
-
154
-
155
-
156
-
157
-
158
-
159
-
160
 |
 |