Sharp AR-M162E AR-M162E AR-M207E Operation Manual Suite - Page 136
CONFIGURING THE PRINTER DRIVER (Windows environment), INSTALLING ACROBAT READER
 |
View all Sharp AR-M162E manuals
Add to My Manuals
Save this manual to your list of manuals |
Page 136 highlights
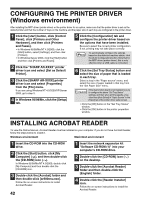
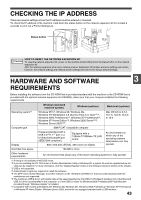
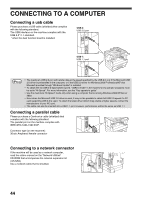
CONFIGURING THE PRINTER DRIVER (Windows environment) After installing the MFP driver (printer driver) or the printer driver for an option, make sure that the printer driver is set as the default printer and that the number of trays on the machine and the paper size of each tray are configured in the printer driver. 1 Click the [start] button, click [Control Panel], click [Printers and Other Hardware], and then click [Printers and Faxes]. • In Windows 95/98/Me/NT 4.0/2000, click the [Start] button, select [Settings], and then click [Printers]. • In Windows Server 2003, click the [Start] button and then click [Printers and Faxes]. 2 Click the "SHARP AR-XXXX" printer driver icon and select [Set as Default Printer]. 3 Click the [SHARP AR-XXXX] printer driver icon and select [Properties] from the [File] menu. If you are using Windows NT 4.0/2000/XP/Server 2003, go to step 5. 4 In Windows 95/98/Me, click the [Setup] tab. 5 Click the [Configuration] tab and configure the printer driver based on the options that have been installed. Be sure to select the correct printer configuration. If not, printing may not take place correctly. Note To automatically configure the settings based on the detected machine status, click the [Auto Configuration] button. Note that for the MFP driver (printer driver), this is only effective when a USB cable is connected. 6 Click the [Set Tray Status] button and select the size of paper that is loaded in each tray. Select a tray in the "Paper source" menu, and select the size of paper loaded in that tray from the "Set Paper Size" menu. Caution If the dual function board is not installed, be sure to configure the above "Set Tray Status" settings, and then when printing specify a tray other than [Auto Select] in "Paper Source" in the [Paper] tab of the printer driver setup screen. • Click the [OK] button in the "Set Tray Status" window. • Click the [OK] button in the printer properties window. INSTALLING ACROBAT READER To view the Online Manual, Acrobat Reader must be installed on your computer. If you do not have Acrobat Reader, follow the steps below to install it. Windows environment Macintosh environment 1 Insert the CD-ROM into the CD-ROM drive. 2 Click the [Start] button, click [My Computer] ( ), and then double-click the [CD-ROM] icon ( ). In Windows 95/98/Me/NT 4.0/2000, double-click [My Computer] and then double-click the [CD-ROM] icon. 3 Double-click the [Acrobat] folder and then double-click [ar500enu.exe]. Follow the on-screen instructions to install Acrobat Reader. 42 1 Insert the network expansion kit "Software CD-ROM (1)" into your computer's CD-ROM drive. 2 Double-click the [CD-ROM] icon ( ) on the desktop. 3 Double-click the [Acrobat Reader] folder and then double-click the [English] folder. 4 Double-click the [Reader Installer] icon. Follow the on-screen instructions to install the Acrobat Reader.
-
 1
1 -
2
-
3
-
4
-
5
-
6
-
7
-
8
-
9
-
10
-
11
-
12
-
13
-
14
-
15
-
16
-
17
-
18
-
19
-
20
-
21
-
22
-
23
-
24
-
25
-
26
-
27
-
28
-
29
-
30
-
31
-
32
-
33
-
34
-
35
-
36
-
37
-
38
-
39
-
40
-
41
-
42
-
43
-
44
-
45
-
46
-
47
-
48
-
49
-
50
-
51
-
52
-
53
-
54
-
55
-
56
-
57
-
58
-
59
-
60
-
61
-
62
-
63
-
64
-
65
-
66
-
67
-
68
-
69
-
70
-
71
-
72
-
73
-
74
-
75
-
76
-
77
-
78
-
79
-
80
-
81
-
82
-
83
-
84
-
85
-
86
-
87
-
88
-
89
-
90
-
91
-
92
-
93
-
94
-
95
-
96
-
97
-
98
-
99
-
100
-
101
-
102
-
103
-
104
-
105
-
106
-
107
-
108
-
109
-
110
-
111
-
112
-
113
-
114
-
115
-
116
-
117
-
118
-
119
-
120
-
121
-
122
-
123
-
124
-
125
-
126
-
127
-
128
-
129
-
130
-
 131
131 -
 132
132 -
 133
133 -
 134
134 -
 135
135 -
 136
136 -
 137
137 -
 138
138 -
 139
139 -
 140
140 -
 141
141 -
142
-
143
-
144
-
145
-
146
-
147
-
148
-
149
-
150
-
151
-
152
-
153
-
154
-
155
-
156
-
157
-
158
-
159
-
160
 |
 |