Sharp AR-M257 AR-M257 AR-317 Operation Manual Suite - Page 159
Selecting The File Format - scan to pdf
 |
View all Sharp AR-M257 manuals
Add to My Manuals
Save this manual to your list of manuals |
Page 159 highlights
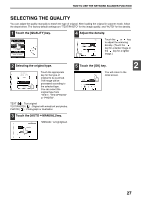
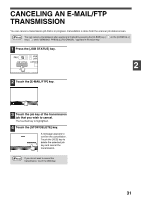
HOW TO USE THE NETWORK SCANNER FUNCTION SELECTING THE FILE FORMAT You can select the format of the image file that will be created (file type, compression mode, and pages per file). The factory default settings are "TIFF" for the file type, "MMR (G4)" for the compression mode, and "ALL" for the pages per file. 1 Touch the [FILE FORMAT] key. QUALITY 300dpi RESOLUTION TIFF-G4 FILE FORMAT AUTO 8½X11 ORIGINAL 2 Select the file type and the compression mode. Either [TIFF] or [PDF] can be selected for the file type of the image data to be created, and [NONE], [MH (G3)] or [MMR (G4)] can be selected for the compression format. 3 Set the number of pages per file. Note • The factory default setting can be changed in the key operator programs. (See "INITIAL FILE FORMAT SETTING" in the key operator's guide.) • To open the scanned image without using the software program in the CD-ROM that accompanies the network scanner expansion kit, the recipient must have a viewer program that can open the image format (file type) that was selected as explained above. • The factory default setting for the image format produces the smallest file (TIFF G4). If the recipient cannot open the image, try sending the image in a different format. • If the number of scanned originals is not divisible by the number set in "PAGES PER FILE", the last file will have less pages. 2 QUALITY 300dpi RESOLUTION FILE FORMAT AUTO 8½X11 ORIGINAL FILE TYPE PDF TIFF COMPRESSION MODE NONE MH (G3) MMR (G4) PAGES PER FILE ALL 1 2 3 4 5 OK 6 Touch the "ALL" key or one of keys [1] to [6]. • [ALL]: The scanned images are combined into a single file. • [1] to [6]: Multiple image files are created, each with the selected number of pages per file. 4 Touch the [OK] key. You will return to the initial screen. OK MMR (G4) 29
-
 1
1 -
2
-
3
-
4
-
5
-
6
-
7
-
8
-
9
-
10
-
11
-
12
-
13
-
14
-
15
-
16
-
17
-
18
-
19
-
20
-
21
-
22
-
23
-
24
-
25
-
26
-
27
-
28
-
29
-
30
-
31
-
32
-
33
-
34
-
35
-
36
-
37
-
38
-
39
-
40
-
41
-
42
-
43
-
44
-
45
-
46
-
47
-
48
-
49
-
50
-
51
-
52
-
53
-
54
-
55
-
56
-
57
-
58
-
59
-
60
-
61
-
62
-
63
-
64
-
65
-
66
-
67
-
68
-
69
-
70
-
71
-
72
-
73
-
74
-
75
-
76
-
77
-
78
-
79
-
80
-
81
-
82
-
83
-
84
-
85
-
86
-
87
-
88
-
89
-
90
-
91
-
92
-
93
-
94
-
95
-
96
-
97
-
98
-
99
-
100
-
101
-
102
-
103
-
104
-
105
-
106
-
107
-
108
-
109
-
110
-
111
-
112
-
113
-
114
-
115
-
116
-
117
-
118
-
119
-
120
-
121
-
122
-
123
-
124
-
125
-
126
-
127
-
128
-
129
-
130
-
131
-
132
-
133
-
134
-
135
-
136
-
137
-
138
-
139
-
140
-
141
-
142
-
143
-
144
-
145
-
146
-
147
-
148
-
149
-
150
-
151
-
152
-
153
-
 154
154 -
 155
155 -
 156
156 -
 157
157 -
 158
158 -
 159
159 -
 160
160 -
 161
161 -
 162
162 -
 163
163 -
 164
164 -
165
-
166
-
167
-
168
-
169
-
170
-
171
-
172
-
173
-
174
-
175
-
176
-
177
-
178
-
179
-
180
-
181
-
182
-
183
-
184
-
185
-
186
-
187
-
188
-
189
-
190
-
191
-
192
-
193
-
194
-
195
-
196
-
197
-
198
-
199
-
200
-
201
-
202
-
203
-
204
-
205
-
206
-
207
-
208
-
209
-
210
-
211
-
212
-
213
-
214
-
215
-
216
-
217
-
218
-
219
-
220
-
221
-
222
-
223
-
224
-
225
-
226
-
227
-
228
-
229
-
230
-
231
-
232
-
233
-
234
-
235
-
236
-
237
-
238
-
239
-
240
-
241
-
242
-
243
-
244
-
245
-
246
-
247
-
248
-
249
-
250
-
251
-
252
-
253
-
254
-
255
-
256
-
257
-
258
-
259
-
260
-
261
-
262
-
263
-
264
-
265
-
266
-
267
-
268
-
269
-
270
-
271
-
272
-
273
-
274
-
275
-
276
-
277
-
278
-
279
-
280
-
281
-
282
-
283
-
284
-
285
-
286
-
287
-
288
-
289
-
290
-
291
-
292
-
293
-
294
-
295
-
296
-
297
-
298
-
299
-
300
-
301
-
302
 |
 |
