Sharp AR-M257 AR-M257 AR-317 Operation Manual Suite - Page 188
Printer driver settings - drivers windows 8
 |
View all Sharp AR-M257 manuals
Add to My Manuals
Save this manual to your list of manuals |
Page 188 highlights
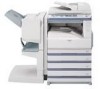
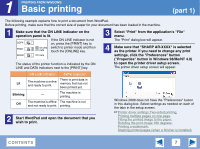
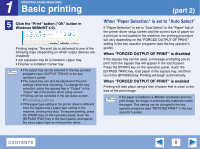
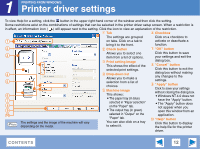
1 PRINTING FROM WINDOWS Printer driver settings To view Help for a setting, click the button in the upper right-hand corner of the window and then click the setting. Some restrictions exist on the combinations of settings that can be selected in the printer driver setup screen. When a restriction is in effect, an information icon ( ) will appear next to the setting. Click the icon to view an explanation of the restriction. 1 Tab 6 Checkbox The settings are grouped Click on a checkbox to 1 on tabs. Click on a tab to activate or deactivate a bring it to the front. function. 2 2 Check button 7 "OK" button 3 4 5 6 7 8 9 10 The settings and the image of the machine will vary Note depending on the model. Allows you to select one item from a list of options. 3 Print setting image This shows the effect of the selected print settings. 4 Drop-down list Allows you to make a selection from a list of choices. 5 Machine image This shows: ● The paper tray (in blue) selected in "Paper selection" on the "Paper" tab. ● The output tray (in green) selected in "Output" on the "Paper" tab. You can also click on a tray to select it. Click this button to save your settings and exit the dialog box. 8 "Cancel" button Click this button to exit the dialog box without making any changes to the settings. 9 "Apply" button Click to save your settings without closing the dialog box. ● Windows NT 4.0 does not have the "Apply" button. ● The "Apply" button does not appear when you open this window from an application. 10 "Help" button Click this button to display the help file for the printer driver. CONTENTS 12
-
 1
1 -
2
-
3
-
4
-
5
-
6
-
7
-
8
-
9
-
10
-
11
-
12
-
13
-
14
-
15
-
16
-
17
-
18
-
19
-
20
-
21
-
22
-
23
-
24
-
25
-
26
-
27
-
28
-
29
-
30
-
31
-
32
-
33
-
34
-
35
-
36
-
37
-
38
-
39
-
40
-
41
-
42
-
43
-
44
-
45
-
46
-
47
-
48
-
49
-
50
-
51
-
52
-
53
-
54
-
55
-
56
-
57
-
58
-
59
-
60
-
61
-
62
-
63
-
64
-
65
-
66
-
67
-
68
-
69
-
70
-
71
-
72
-
73
-
74
-
75
-
76
-
77
-
78
-
79
-
80
-
81
-
82
-
83
-
84
-
85
-
86
-
87
-
88
-
89
-
90
-
91
-
92
-
93
-
94
-
95
-
96
-
97
-
98
-
99
-
100
-
101
-
102
-
103
-
104
-
105
-
106
-
107
-
108
-
109
-
110
-
111
-
112
-
113
-
114
-
115
-
116
-
117
-
118
-
119
-
120
-
121
-
122
-
123
-
124
-
125
-
126
-
127
-
128
-
129
-
130
-
131
-
132
-
133
-
134
-
135
-
136
-
137
-
138
-
139
-
140
-
141
-
142
-
143
-
144
-
145
-
146
-
147
-
148
-
149
-
150
-
151
-
152
-
153
-
154
-
155
-
156
-
157
-
158
-
159
-
160
-
161
-
162
-
163
-
164
-
165
-
166
-
167
-
168
-
169
-
170
-
171
-
172
-
173
-
174
-
175
-
176
-
177
-
178
-
179
-
180
-
181
-
182
-
 183
183 -
 184
184 -
 185
185 -
 186
186 -
 187
187 -
 188
188 -
 189
189 -
 190
190 -
 191
191 -
 192
192 -
 193
193 -
194
-
195
-
196
-
197
-
198
-
199
-
200
-
201
-
202
-
203
-
204
-
205
-
206
-
207
-
208
-
209
-
210
-
211
-
212
-
213
-
214
-
215
-
216
-
217
-
218
-
219
-
220
-
221
-
222
-
223
-
224
-
225
-
226
-
227
-
228
-
229
-
230
-
231
-
232
-
233
-
234
-
235
-
236
-
237
-
238
-
239
-
240
-
241
-
242
-
243
-
244
-
245
-
246
-
247
-
248
-
249
-
250
-
251
-
252
-
253
-
254
-
255
-
256
-
257
-
258
-
259
-
260
-
261
-
262
-
263
-
264
-
265
-
266
-
267
-
268
-
269
-
270
-
271
-
272
-
273
-
274
-
275
-
276
-
277
-
278
-
279
-
280
-
281
-
282
-
283
-
284
-
285
-
286
-
287
-
288
-
289
-
290
-
291
-
292
-
293
-
294
-
295
-
296
-
297
-
298
-
299
-
300
-
301
-
302
 |
 |
