Sharp AR-M257 AR-M257 AR-317 Operation Manual Suite - Page 166
Checking The Ip Address
 |
View all Sharp AR-M257 manuals
Add to My Manuals
Save this manual to your list of manuals |
Page 166 highlights
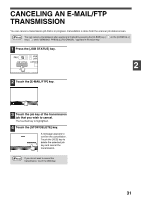
CHECKING THE IP ADDRESS To check the IP address of the machine, print out the settings list from the operation panel of the machine. 1 Press the [CUSTOM SETTINGS] key. B STATUS LINE DATA CUSTOM SETTINGS The custom settings screen will appear. 2 Touch the [LIST PRINT] key. LAY AST LIST PRINT CL ESS ROL RECEIVE MODE FA F 3 Touch the [PRINTER TEST PAGE] key. PRINTER TEST PAGE FAX REPORT SENDING ADDRESS LIST 4 Touch the [PRINTER SETTING LIST] key. PRINTER SETTINGS LIST PCL EXTENDED FONT LIST PCL SYMBO SET LIST NIC PAGE "PRINT JOB IN MEMORY. PLEASE WAIT UNTIL PRINT OUT." appears in the message screen and printing begins. Note If the [NIC PAGE] key does not appear, touch the key to show the next screen. 36
-
 1
1 -
2
-
3
-
4
-
5
-
6
-
7
-
8
-
9
-
10
-
11
-
12
-
13
-
14
-
15
-
16
-
17
-
18
-
19
-
20
-
21
-
22
-
23
-
24
-
25
-
26
-
27
-
28
-
29
-
30
-
31
-
32
-
33
-
34
-
35
-
36
-
37
-
38
-
39
-
40
-
41
-
42
-
43
-
44
-
45
-
46
-
47
-
48
-
49
-
50
-
51
-
52
-
53
-
54
-
55
-
56
-
57
-
58
-
59
-
60
-
61
-
62
-
63
-
64
-
65
-
66
-
67
-
68
-
69
-
70
-
71
-
72
-
73
-
74
-
75
-
76
-
77
-
78
-
79
-
80
-
81
-
82
-
83
-
84
-
85
-
86
-
87
-
88
-
89
-
90
-
91
-
92
-
93
-
94
-
95
-
96
-
97
-
98
-
99
-
100
-
101
-
102
-
103
-
104
-
105
-
106
-
107
-
108
-
109
-
110
-
111
-
112
-
113
-
114
-
115
-
116
-
117
-
118
-
119
-
120
-
121
-
122
-
123
-
124
-
125
-
126
-
127
-
128
-
129
-
130
-
131
-
132
-
133
-
134
-
135
-
136
-
137
-
138
-
139
-
140
-
141
-
142
-
143
-
144
-
145
-
146
-
147
-
148
-
149
-
150
-
151
-
152
-
153
-
154
-
155
-
156
-
157
-
158
-
159
-
160
-
 161
161 -
 162
162 -
 163
163 -
 164
164 -
 165
165 -
 166
166 -
 167
167 -
 168
168 -
 169
169 -
 170
170 -
 171
171 -
172
-
173
-
174
-
175
-
176
-
177
-
178
-
179
-
180
-
181
-
182
-
183
-
184
-
185
-
186
-
187
-
188
-
189
-
190
-
191
-
192
-
193
-
194
-
195
-
196
-
197
-
198
-
199
-
200
-
201
-
202
-
203
-
204
-
205
-
206
-
207
-
208
-
209
-
210
-
211
-
212
-
213
-
214
-
215
-
216
-
217
-
218
-
219
-
220
-
221
-
222
-
223
-
224
-
225
-
226
-
227
-
228
-
229
-
230
-
231
-
232
-
233
-
234
-
235
-
236
-
237
-
238
-
239
-
240
-
241
-
242
-
243
-
244
-
245
-
246
-
247
-
248
-
249
-
250
-
251
-
252
-
253
-
254
-
255
-
256
-
257
-
258
-
259
-
260
-
261
-
262
-
263
-
264
-
265
-
266
-
267
-
268
-
269
-
270
-
271
-
272
-
273
-
274
-
275
-
276
-
277
-
278
-
279
-
280
-
281
-
282
-
283
-
284
-
285
-
286
-
287
-
288
-
289
-
290
-
291
-
292
-
293
-
294
-
295
-
296
-
297
-
298
-
299
-
300
-
301
-
302
 |
 |

36
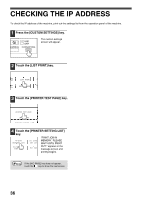
CHECKING THE IP ADDRESS
To check the IP address of the machine, print out the settings list from the operation panel of the machine.
1
Press the [CUSTOM SETTINGS] key.
The custom settings
screen will appear.
2
Touch the [LIST PRINT] key.
3
Touch the [PRINTER TEST PAGE] key.
4
Touch the [PRINTER SETTING LIST]
key.
"PRINT JOB IN
MEMORY. PLEASE
WAIT UNTIL PRINT
OUT." appears in the
message screen and
printing begins.
If the [NIC PAGE] key does not appear,
touch the
key to show the next screen.
DATA
LINE
B STATUS
CUSTOM SETTINGS
ESS
ROL
CL
RECEIVE MODE
LAY
AST
FA
F
LIST PRINT
PRINTER TEST PAGE
SENDING ADDRESS LIST
FAX REPORT
PCL SYMBO
SET LIST
NIC PAGE
PCL EXTENDED
FONT LIST
PRINTER
SETTINGS LIST
Note