Sharp BD-HP25U BD-HP25U Operation Manual - Page 18
Connecting to a TV/projector
 |
UPC - 074000355026
View all Sharp BD-HP25U manuals
Add to My Manuals
Save this manual to your list of manuals |
Page 18 highlights
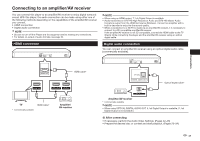
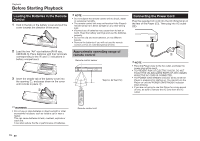
Connection Connecting to a TV/projector You can enjoy high quality digital picture and sound using an HDMI cable. (Only TVs/projectors with an HDMI terminal can be connected to this player.) When you use AQUOS LINK, make sure to use a certified HDMI cable. 1 Be sure to turn off this Player and the TV/projector before making any connections. 2 Firmly connect an HDMI cable (commercially available) to the HDMI OUT terminal on the player (1) and the HDMI IN terminal of the TV/projector (2). NOTE • In this player, "HDMI Video Out" is set to "Auto" as a default (See page 42). (Normally set to "Auto".) If you don't get a stable image with "HDMI Video Out" set to "Auto", select the output resolution which corresponds to the connected equipment. • To enjoy 3D images, connection to a 3D compatible TV is needed. • For connection to a TV/projector, refer to the TV/projector's operation manual. E After connecting • If desired, connect audio equipment. (Page 17) • If necessary, perform the Audio Video Settings. (Pages 42-43) • Refer to AQUOS LINK function. (Pages 23 and 43) • Prepare the desired disc or content and start playback. (Pages 25-34) HDMI cable (commercially available) Projector TV 16
-
 1
1 -
2
-
3
-
4
-
5
-
6
-
7
-
8
-
9
-
10
-
11
-
12
-
 13
13 -
 14
14 -
 15
15 -
 16
16 -
 17
17 -
 18
18 -
 19
19 -
 20
20 -
 21
21 -
 22
22 -
 23
23 -
24
-
25
-
26
-
27
-
28
-
29
-
30
-
31
-
32
-
33
-
34
-
35
-
36
-
37
-
38
-
39
-
40
-
41
-
42
-
43
-
44
-
45
-
46
-
47
-
48
-
49
-
50
-
51
-
52
-
53
-
54
-
55
-
56
-
57
-
58
-
59
-
60
-
61
-
62
-
63
-
64
-
65
-
66
-
67
-
68
-
69
-
70
-
71
-
72
 |
 |
