Singer 9985 Quantum Stylist TOUCH Instruction Manual - Page 14
Removable Extension, Table, Changing The Presser
 |
View all Singer 9985 Quantum Stylist TOUCH manuals
Add to My Manuals
Save this manual to your list of manuals |
Page 14 highlights
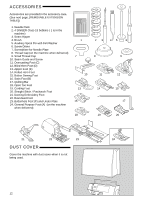
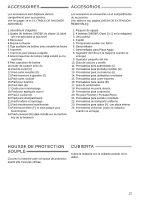
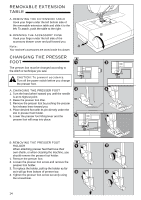
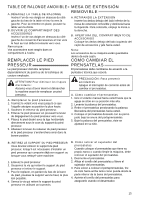
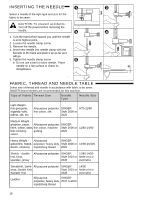
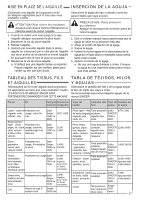
REMOVABLE EXTENSION TABLE A. REMOVING THE EXTENSION TABLE Hook your finger under the left bottom side of the removable extension table and slide it to the left. To attach, push the table to the right. B. OPENING THE ACCESSORY CASE Hook your finger under the left side of the accessory drawer cover and pull toward you. Note: Your machine's accessories are stored inside this drawer. CHANGING THE PRESSER FOOT The presser foot must be changed according to the stitch or technique you sew. CAUTION: To prevent accidents. Turn off the power switch before you change the presser foot. A. CHANGING THE PRESSER FOOT 1. Turn the hand wheel toward you until the needle is at its highest point. 2. Raise the presser foot lifter. 3. Remove the presser foot by pushing the presser foot release lever toward you. 4. Place desired foot with its pin directly under the slot in presser foot holder. 5. Lower the presser foot lifting lever and the presser foot will snap into place. B. REMOVING THE PRESSER FOOT HOLDER When attaching presser feet that have their own shank, or when cleaning the machine, you should remove the presser foot holder. 1. Remove the presser foot. 2. Loosen the presser foot screw and remove the presser foot holder. 3. To replace the holder, pull up the holder as far as it will go from bottom of presser bar. 4. Tighten the presser foot screw securely using the screwdriver. 14
-
 1
1 -
2
-
3
-
4
-
5
-
6
-
7
-
8
-
 9
9 -
 10
10 -
 11
11 -
 12
12 -
 13
13 -
 14
14 -
 15
15 -
 16
16 -
 17
17 -
 18
18 -
 19
19 -
20
-
21
-
22
-
23
-
24
-
25
-
26
-
27
-
28
-
29
-
30
-
31
-
32
-
33
-
34
-
35
-
36
-
37
-
38
-
39
-
40
-
41
-
42
-
43
-
44
-
45
-
46
-
47
-
48
-
49
-
50
-
51
-
52
-
53
-
54
-
55
-
56
-
57
-
58
-
59
-
60
-
61
-
62
-
63
-
64
-
65
-
66
-
67
-
68
-
69
-
70
-
71
-
72
-
73
-
74
-
75
-
76
-
77
-
78
-
79
-
80
-
81
-
82
-
83
-
84
-
85
-
86
-
87
-
88
-
89
-
90
-
91
-
92
-
93
-
94
-
95
-
96
-
97
-
98
-
99
-
100
-
101
-
102
-
103
-
104
-
105
-
106
-
107
-
108
 |
 |
