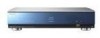
Sony BDPS2000ES Operating Instructions - Page 11
D Connecting to an HDMI input jack, If your TV has a CONTROL S jack - blu ray disc
 |
UPC - 027242723801
View all Sony BDPS2000ES manuals
Add to My Manuals
Save this manual to your list of manuals |
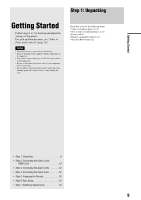
Page 11 highlights
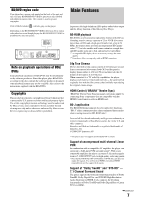
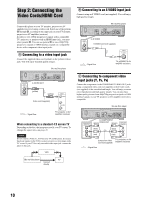
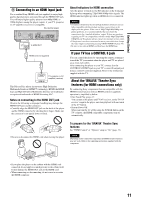
Getting Started D Connecting to an HDMI input jack Use a certified Sony HDMI cord (not supplied) to enjoy high quality digital pictures and sound through the HDMI OUT jack. You will enjoy higher quality pictures from 480p/1080i, or 1080p (highest among the player output), if your TV, projector or AV amplifier (receiver) is compatible. Blu-ray Disc player AC IN CONTROL S IN/ IR IN HDMI OUT VIDEO OUT VIDEO COMPONENT VIDEO OUT Y PB PR S VIDEO COAXIAL AUDIO OUT OPTICAL DIGITAL L OUT PCM/DTS/ R DOLBY DIGITAL 5.1CH OUTPUT FRONT REAR CENTER L R WOOFER HDMI OUT to HDMI OUT HDMI cord (not supplied) HDMI IN TV, projector, or AV amplifier (receiver) This Blu-ray Disc player incorporates High-Definition Multimedia Interface (HDMI™) technology. HDMI, the HDMI logo and High-Definition Multimedia Interface are trademarks or registered trademarks of HDMI Licensing LLC. Notes on connecting to the HDMI OUT jack Observe the following as improper handling may damage the HDMI OUT jack and the connector. • Carefully align the HDMI OUT jack on the back of the player and the HDMI connector by checking their shapes. Make sure the connector is not upside down or tilted. About indicators for HDMI connection After the player is turned on, the HD indicator on the front panel lights up when outputting 720p/1080i/1080p video signals. The HDMI indicator lights up when an HDMI device is connected. Notes • Consumers should note that not all high definition television sets are fully compatible with this product and may cause artifacts to be displayed in the picture. In the case of 480p/720p/1080i/1080p scan picture problems, it is recommended that the user switch the connection to the 'standard definition' output. If there are questions regarding our TV set compatibility with this model 480p/720p/1080i/ 1080p Blu-ray Disc player, please contact our customer service center. • If the picture is not clear, not natural or not to your satisfaction, change the video output resolution by pressing VIDEO FORMAT (page 46). • Be sure to use only an HDMI cord that bears the HDMI logo. If your TV has a CONTROL S jack You can control the player by operating the remote, pointing it toward the TV (convenient when the player and TV are placed away from each other). After connecting the player to your TV, connect also the CONTROL S IN/IR IN jack to your TV's control S (output) jack using a control S cord (not supplied). Refer to the instructions supplied with the TV. About the 'BRAVIA' Theatre Sync features (for HDMI connections only) By connecting Sony components that are compatible with the HDMI Control function with an HDMI cord (not supplied), operation is simplified as below: • One-Touch Play (page 21) You can turn on the player and TV/AV receiver, set the TV/AV receiver's input to the player, and start playback with one touch of the H button. • System Power-Off When you turn the TV off by using the POWER button on the TV's remote, the HDMI compatible components turn off automatically. HODUMTI HODUMTI • Be sure to disconnect the HDMI cord when moving the player. To prepare for the 'BRAVIA' Theatre Sync features Set "HDMI Control" of "Options" setup to "On" (page 52). Note Depending on the connected component, the HDMI Control function may not work. Refer to the operating instructions supplied with the component. • If you place the player on the cabinet with the HDMI cord connected, do not apply too much pressure to the cabinet wall. It may damage the HDMI OUT jack or the HDMI cord. • When connecting or disconnecting, do not screw in or rotate the HDMI connector. 11
-
 1
1 -
2
-
3
-
4
-
5
-
 6
6 -
 7
7 -
 8
8 -
 9
9 -
 10
10 -
 11
11 -
 12
12 -
 13
13 -
 14
14 -
 15
15 -
 16
16 -
17
-
18
-
19
-
20
-
21
-
22
-
23
-
24
-
25
-
26
-
27
-
28
-
29
-
30
-
31
-
32
-
33
-
34
-
35
-
36
-
37
-
38
-
39
-
40
-
41
-
42
-
43
-
44
-
45
-
46
-
47
-
48
-
49
-
50
-
51
-
52
-
53
-
54
-
55
-
56
-
57
-
58
-
59
-
60
-
61
-
62
-
63
-
64
-
65
-
66
-
67
-
68
-
69
-
70
-
71
 |
 |
