Sony CAV-M1000ES Setup Software Operating Instructions - Page 10
To con the triggers, Volt Triggers tab, Zone 1 sub-tab, Source, To modify the RF ID of the CAV
 |
View all Sony CAV-M1000ES manuals
Add to My Manuals
Save this manual to your list of manuals |
Page 10 highlights
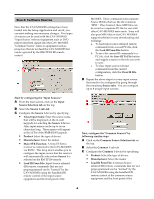
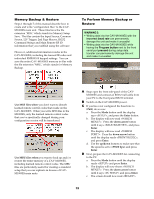
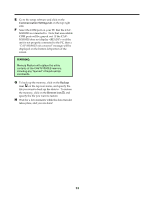
,(# 8 / 0 The CAV-M1000ES can trigger a 12V signal for each of the 6 different zones. The triggers can activate power (such as turning on the projector) or events (such as rolling down the projection screen) whenever a specific zone or source is activated. -(# * ) $ The CAV-M1000ES Main Unit uses an RF ID to communicate with a specific RM-TP100 remote control. You can set up a unique RF ID for a given remote so that the RF communication occurs only between the remote and the CAV-M1000ES with matching RF ID. To configure the triggers: ! Click on the 12 Volt Triggers tab on the top. " Select the Zone 1 sub-tab. # Configure the trigger by selecting the option: • On: The trigger will always stay on as long as the zone is activated. • Off: The trigger will always remain off regardless of zone activation status. • Source: The trigger will turn on if the current zone is activated and at least one of the selected sources is on. For instance, if Source 1 is checked off (as shown in the example above), then the trigger will go on only if Zone 1 is activated and if Source 1 is on. $ Repeat the steps above to specify additional triggers for different zones. To modify the RF ID of the CAV-M1000ES main unit, do the following: ! Click on the Main Remote RF ID tab from the top. " The RF ID is an 8-bit sequence labeled from 0 to 7 (right to left). Turn on or off parts of the RF ID key by clicking on the boxes. To modify the RF ID on the RM-TP100 remote control, see the documentation for the RM-TP100 RF remote. NOTE: Before you continue with the data transfer, we recommend that you save your configuration data. Do this by clicking on the save icon at the top section of the screen. If the data transfer crashes for any reason, you will be able to retrieve your configuration information from the saved file later on. 7
-
 1
1 -
2
-
3
-
4
-
 5
5 -
 6
6 -
 7
7 -
 8
8 -
 9
9 -
 10
10 -
 11
11 -
 12
12 -
 13
13 -
 14
14 -
 15
15 -
16
-
17
-
18
 |
 |
