Sony CAV-M1000ES Setup Software Operating Instructions - Page 11
Enter, down arrow, up/down, <57600 bps>, Communication, Settings, Write Settings icon
 |
View all Sony CAV-M1000ES manuals
Add to My Manuals
Save this manual to your list of manuals |
Page 11 highlights
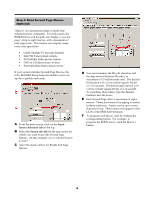
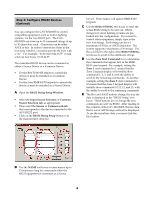
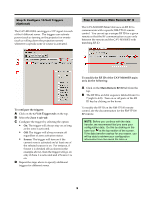
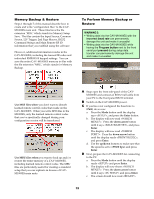
1(9 $ * % After completing Steps 1 through 6, your configuration is complete. You are now ready to write the setup information to the CAV-M1000ES. First, you need to prepare the CAV-M1000ES hardware to connect with your PC. NOTE: If you haven't done so already, save your configuration data. Do this by clicking on the save icon at the top section of the screen. If the data transfer crashes for any reason, you will be able to retrieve your configuration information from the saved file later on. WARNINGS: • Writing data into the CAV-M1000ES with the incorrect baud rate can permanently damage the unit and make it unusable! • Writing data into the CAV-M1000ES while having the Program button next to the front serial port pressed during setup data transfer can permanently damage the unit and make it unusable! $ Next, prepare the CAV-M1000ES for connecting to the PC. a. Press the Mode button until the display reads and press Enter. b. The display will now shows . Press the down arrow button until it says and press Enter. c. The screen should now read . ! Snap open the front sub-panel of the CAV- M1000ES and connect an RS232 null cable from your PC to the front panel RS232 terminal. " Switch on the CAV-M1000ES power. # If you have not configured the baud rate to 57600, do so now. a. Press the Mode button until the display says , and press the Enter button. b. The display will now read . Press the down arrow button until it says , and press Enter. c. The display will now read . Press the down arrow button until the display reads , and press Enter. d. Use the up/down buttons to make sure that the speed is set to and press Enter. % Go to the setup software and click on the Communication Settings tab on the top right side. Select the COM port on your PC that the CAVM1000ES is connected to. Note that unavailable COM ports will be grayed out. If the CAVM1000ES does not display or if the unit is not properly connected to the PC, then a "CAV-M1000ES not connected" message will be displayed on the bottom left portion of the screen. & Click on the Write Settings icon to transfer the configuration you have created into the CAV-M1000ES main unit. ' Wait just a few seconds while the transfer takes place, and press the CAV-M1000ES Enter button when the M1000ES display instructs you to do so.
-
 1
1 -
2
-
3
-
4
-
5
-
 6
6 -
 7
7 -
 8
8 -
 9
9 -
 10
10 -
 11
11 -
 12
12 -
 13
13 -
 14
14 -
 15
15 -
 16
16 -
17
-
18
 |
 |
