Sony CAV-M1000ES Setup Software Operating Instructions - Page 13
Use MSS files when, Use MBU files when, Enter, down arrow, up/down, <57600 bps>, Enter.
 |
View all Sony CAV-M1000ES manuals
Add to My Manuals
Save this manual to your list of manuals |
Page 13 highlights
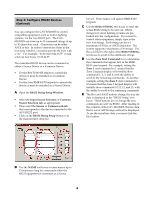
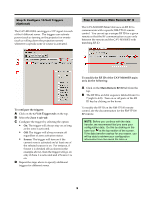
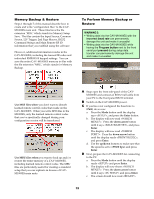
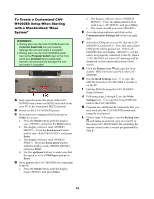
*) " ; < Steps 1 through 7 of this manual describe how to create and write "configuration files" to the CAVM1000ES main unit. These files have the file extension "MSS," which stands for Memory Setup Save. The files contain the Input Source, Common Source, 12V Trigger, 2nd Page Macros, RS232 Command Strings and Main Remote RF ID information that you establish using the software. However, additional information resides in the CAV-M1000ES, including the learned IR codes and individual RMR-K100 keypad settings. You can save the entire CAV-M1000ES memory in files with the file extension "MBU," which stands for Memory Backup. . )*) " ; WARNINGS: • Writing data into the CAV-M1000ES with the incorrect baud rate can permanently damage the unit and make it unusable! • Writing data into the CAV-M1000ES while having the Program button next to the front serial port pressed during setup data transfer can permanently damage the unit and make it unusable! Use MSS files when you don't want to disturb learned remote control codes that reside on the CAV-M1000ES. When you write MSS files to the M1000ES, only the learned remote control codes that you've specifically changed during your configuration session will be transferred. Use MBU files when you want to back up and/or restore the entire memory of a CAV-M1000ES, including learned remote control codes. The MBU files are particularly useful for creating a standard setup that you can replicate in dozens of CAVM1000ES main units. ! Snap open the front sub-panel of the CAV- M1000ES and connect an RS232 null cable from your PC to the front panel RS232 terminal. " Switch on the CAV-M1000ES power. # If you have not configured the baud rate to 57600, do so now. a. Press the Mode button until the display says , and press the Enter button. b. The display will now read . Press the down arrow button until it says , and press Enter. c. The display will now read . Press the down arrow button until the display reads , and press Enter. d. Use the up/down buttons to make sure that the speed is set to and press Enter. $ Next, prepare the CAV-M1000ES for connecting to the PC. a. Press the Mode button until the display reads and press Enter. b. The display will now shows . Press the down arrow button until it says and press Enter. c. The screen should now read .
-
 1
1 -
2
-
3
-
4
-
5
-
6
-
7
-
 8
8 -
 9
9 -
 10
10 -
 11
11 -
 12
12 -
 13
13 -
 14
14 -
 15
15 -
 16
16 -
 17
17 -
 18
18
 |
 |
