Sony CCD-FX710 Primary User Manual - Page 14
Camera, Recording, Inserting, Scene, Middle, Recorded, Insert, Recording, External, Microphone,
 |
View all Sony CCD-FX710 manuals
Add to My Manuals
Save this manual to your list of manuals |
Page 14 highlights
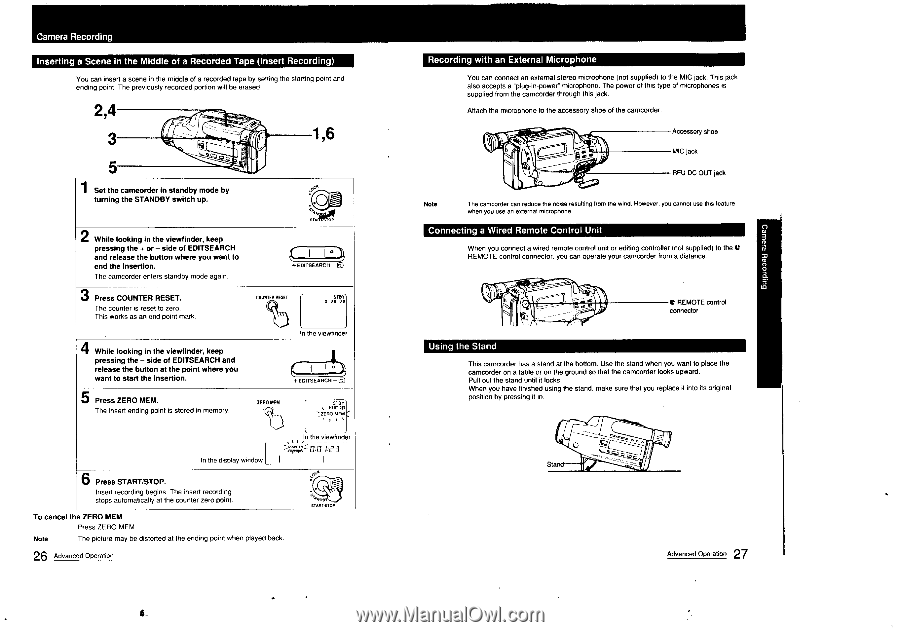
Camera Recording Inserting a Scene in the Middle of a Recorded Tape (Insert Recording) You can insert a scene in the middle of a recorded tape by setting the starting point and ending point. The previously recorded portion will be erased. 2,4 3 1,6 5 1 Set the camcorder in standby mode by turning the STANDBY switch up. 2 While looking in the viewfinder, keep pressing the + or - side of EDITSEARCH and release the button where you want to end the Insertion. The camcorder enters standby mode again. 3 Press COUNTER RESET. The counter is reset to zero. This works as an end point mark. 4 While looking in the viewfinder, keep pressing the - side of EDITSEARCH and release the button at the point where you want to start the insertion. 5 Press ZERO MEM. The insert ending point is stored in memory. ,..„ ° I I + EDITSEARCII - 0 cowl 'I RESET 0 .RoT-O0Y0 In the viewfinde c, I I l ° EDITSEARCH - ZERO MEM --- .,EI:11Oa-I°r-fl'rEem,('1• In the display window I 6 Press START/STOP. Insert recording begins. The insert recording stops automatically at the counter zero point. To cancel the ZERO MEM Press ZERO MEM. Note The picture may be distorted at the ending point when played back. 26 Advanced. Operation In the viewfinder :- LTC Pe 3 I li it. .NOB W . START OP Recording with an External Microphone You can connect an external stereo microphone (not supplied) to the MIC jack. This jack also accepts a "plug-in-power" microphone. The power of this type of microphones is supplied from the camcorder through this jack. Attach the microphone to the accessory shoe of the camcorder. Accessory shoe MIC jack O RFU DC OUT jack Note The camcorder can reduce the noise resulting from the wind. However, you cannot use this feature when you use an external microphone Connecting a Wired Remote Control Unit When you connect a wired remote control unit or editing controller (not supplied) to the e REMOTE control connector, you can operate your camcorder from a distance. O C REMOTE control connector Using the Stand This camcorder has a stand at the bottom. Use the stand when you want to place the camcorder on a table or on the ground so that the camcorder looks upward. Pull out the stand until it locks. When you have finished using the stand, make sure that you replace it into its original position by pressing it in. Stand 27 Advanced Operation
-
 1
1 -
2
-
3
-
4
-
5
-
6
-
7
-
8
-
 9
9 -
 10
10 -
 11
11 -
 12
12 -
 13
13 -
 14
14 -
 15
15 -
 16
16 -
 17
17 -
 18
18 -
 19
19 -
20
-
21
-
22
-
23
-
24
-
25
-
26
-
27
-
28
-
29
-
30
-
31
 |
 |