Sony CCD-FX710 Primary User Manual - Page 7
Inserting, Adjusting, Viewfinder
 |
View all Sony CCD-FX710 manuals
Add to My Manuals
Save this manual to your list of manuals |
Page 7 highlights
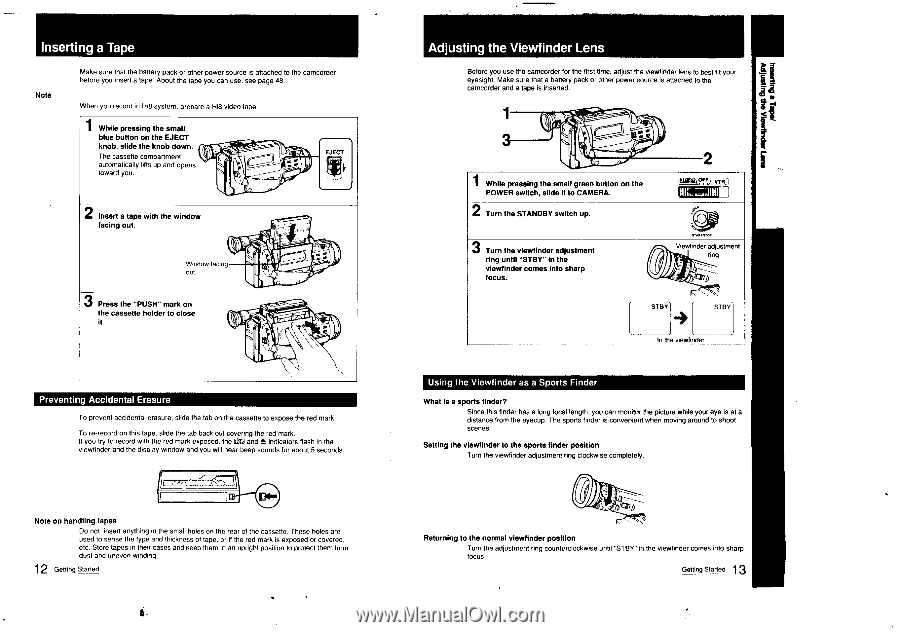
Inserting a Tape Note Make sure that the battery pack or other power source is attached to the camcorder before you insert a tape. About the tape you can use, see page 48. When you record in Hi8 system, prepare a Hi8 video tape. 1 While pressing the small blue button on the EJECT knob, slide the knob down. The cassette compartment automatically lifts up and opens toward you. EJECT 2 Insert a tape with the window facing out. O Window facing out 3 Press the "PUSH" mark on the cassette holder to close it. nv Preventing Accidental Erasure To prevent accidental erasure, slide the tab on the cassette to expose the red mark. To re-record on this tape, slide the tab back out covering the red mark. If you try to record with the red mark exposed, the G and A indicators flash in the viewfinder and the display window and you will hear beep sounds for about 5 seconds. 1 Note on handling tapes Do not insert anything in the small holes on the rear of the cassette. These holes are used to sense the type and thickness of tape, or if the red mark is exposed or covered, etc. Store tapes in their cases and keep them in an upright position to protect them from dust and uneven winding. 12 Getting Started Adjusting the Viewfinder Lens Before you use the camcorder for the first time, adjust the viewfinder lens to best fit your eyesight. Make sure that a battery pack or other power source is attached to the camcorder and a tape is inserted. 1 2 1 While pressing the smal green button on the POWER switch, slide It to CAMERA. 2 Turn the STANDBY switch up. 3 Turn the viewfinder adjustment ring until "STBY" in the viewfinder comes into sharp focus. Viewfinder adjustment ring STBY STBY In the viewfinder Using the Viewfinder as a Sports Finder What is a sports finder? Since this finder has a long focal length, you Can monitor the picture while your eye in at a distance from the eyecup. The sports finder is convenient when moving around to shoot scenes. Setting the viewfinder to the sports finder position Turn the viewfinder adjustment ring clockwise completely. 3 Returning to the normal viewfinder position Turn the adjustment ring counterclockwise until "STBY" in the viewfinder comes into sharp focus. 13 Getting Started
-
 1
1 -
 2
2 -
 3
3 -
 4
4 -
 5
5 -
 6
6 -
 7
7 -
 8
8 -
 9
9 -
 10
10 -
 11
11 -
 12
12 -
13
-
14
-
15
-
16
-
17
-
18
-
19
-
20
-
21
-
22
-
23
-
24
-
25
-
26
-
27
-
28
-
29
-
30
-
31
 |
 |