Sony DCRPC55 Operating Guide - Page 24
Functions used for recording/playback, etc., Recording, To use zoom
 |
UPC - 027242669697
View all Sony DCRPC55 manuals
Add to My Manuals
Save this manual to your list of manuals |
Page 24 highlights
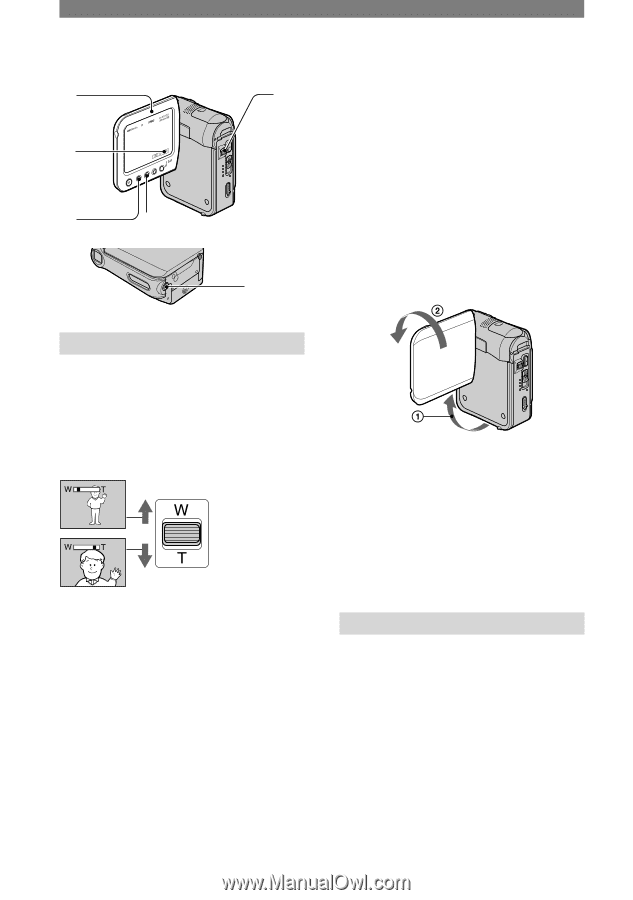
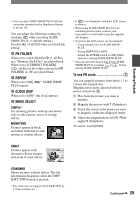
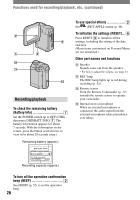
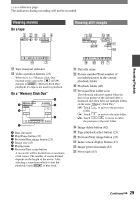
Functions used for recording/playback, etc. 1 2 3 4 5 6 To adjust the focus for an off center subject (SPOT FOCUS See [SPOT FOCUS] on page 42. To fix the exposure for the selected subject (Flexible spot meter) ...... See [SPOT METER] on page 41. To record in mirror mode Open the LCD panel 90 degrees to the camcorder (), then rotate it 270 degrees to the lens side (). Recording To use zoom Move the power zoom lever slightly for a slower zoom. Move it further for a faster zoom. Wider range of view: (Wide angle) Close view: (Telephoto) • The minimum distance required between your camcorder and the subject to get a sharp focus is about 1 cm (about 13/32 in.) for wide angle and about 80 cm (about 2 5/8 feet) for telephoto. • You can set [DIGITAL ZOOM] if you want to zoom to a level greater than 10 times (p. 43). To adjust the exposure for backlit subjects To adjust the exposure for backlit subjects, press BACK LIGHT to display . To cancel the back light function, press BACK LIGHT again. 24 • A mirror-image of the subject appears on the LCD screen, but the picture will be normal when recorded. To use a tripod Attach the tripod (optional: the length of the screw must be less than 5.5 mm (7/32 in.)) to the tripod receptacle using a tripod screw. Playback Viewing pictures with motion effects (SLIDE SHOW PLUS Set the POWER switch to PLAY/EDIT, then press the SLIDE SHOW PLUS button . [Starting SLIDE SHOW PLUS] appears and the playback of pictures in the "Memory Stick Duo" starts automatically. To cancel SLIDE SHOW PLUS, press the SLIDE SHOW PLUS button again. • Close the LCD panel with the LCD screen facing out (p. 15).
-
 1
1 -
2
-
3
-
4
-
5
-
6
-
7
-
8
-
9
-
10
-
11
-
12
-
13
-
14
-
15
-
16
-
17
-
18
-
 19
19 -
 20
20 -
 21
21 -
 22
22 -
 23
23 -
 24
24 -
 25
25 -
 26
26 -
 27
27 -
 28
28 -
 29
29 -
30
-
31
-
32
-
33
-
34
-
35
-
36
-
37
-
38
-
39
-
40
-
41
-
42
-
43
-
44
-
45
-
46
-
47
-
48
-
49
-
50
-
51
-
52
-
53
-
54
-
55
-
56
-
57
-
58
-
59
-
60
-
61
-
62
-
63
-
64
-
65
-
66
-
67
-
68
-
69
-
70
-
71
-
72
-
73
-
74
-
75
-
76
-
77
-
78
-
79
-
80
-
81
-
82
-
83
-
84
-
85
-
86
-
87
-
88
-
89
-
90
-
91
-
92
-
93
-
94
-
95
-
96
-
97
-
98
-
99
-
100
-
101
-
102
-
103
-
104
-
105
-
106
-
107
-
108
-
109
-
110
-
111
-
112
-
113
-
114
-
115
 |
 |