Sony DCRPC55 Operating Guide - Page 43
Flash Set, Color Slow S, Color Slow Shutter, Self-timer, Digital Zoom, Flash Mode, Flash Level
 |
UPC - 027242669697
View all Sony DCRPC55 manuals
Add to My Manuals
Save this manual to your list of manuals |
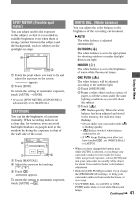
Page 43 highlights
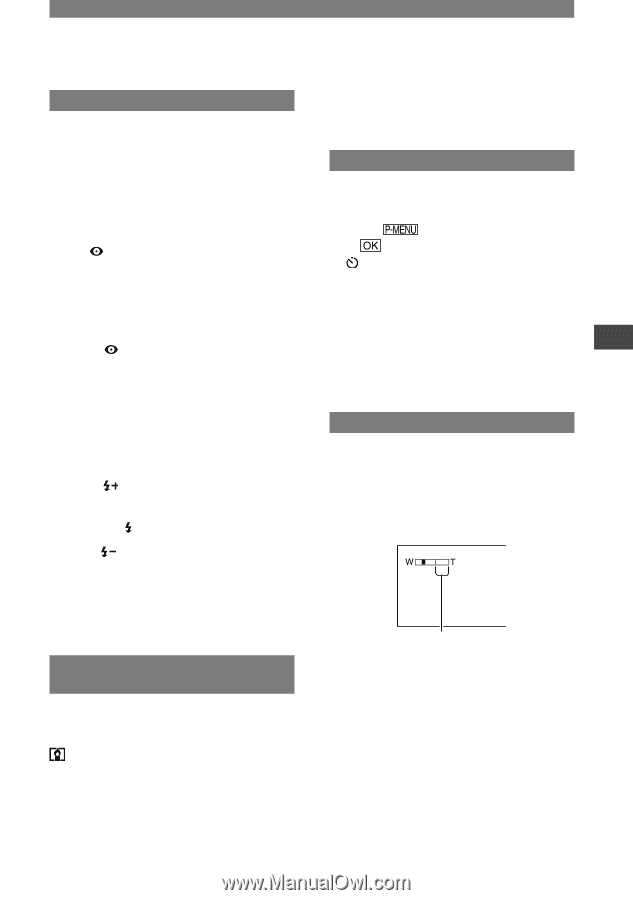
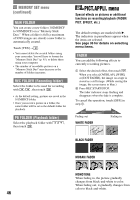
FLASH SET Note that these settings will not function with external flashes (optional) that do not support the following settings. FLASH MODE ON Flashes every time. ON Flashes to reduce the red-eye phenomenon. AUTO Flashes automatically. AUTO Flashes automatically to reduce the redeye phenomenon. • If the flash is not capable of preventing the redeye phenomenon, you can select only [ON] or [AUTO]. FLASH LEVEL HIGH( ) Makes the flash level higher. NORMAL( ) LOW( ) Makes the flash level lower. • The setting returns to [NORMAL] when you disconnect the power source from your camcorder for more than 5 minutes. COLOR SLOW S (Color Slow Shutter) When you set [COLOR SLOW S] to [ON], you can record an image brighter in color even in dark places. and [COLOR SLOW SHUTTER] appear on the screen. To cancel [COLOR SLOW S], touch [OFF]. • Adjust the focus manually ([FOCUS], p. 42) when it is hard to focus automatically. • The shutter speed of your camcorder changes depending on the brightness. The motion of the picture may slow down at this time. SELF-TIMER The self-timer starts recording after about 10 seconds. Touch . [SELF-TIMER] [ON] appears. Press REC START/STOP to record movies, or PHOTO to record still images. To cancel the count down, touch [RESET]. To cancel the self-timer, select [OFF] in step . • You can also use the self-timer with the Remote Commander (p. 32). DIGITAL ZOOM You can select the maximum zoom level in case you want to zoom to a level greater than 10 × (the default setting) while recording on a tape. Note that the image quality decreases when you are using the digital zoom. The right side of the bar shows the digital zooming factor. The zooming zone appears when you select the zooming level. OFF Up to 10 × zoom is performed optically. 20 × Up to 10 × zoom is performed optically, and after that, up to 20 × zoom is performed digitally. Continued 43 Using the Menu
-
 1
1 -
2
-
3
-
4
-
5
-
6
-
7
-
8
-
9
-
10
-
11
-
12
-
13
-
14
-
15
-
16
-
17
-
18
-
19
-
20
-
21
-
22
-
23
-
24
-
25
-
26
-
27
-
28
-
29
-
30
-
31
-
32
-
33
-
34
-
35
-
36
-
37
-
 38
38 -
 39
39 -
 40
40 -
 41
41 -
 42
42 -
 43
43 -
 44
44 -
 45
45 -
 46
46 -
 47
47 -
 48
48 -
49
-
50
-
51
-
52
-
53
-
54
-
55
-
56
-
57
-
58
-
59
-
60
-
61
-
62
-
63
-
64
-
65
-
66
-
67
-
68
-
69
-
70
-
71
-
72
-
73
-
74
-
75
-
76
-
77
-
78
-
79
-
80
-
81
-
82
-
83
-
84
-
85
-
86
-
87
-
88
-
89
-
90
-
91
-
92
-
93
-
94
-
95
-
96
-
97
-
98
-
99
-
100
-
101
-
102
-
103
-
104
-
105
-
106
-
107
-
108
-
109
-
110
-
111
-
112
-
113
-
114
-
115
 |
 |