Sony DCRPC55 Operating Guide - Page 51
Dv Out, Video Input, Usb-camera, Usb-ply/edt Usb-play/edit, Disp Guide, Data Code, Lcd Bl Level
 |
UPC - 027242669697
View all Sony DCRPC55 manuals
Add to My Manuals
Save this manual to your list of manuals |
Page 51 highlights
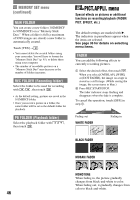
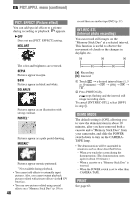
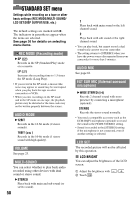
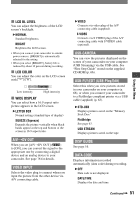
Using the Menu LCD BL LEVEL You can adjust the brightness of the LCD screen's backlight. NORMAL Standard brightness. BRIGHT Brightens the LCD screen. • When you connect your camcorder to outside power sources, [BRIGHT] is automatically selected for the setting. • When you select [BRIGHT], battery life is reduced by about 10 percent during recording. LCD COLOR You can adjust the color on the LCD screen with / . Low intensity High intensity WIDE DISPLAY You can select how a 16:9 aspect ratio picture appears in the LCD screen. LETTER BOX Normal setting (standard type of display) SQUEZE (Squeeze) Expands the picture vertically when black bands appear at the top and bottom of the screen in 16:9 aspect ratio. A/VDV OUT When you set [A/VDV OUT] ( ) to [ON], you can convert the signal to the appropriate one by connecting a digital device and an analog device to your camcorder. See page 76 for details. VIDEO INPUT Selects the video plug to connect when you input the picture from the other device via A/V connecting cable. VIDEO Connects via video plug of the A/V connecting cable (supplied). S VIDEO Connects via S VIDEO plug of the A/V connecting cable with S VIDEO cable (optional). USB-CAMERA You can view the pictures displayed on the screen of your camcorder on your computer (USB Streaming) via the USB cable. See "First Step Guide" stored on the supplied CD-ROM (p. 66). USB-PLY/EDT (USB-Play/Edit) Select this when you view pictures stored in your camcorder on your computer (p. 66), or when you connect your camcorder to a PictBridge compliant printer via a USB cable (supplied) (p. 63). STD-USB Displays pictures saved on the "Memory Stick Duo." PictBridge See page 63. USB STREAM Displays pictures saved on the tape. DISP GUIDE See page 16. DATA CODE Displays information recorded automatically (data code) during recording. OFF Data code is not displayed. DATE/TIME Displays the date and time. Continued 51
-
 1
1 -
2
-
3
-
4
-
5
-
6
-
7
-
8
-
9
-
10
-
11
-
12
-
13
-
14
-
15
-
16
-
17
-
18
-
19
-
20
-
21
-
22
-
23
-
24
-
25
-
26
-
27
-
28
-
29
-
30
-
31
-
32
-
33
-
34
-
35
-
36
-
37
-
38
-
39
-
40
-
41
-
42
-
43
-
44
-
45
-
 46
46 -
 47
47 -
 48
48 -
 49
49 -
 50
50 -
 51
51 -
 52
52 -
 53
53 -
 54
54 -
 55
55 -
 56
56 -
57
-
58
-
59
-
60
-
61
-
62
-
63
-
64
-
65
-
66
-
67
-
68
-
69
-
70
-
71
-
72
-
73
-
74
-
75
-
76
-
77
-
78
-
79
-
80
-
81
-
82
-
83
-
84
-
85
-
86
-
87
-
88
-
89
-
90
-
91
-
92
-
93
-
94
-
95
-
96
-
97
-
98
-
99
-
100
-
101
-
102
-
103
-
104
-
105
-
106
-
107
-
108
-
109
-
110
-
111
-
112
-
113
-
114
-
115
 |
 |