Sony DSC-T110 Cyber-shot® Handbook - Page 21
Customizing MENU items
 |
UPC - 027242813359
View all Sony DSC-T110 manuals
Add to My Manuals
Save this manual to your list of manuals |
Page 21 highlights
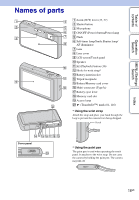
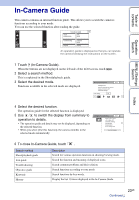
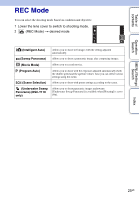
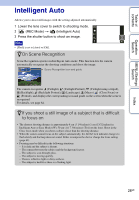
Table of contents Customizing MENU items During shooting/playback, the four MENU items appear below on the LCD screen. You can customize these four buttons to the desired MENU items and layout, letting you conveniently locate frequently used buttons. These buttons can be customized and the settings saved for each recording mode during shooting, and for internal memory and the memory card during playback. 1 Touch to display the MENU screen. 2 (Customize) t [OK] Operation Search MENU/Settings Search Index 3 Select a MENU icon and drag it to the desired position on the left side of the LCD screen. The MENU icon in the customization area is replaced. 4 To cancel, touch . Note • You cannot customize the MENU icon in Easy Mode. Customization area zTaking advantage of customization Not only can you swap MENU icons, but you can also swap MENU icons inside the customization area and reduce the number of MENU icons. Swapping MENU icons inside the customization area While touching a MENU icon inside the customization area, move it to the desired location. Reducing the number of icons in the customization area While touching a MENU icon inside the customization area, move it to the area on the right. 21GB
-
 1
1 -
2
-
3
-
4
-
5
-
6
-
7
-
8
-
9
-
10
-
11
-
12
-
13
-
14
-
15
-
 16
16 -
 17
17 -
 18
18 -
 19
19 -
 20
20 -
 21
21 -
 22
22 -
 23
23 -
 24
24 -
 25
25 -
 26
26 -
27
-
28
-
29
-
30
-
31
-
32
-
33
-
34
-
35
-
36
-
37
-
38
-
39
-
40
-
41
-
42
-
43
-
44
-
45
-
46
-
47
-
48
-
49
-
50
-
51
-
52
-
53
-
54
-
55
-
56
-
57
-
58
-
59
-
60
-
61
-
62
-
63
-
64
-
65
-
66
-
67
-
68
-
69
-
70
-
71
-
72
-
73
-
74
-
75
-
76
-
77
-
78
-
79
-
80
-
81
-
82
-
83
-
84
-
85
-
86
-
87
-
88
-
89
-
90
-
91
-
92
-
93
-
94
-
95
-
96
-
97
-
98
-
99
-
100
-
101
-
102
-
103
-
104
-
105
-
106
-
107
-
108
-
109
-
110
-
111
-
112
-
113
-
114
-
115
-
116
-
117
-
118
-
119
-
120
-
121
-
122
-
123
-
124
-
125
-
126
-
127
-
128
-
129
-
130
-
131
-
132
-
133
-
134
-
135
-
136
-
137
-
138
-
139
-
140
-
141
-
142
-
143
-
144
-
145
-
146
-
147
-
148
-
149
-
150
-
151
-
152
-
153
-
154
-
155
-
156
-
157
-
158
-
159
-
160
-
161
-
162
-
163
-
164
 |
 |
