Sony DVP-NW50 User Manual - Page 12
Press the KITCHEN, BEDROOM, DEN, or - remote
 |
View all Sony DVP-NW50 manuals
Add to My Manuals
Save this manual to your list of manuals |
Page 12 highlights
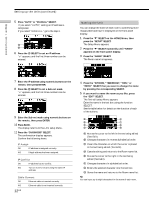
Chapter 1 Getting Started Setting up the Units (continued) 5 Press "AUTO" or "MANUAL" SELECT. If you select "AUTO," setting an IP address is completed. If you select "MANUAL," go to the step 6. 6 Press the A SELECT to set an IP address. "i" appears, and the first three numbers can be entered. Naming the Unit You can change the name of each room to something more recognizable and have it displayed on the front panel display. 1 Press the "V" SELECT on the HOME Menu, then press the "SETUP" SELECT. The Setup Menu appears. 2 Press the "V" SELECT repeatedly until "NAME" appears on the front panel display. 3 Press the "NAME" SELECT. The Room name list appears. 7 Enter the IP address using numeric buttons on the remote, then press ENTER. 8 Press the B SELECT to set a Sub-net mask. "i" appears, and the first three numbers can be entered. 9 Enter the Sub-net mask using numeric buttons on the remote, then press ENTER. 10 Press BACK. The display returns to the LAN setup Menu. 11 Press the "DIAGNOSIS" SELECT. The confirmation display appears. Confirm the following items. IP Assign OK IP address is assigned correctly. NG Illegal address has been assigned. IP Conflict OK IP address has no conflict. NG Two or more Units are using the same IP address. Cable Connect OK Ethernet cable is inserted correctly. NG Ethernet cable is not inserted correctly. 12US 4 Press the "KITCHEN," "BEDROOM," "DEN," or "PATIO" SELECT that you want to change the name by pressing the corresponding SELECT. 5 If you want to name the room as you like, press the "EDIT" SELECT. The Text edit setup Menu appears. Enter the name in the text box using the function SELECT. See the table below for details on the function of each of the buttons. A Moves the cursor to the left in the text being edited (Text Edit). B Changes characters in reverse alphabetical order. C Clears the character on which the cursor is placed in the text being edited (Text Edit). D Cancels editing and returns to the Room name list. E Moves the cursor to the right in the text being edited (Text Edit). F Changes characters in alphabetical order. G Enters the selected character into the text box. H Stores the name and returns to the Room name list. Tip You can input up to eight characters for the name of each room.
-
 1
1 -
2
-
3
-
4
-
5
-
6
-
 7
7 -
 8
8 -
 9
9 -
 10
10 -
 11
11 -
 12
12 -
 13
13 -
 14
14 -
 15
15 -
 16
16 -
 17
17 -
18
-
19
-
20
-
21
-
22
-
23
-
24
-
25
-
26
-
27
-
28
-
29
-
30
-
31
-
32
-
33
-
34
-
35
-
36
-
37
-
38
-
39
-
40
-
41
-
42
-
43
-
44
-
45
-
46
-
47
-
48
-
49
-
50
-
51
-
52
-
53
-
54
-
55
-
56
-
57
-
58
-
59
-
60
 |
 |
