Sony DVP-NW50 User Manual - Page 13
Press HOME to return to Home Menu. - remote codes
 |
View all Sony DVP-NW50 manuals
Add to My Manuals
Save this manual to your list of manuals |
Page 13 highlights
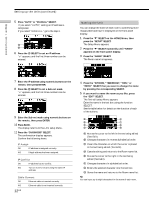
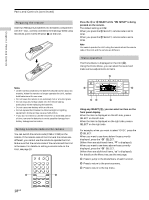
Chapter 1 Getting Started Setting the time You must set the time to make functions available, such as an alarm or a sleep timer. Display the Home Menu as shown below beforehand (see page 18). 1 Press the "V" SELECT on the HOME Menu, then press the "CLOCK" SELECT. The Clock Menu appears. Setting a remote code on the Unit If the supplied remote interferes with an other, set the remote code for this Unit and the remote to one that differs from the other Unit. The defalt remote code setting for the Unit and the supplied remote is CIS2. 1 Press the "V" SELECT on the HOME Menu, then press the "SETUP" SELECT. The Setup Menu appears. 2 Press the "TIME SET" SELECT. The Time set Menu appears. 3 Press the "24H" (or the "12H") SELECT on the Time set Menu to select the time display mode. The time display mode toggles between 24H and 12H as you press the button. 4 Set the hour and minute using the "HOUR" and the "MIN" SELECT. 5 Press HOME to return to Home Menu. The time is displayed on the right side of the upper line on the HOME Menu. Note The clock is not displayed when the Unit is in the Edit Menu or Party mode. 2 Press the "V" SELECT repeatedly until "SIRCS" appears on the front panel display. 3 Press the "SIRCS" SELECT. 4 Press the "CIS2" (or "CIS3") SELECT. The remote code is set to the same one used by RM SETUP on the remote. Note You cannot operate the Unit using the remote when the remote code of the Unit and the remote are different. Selecting the time interval for automatic return to the Home Menu The front panel display automatically returns to the Home Menu when the selected time has elapsed. The defalt time setting for the Unit is 30 seconds. 1 Press the "V" SELECT on the HOME Menu, then press the "SETUP" SELECT. The Setup Menu appears. 2 Press the "V" SELECT repeatedly until "TIME OUT" appears on the front panel display. 3 Press the "TIME OUT" SELECT. 4 Press the "30sec," "5sec," "10sec," or "No" SELECT. Note If you select "No," the front panel display does not return to the Home Menu automatically. 13US
-
 1
1 -
2
-
3
-
4
-
5
-
6
-
7
-
 8
8 -
 9
9 -
 10
10 -
 11
11 -
 12
12 -
 13
13 -
 14
14 -
 15
15 -
 16
16 -
 17
17 -
 18
18 -
19
-
20
-
21
-
22
-
23
-
24
-
25
-
26
-
27
-
28
-
29
-
30
-
31
-
32
-
33
-
34
-
35
-
36
-
37
-
38
-
39
-
40
-
41
-
42
-
43
-
44
-
45
-
46
-
47
-
48
-
49
-
50
-
51
-
52
-
53
-
54
-
55
-
56
-
57
-
58
-
59
-
60
 |
 |
