Sony DVP-NW50 User Manual - Page 18
Press the, SELECT while, RM SETUP, is being, pressed on the remote., Using any SELECT, you can
 |
View all Sony DVP-NW50 manuals
Add to My Manuals
Save this manual to your list of manuals |
Page 18 highlights
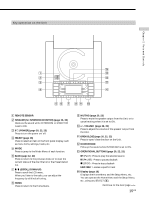
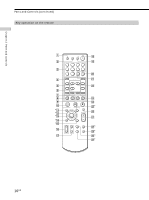
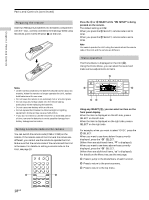
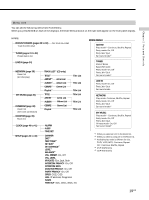
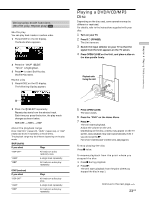
Chapter 2 Parts and Controls Parts and Controls (continued) Preparing the remote Insert two R06 (size-AA) batteries into the battery compartment with the + and - correctly oriented to the markings. When using the remote, point it at the IR sensor on the Unit. Press the A or B SELECT while "RM SETUP" is being pressed on the remote. The default setting is CIS2. When you press the A SELECT, remote code is set to CIS2. When you press the B SELECT, remote code is set to CIS3. Note You cannot operate the Unit using the remote when the remote code of the Unit and the remote are different. Menu operation The Home Menu is displayed on the Unit (A). Using the Home Menu, you can select the sound and make various adjustments to items. Notes • Under normal conditions, the batteries should last for about six months. When the remote no longer operates the Unit, replace both batteries with new ones. • Do not leave the remote in an extremely hot or a humid place. • Do not drop any foreign object into the remote casing, particularly when replacing the batteries. • Do not use a new battery with an old one. • Do not expose the IR sensor to direct sunlight or lighting equipment. Doing so may cause a malfunction. • If you do not intend to use the remote for an extended period of time, remove the batteries to avoid possible damage from battery leakage and corrosion. Setting a remote code on the remote You can switch the remote code (CIS2 or CIS3) on the remote. If the remote code of the Unit and the remote are different, you cannot use the remote to operate the Unit. Make sure that the remote code of the remote and the Unit is the same. For details on setting a remote code on the Unit, see page 13. 18US RM SETUP TV/VIDEO TV 1234 5678 90 ENTER CLEAR SELECT MODE BACK HOME DOWN UP Using any SELECT (B), you can select an item on the front panel display. When the item is displayed on the left side, press a SELECT on the left side. When the item is displayed on the right side, press a SELECT on the right side. For example, when you want to select "DVD," press the F SELECT. When you want to see items below those currently displayed, press the "H" SELECT. (When there are additional items, "V" is displayed). When you want to see items above those currently displayed, press the "G" SELECT. (When there are additional items, "v" is displayed). For details on the Menu tree, see the next page. C Press to jump to the Mode Menu of each function. D Press to return to the previous menu. E Press to return to the top menu.
-
 1
1 -
2
-
3
-
4
-
5
-
6
-
7
-
8
-
9
-
10
-
11
-
12
-
 13
13 -
 14
14 -
 15
15 -
 16
16 -
 17
17 -
 18
18 -
 19
19 -
 20
20 -
 21
21 -
 22
22 -
 23
23 -
24
-
25
-
26
-
27
-
28
-
29
-
30
-
31
-
32
-
33
-
34
-
35
-
36
-
37
-
38
-
39
-
40
-
41
-
42
-
43
-
44
-
45
-
46
-
47
-
48
-
49
-
50
-
51
-
52
-
53
-
54
-
55
-
56
-
57
-
58
-
59
-
60
 |
 |
