Sony FWD-42PV1 Operating Instructions - Page 15
Connections - manual
 |
View all Sony FWD-42PV1 manuals
Add to My Manuals
Save this manual to your list of manuals |
Page 15 highlights
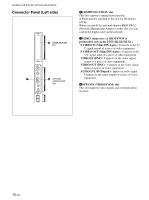
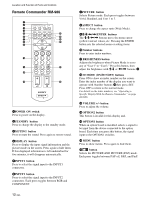
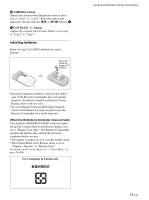
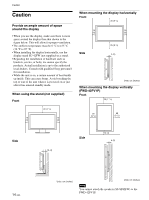
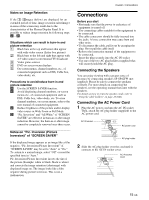
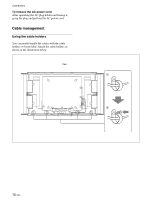
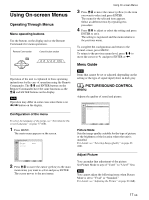
Notes on Image Retention If the 1- 5images (below) are displayed for an extended period of time, image retention (afterimage) in areas of the screen may result due to the characteristics of the Plasma Display Panel. It is possible to reduce image retention by following steps A - D. Situations which can result in burn-in and picture retention 1 Black bars at the top and bottom that appear with wide video source (Letter box picture) 2 Black bars to the left and right that appear with 4:3 video source (conventional TV broadcast) 3 Video game sources 4 DVD on-screen menu displays 5 On-screen menus, channel numbers, etc., of connected equipment such as DSS, Cable box, video decks, etc. Precautions to avoid/reduce burn-in and picture retention A Use the SCREEN SAVER function. B Avoid displaying channel numbers, on-screen menus etc., of connected equipment such as DSS, Cable box, video decks, etc. To erase channel numbers, on-screen menus, refer to the user manual of connected equipment. C Reduce brightness of the picture and/or display video source in Wide Zoom or Full Mode. D "Pic. Inversion" and "All White" of "SCREEN SAVER" are effective in burn-in or after image reduction. However, the burn-in or after image cannot be completely removed once they occur. Notes on "Pic. Inversion (Picture Inversion)" of "SCREEN SAVER" If the displayed image appears as an image like a film negative, "Pic. Inversion (Picture Inversion)" of "SCREEN SAVER" may be set to "Auto" or "On." To return to a normal image, select "Off" or reset the specified time in "Auto." Pic. Inversion (Picture Inversion) inverts the tint of the picture (Example: white to black, black to white) and corrects the image retention (afterimage) with displayed image on. The image looks like a film negative during picture inversion. This is not a malfunction. Caution / Connections Connections Before you start • First make sure that the power to each piece of equipment is turned off. • Use connecting cables suitable for the equipment to be connected. • The cable connectors should be fully inserted into the jacks. A loose connection may cause hum and other noise. • To disconnect the cable, pull it out by grasping the plug. Never pull the cable itself. • Refer to the instruction manual of the equipment to be connected. • Insert the plug securely into the AC IN socket. • Use one of the two AC plug holders (supplied) that will securely hold the AC plug. Connecting the Speakers You can enjoy viewing with a greater sense of presence by connecting speakers SS-SP42FW (not supplied). Please be sure to connect the speakers correctly. For more details on connecting the speakers, see the operating manual that came with the speakers. For details on how to route the speaker cords, refer to "Using the cable holders" on page 16 (GB). Connecting the AC Power Cord 1 Plug the AC power cord into the AC IN socket. Then, attach the AC plug holder (supplied) to the AC power cord. AC IN socket AC power cord AC plug holder 2 Slide the AC plug holder over the cord until it connects to the AC IN socket cover. AC IN socket cover 15 (GB)
-
 1
1 -
2
-
3
-
4
-
5
-
6
-
7
-
8
-
9
-
 10
10 -
 11
11 -
 12
12 -
 13
13 -
 14
14 -
 15
15 -
 16
16 -
 17
17 -
 18
18 -
 19
19 -
 20
20 -
21
-
22
-
23
-
24
-
25
-
26
-
27
-
28
-
29
-
30
-
31
-
32
-
33
-
34
-
35
-
36
-
37
-
38
-
39
-
40
-
41
-
42
-
43
-
44
-
45
-
46
-
47
 |
 |