Sony FWD-42PV1 Operating Instructions - Page 41
Changing the Image Position, Automatically, Turning the screen all white, Adjusting the brightness - contrast ratio
 |
View all Sony FWD-42PV1 manuals
Add to My Manuals
Save this manual to your list of manuals |
Page 41 highlights
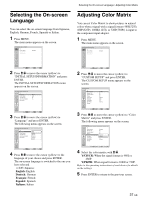
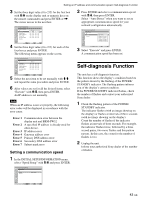
Changing the Image Position Automatically 1 In the SCREEN SAVER menu, press M/m to move the cursor (yellow) to "Pic. Orbit" and press ENTER. The following menu appears on the display panel. SCREEN SAVER Pic. Orbit Orbit: Orbit Range: Orbit Cycle: Off Small 30sec Select Set ENTER Exit MENU 2 Press M/m to move the cursor (yellow) to "Orbit" and press ENTER. The following menu appears on the display panel. SCREEN SAVER Pic. Orbit Orbit: Orbit Range: Orbit Cycle: Off OSmn all 30sec Select Set ENTER Exit MENU 3 Select the Orbit mode with M/m. Off: Cancel the Pic. Orbit function. On: Set the Pic. Orbit function. 4 Press ENTER. The menu returns to the Pic. Orbit menu. 5 Select Orbit Range (moving distance) or Orbit Cycle (time) with M/m and press ENTER. The following values can be selected. Orbit Range : Small, Mid, Large Orbit Cycle : 10sec, 30sec, 1min, 5min The following menu appears on the display panel. (The illustration below is for selecting Orbit Range.) SCREEN SAVER Pic. Orbit Orbit: Orbit Range: Orbit Cycle: Off Small M30idsec Large Select Set ENTER Exit MENU 6 Adjust the Orbit Range or Orbit Cycle with M/m and press ENTER. When both Pic Inversion and Pic. Orbit are set to ON If the Pic. Orbit function is actuated while the picture is reversed, the reversed picture is displayed changing position. SCREEN SAVER Function Turning the screen all white You can reduce after image and burn-in by turning the screen all white for about 30 minutes. 1 In the SCREEN SAVER menu, press M/m to move the cursor (yellow) to "All White" and press ENTER. The following menu appears on the display panel. SCREEN SAVER Pic. Inversion: Off Pic. Orbit All White: Off Background: OGnray Auto Dimmer: On Select Set ENTER Exit MENU 2 Select On with M/m and press ENTER. To cancel All White Select Off in step 2. Adjusting the brightness of background of picture When Wide Mode set to Normal, you may find an after image or burn-in occuring in the area where the picture (aspect ratio 4:3) separates from its background (dark bands showing on both sides of the picture). You can reduce an after image or burn-in by adjusting the brightness of background. 1 In the SCREEN SAVER menu, press M/m to move the cursor (yellow) to "Background" and press ENTER. The following menu appears on the display panel. SCREEN SAVER Pic. Inversion: Pic. Orbit All White: Background: Auto Dimmer: Off Off Gray DOanrk Gray Black Select Set ENTER Exit MENU 2 Select the brightness of background with M/m and press ENTER. Gray : Sets it much brighter. Dark Gray : Sets it brighter. Black : Sets it dark. The lower the brightness contrast between the picture and its background, the more reduction in after image and burn-in may result. 41 (GB)
-
 1
1 -
2
-
3
-
4
-
5
-
6
-
7
-
8
-
9
-
10
-
11
-
12
-
13
-
14
-
15
-
16
-
17
-
18
-
19
-
20
-
21
-
22
-
23
-
24
-
25
-
26
-
27
-
28
-
29
-
30
-
31
-
32
-
33
-
34
-
35
-
 36
36 -
 37
37 -
 38
38 -
 39
39 -
 40
40 -
 41
41 -
 42
42 -
 43
43 -
 44
44 -
 45
45 -
 46
46 -
47
 |
 |