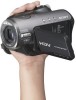
Sony HDR HC3 Operating Guide - Page 91
To cancel the operation, Using a Computer
 |
UPC - 086753091267
View all Sony HDR HC3 manuals
Add to My Manuals
Save this manual to your list of manuals |
Page 91 highlights
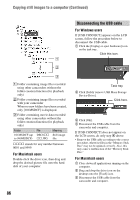
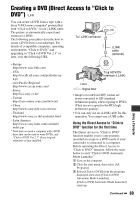
10Touch [NO] to finish creating a DVD. - While recording images onto a "Memory Stick Duo." - When "Click to DVD" is started up from the computer. Using a Computer The disc tray comes out automatically. To create another DVD with the same content, touch [YES]. The disc tray comes out. Place a new writable DVD in the disc drive. Then, repeat steps 9 and 10. To cancel the operation Touch [CANCEL] on the LCD screen on your camcorder. • You cannot cancel the operation after [Finalizing DVD.] is displayed on the LCD screen of your camcorder. • Do not disconnect the i.LINK cable or set the POWER switch to another mode on your camcorder until the picture is completely copied to the computer. • When [CONVERTING] or [WRITING] is displayed on the screen, capturing of pictures has already finished. Even if you disconnect the i.LINK cable or turn off the camcorder at this stage, DVD creation will continue on your computer. • If any of the following occurs, copying of the picture is canceled. A DVD containing the data up to the point the operation was canceled is created. Refer to the help files of "Click to DVD" for details. - The tape contains a 10-second or longer blank portion. - The tape data contains a date before the date of later images. - Both 16:9 (wide) and 4:3 pictures are recorded on the same tape. • You cannot create a DVD in the following situations: - While a tape is running. 91
-
 1
1 -
2
-
3
-
4
-
5
-
6
-
7
-
8
-
9
-
10
-
11
-
12
-
13
-
14
-
15
-
16
-
17
-
18
-
19
-
20
-
21
-
22
-
23
-
24
-
25
-
26
-
27
-
28
-
29
-
30
-
31
-
32
-
33
-
34
-
35
-
36
-
37
-
38
-
39
-
40
-
41
-
42
-
43
-
44
-
45
-
46
-
47
-
48
-
49
-
50
-
51
-
52
-
53
-
54
-
55
-
56
-
57
-
58
-
59
-
60
-
61
-
62
-
63
-
64
-
65
-
66
-
67
-
68
-
69
-
70
-
71
-
72
-
73
-
74
-
75
-
76
-
77
-
78
-
79
-
80
-
81
-
82
-
83
-
84
-
85
-
 86
86 -
 87
87 -
 88
88 -
 89
89 -
 90
90 -
 91
91 -
 92
92 -
 93
93 -
 94
94 -
 95
95 -
 96
96 -
97
-
98
-
99
-
100
-
101
-
102
-
103
-
104
-
105
-
106
-
107
-
108
-
109
-
110
-
111
-
112
-
113
-
114
-
115
-
116
-
117
-
118
-
119
-
120
-
121
-
122
-
123
-
124
-
125
-
126
-
127
-
128
-
129
-
130
-
131
-
132
-
133
-
134
-
135
 |
 |
