Sony IT-M704 Operating Instructions - Page 13
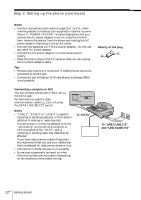
To attach the quick sheet, To attach assignment of using line sticker, To tilt the phone
 |
View all Sony IT-M704 manuals
Add to My Manuals
Save this manual to your list of manuals |
Page 13 highlights
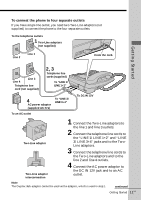
To attach the quick sheet Attach the supplied quick sheet on the bottom of the phone. To attach assignment of using line sticker Attach the supplied assignment of using line sticker under the speaker of the phone. Getting Started To tilt the phone If you want to tilt the phone, attach the supplied wall bracket on the bottom of the phone. Wall bracket 2 groove 1 Pad 1 Put the four pads into the hollows of the wall bracket. 2 Attach the wall bracket to the telephone. 3 Connect the telephone line cords and AC power adaptor by following the procedure on page 10 or 11. continued Getting Started 13US
-
 1
1 -
2
-
3
-
4
-
5
-
6
-
7
-
 8
8 -
 9
9 -
 10
10 -
 11
11 -
 12
12 -
 13
13 -
 14
14 -
 15
15 -
 16
16 -
 17
17 -
 18
18 -
19
-
20
-
21
-
22
-
23
-
24
-
25
-
26
-
27
-
28
-
29
-
30
-
31
-
32
-
33
-
34
-
35
-
36
-
37
-
38
-
39
-
40
-
41
-
42
-
43
-
44
-
45
-
46
-
47
-
48
-
49
-
50
-
51
-
52
-
53
-
54
-
55
-
56
-
57
-
58
-
59
-
60
-
61
-
62
-
63
-
64
-
65
-
66
-
67
-
68
-
69
-
70
-
71
-
72
-
73
-
74
-
75
-
76
-
77
-
78
-
79
-
80
-
81
-
82
-
83
-
84
-
85
-
86
-
87
-
88
-
89
-
90
-
91
-
92
-
93
-
94
-
95
-
96
-
97
-
98
-
99
-
100
-
101
-
102
-
103
-
104
 |
 |

Getting Started
13
US
Getting Started
To attach the quick sheet
Attach the supplied quick sheet on the bottom of
the phone.
To attach assignment of using line sticker
Attach the supplied assignment of using line
sticker under the speaker of the phone.
To tilt the phone
If you want to tilt the phone, attach the supplied wall bracket on the
bottom of the phone.
1
Put the four pads into the
hollows of the wall bracket.
2
Attach the wall bracket to the
telephone.
3
Connect the telephone line
cords and AC power adaptor by
following the procedure on
page 10 or 11.
2
Wall bracket
groove
1
Pad
continued