Sony KV-32XBR96S Primary User Manual - Page 42
VMC-810S/820S
 |
View all Sony KV-32XBR96S manuals
Add to My Manuals
Save this manual to your list of manuals |
Page 42 highlights
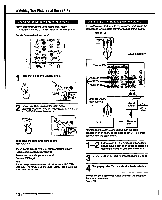
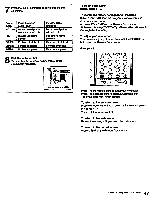
Watching Two Pictures at Once (PIP) Changing the window picture input mode Follow these instructions to select the input mode (TV/ VIDEO 1, VIDEO 2, VIDEO 3) for the window picture. Remote Commander (Inner panel) CH INDEX POSITION PIP 0 0 0 SPUT AUDIC SWAP OFF ) 0000 -CH- TVNIDEO REPLAY ) SWAM C.CMKIV RcnrAE ) 0 0 - 4. 1 cil;:i • 0 VTR1 2 3 MW LEARN 1Press PIP to display a window picture. PIP 6 6 2 Press TVNIDEO to select the input mode. Each timeyoupress 7V/VIDEO, IV,"'VIDEO 1," "VIDEO2" and'VIDEO 3"appearinsequence. TVNIDEO 1 V E1 2o To receive the window picture sound Press AUDIO. P The displayappears fora few seconds, indicating that,the windowpicture soundisbeingreoglved. To restore the main picture sound Press AUDIO again. Note The window picture sound is also output from the AUDIO (VAR) OUT jacks. The AUDIO OUT and MONITOR OUT jacks output the main picture sound only. Displaying CATV input as a window picture To use Picture-in-Picture with pay cable TV input, make the connections to your cable converter box as shown below. (Front of TV) odinfcicr MOO tamNatgOlo it Signal flow (Rear of TV) C:=1:1I- 11 0 9 •IT 1 0 s 6 w ON VMC-810S/820S (not supplied) Signal splitter del= CAN cable VCR Decoder box After making the above connections, turn the cable connection on by following the steps on pp. 24 - 25; then continue with the steps below. 1-2 Follow steps 1- 2 in "Changing the window picture input mode" on this page to select the video input mode for your connected VCR. 3 Put your VCR on an inactive channel (channel 3 or 4). 4 Change pay cable TV channels with the decoder box. To control your cable converter box with the supplied Remote Commander See p. 74. 42 Chapter 3: Using Advanced Features I
-
 1
1 -
2
-
3
-
4
-
5
-
6
-
7
-
8
-
9
-
10
-
11
-
12
-
13
-
14
-
15
-
16
-
17
-
18
-
19
-
20
-
21
-
22
-
23
-
24
-
25
-
26
-
27
-
28
-
29
-
30
-
31
-
32
-
33
-
34
-
35
-
36
-
 37
37 -
 38
38 -
 39
39 -
 40
40 -
 41
41 -
 42
42 -
 43
43 -
 44
44 -
 45
45 -
 46
46 -
 47
47 -
48
-
49
-
50
-
51
-
52
-
53
-
54
-
55
-
56
-
57
-
58
-
59
-
60
-
61
-
62
-
63
-
64
-
65
-
66
-
67
-
68
-
69
-
70
-
71
-
72
-
73
-
74
-
75
-
76
-
77
-
78
-
79
-
80
-
81
 |
 |