Sony LF-B1 Operating Instructions (LF-PK1) - Page 17
In the [Base Station Selection] window, All programs] [Programs] in Windows - support
 |
View all Sony LF-B1 manuals
Add to My Manuals
Save this manual to your list of manuals |
Page 17 highlights
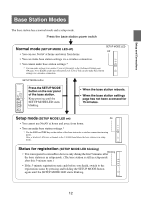
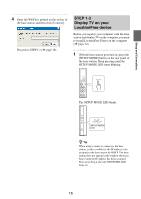
Setup and Connections 2 Double-click the (LocationFree Player) icon on the desktop of the computer. You can also use the [Start] menu. Point to [All programs] ([Programs] in Windows 2000), [Sony LocationFree Player], and then click [LocationFree Player]. LocationFree Player starts, and the [NetAV Connection] window appears. pressing the SETUP MODE button until the LED starts blinking. Open a connection with the base station. Base station registration begins automatically. 4 Click [OK] to connect to the base station. Notes • Depending on the security software installed on the computer, a confirmation message may be displayed at startup to confirm whether to block LocationFree Player. If a message appears, set to unblock it. • If the destination base station cannot be found at startup, a confirmation message appears. For details on changing the settings of the security software, click [Web Support] in the [Base Station Selection] window and refer to the support page that appears. 3 In the [Base Station Selection] window, select a base station with a green icon from the list, and then click [Connect]. Select a green icon. The base station is restarted automatically after registration. Wait until a connection is established with the base station. Go to page 29 and set the TV channels. To watch TV and videos away from home, proceed to the next section "STEP 2 Setup to Watch TV Away from Home." z Tip You can change the nickname on the screen that appears if you click [Properties]. Note Before clicking [Connect], check that the SETUP MODE LED is still blinking. If the SETUP MODE LED turns on without blinking, keep 17
-
 1
1 -
2
-
3
-
4
-
5
-
6
-
7
-
8
-
9
-
10
-
11
-
 12
12 -
 13
13 -
 14
14 -
 15
15 -
 16
16 -
 17
17 -
 18
18 -
 19
19 -
 20
20 -
 21
21 -
 22
22 -
23
-
24
-
25
-
26
-
27
-
28
-
29
-
30
-
31
-
32
-
33
-
34
-
35
-
36
-
37
-
38
-
39
-
40
-
41
-
42
-
43
-
44
-
45
-
46
-
47
-
48
-
49
-
50
-
51
-
52
-
53
-
54
-
55
-
56
-
57
-
58
-
59
 |
 |
