Sony MEX-1HD Operating Instructions - Page 9
Initial settings, Deactivating the Demonstration display - hdd
 |
View all Sony MEX-1HD manuals
Add to My Manuals
Save this manual to your list of manuals |
Page 9 highlights
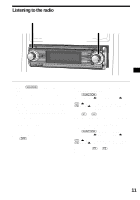
Initial settings The following settings are required before you operate the unit for the first time, after replacing the car battery, or changing the connection. If the date or the time on the unit is not set correctly, the HDD may trace the playback history incorrectly. 1 Press the RESET button (page 8). 2 Attach the front panel (page 8). 3 Rotate the R dial to select AM Step "9K" or "10K," then press the R dial. The AM (FM) tuning interval is factory-set to "10K." If the frequency allocation system of your country is based on 9 kHz (50 kHz) interval, set to "9K." Deactivating the Demonstration display In the default setting, Demonstration is set to "On" (to active the demonstration display). After initial setting, you must set Demonstration to "Off." 1 Press (MENU). 2 Rotate the R dial to select "Display," then press the R dial. 3 Rotate the R dial to select "Demonstration," then press the R dial. 4 Rotate the R dial to select "Off," then press the R dial. 5 Press (F3) ( ). The normal display appears. 4 Set the date and time. 1 Rotate the R dial to select the year, then press the R dial. 2 Rotate the R dial to select the month, then press the R dial. 3 Repeat steps 1 and 2 to set the day, hour, minute. The set date and time are displayed and the clock appears. When you set the date and time after the initial settings Press (MENU) and select "Time Set" in "Setup," then press the R dial. Note During the date and time setting, if Demonstration display appears, press the R dial to display the date and time setting display. Tips • The clock uses a 12-hour digital indication. • The "AM" or "PM" indication is automatically switched depending on the set hour. • The indication for the day of the week changes automatically according to the date. • If you press (F1) in step 4, the cursor moves to the previous item. 9
-
 1
1 -
2
-
3
-
 4
4 -
 5
5 -
 6
6 -
 7
7 -
 8
8 -
 9
9 -
 10
10 -
 11
11 -
 12
12 -
 13
13 -
 14
14 -
15
-
16
-
17
-
18
-
19
-
20
-
21
-
22
-
23
-
24
-
25
-
26
-
27
-
28
-
29
-
30
-
31
-
32
-
33
-
34
-
35
-
36
-
37
-
38
-
39
-
40
-
41
-
42
-
43
-
44
-
45
-
46
-
47
-
48
-
49
-
50
-
51
-
52
-
53
-
54
-
55
-
56
-
57
-
58
-
59
-
60
-
61
-
62
-
63
-
64
-
65
-
66
-
67
-
68
-
69
-
70
-
71
-
72
-
73
-
74
-
75
-
76
-
77
-
78
-
79
-
80
-
81
-
82
-
83
-
84
-
85
-
86
-
87
-
88
-
89
-
90
-
91
-
92
-
93
-
94
-
95
-
96
-
97
-
98
-
99
-
100
-
101
-
102
-
103
-
104
-
105
-
106
-
107
-
108
-
109
-
110
-
111
-
112
-
113
-
114
-
115
-
116
-
117
-
118
-
119
-
120
-
121
-
122
-
123
-
124
-
125
-
126
-
127
-
128
-
129
-
130
-
131
-
132
-
133
-
134
-
135
-
136
-
137
-
138
-
139
-
140
-
141
-
142
-
143
-
144
-
145
-
146
-
147
-
148
-
149
-
150
-
151
-
152
-
153
-
154
-
155
-
156
 |
 |
