Sony MEX-5DI Operating Instructions - Page 37
Displaying an image as a slide show, — Slide Show (Slide show mode), Deleting the picture data
 |
View all Sony MEX-5DI manuals
Add to My Manuals
Save this manual to your list of manuals |
Page 37 highlights
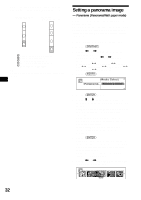
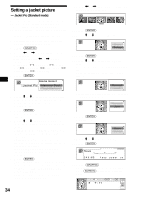
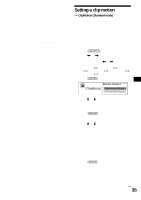
Displaying an image as a slide show - Slide Show (Slide show mode) Scroll static images in a "Memory Stick" as a slide show. (This data will not be stored.) 1 Insert a "Memory Stick" (page 12). 2 Press (GRAPHIC). 3 Press < or , repeatedly to select "Slide Show." Each time you press < or ,, the item changes as follows: Wall Paper y Panorama y Jacket Pic y ClipMotion y Slide Show y Picture Del y Char Setup 4 Press (ENTER). Deleting the picture data - Picture Del The unit cannot store an image(s) whose capacity is more than 2 MB. 1 Press (GRAPHIC). 2 Press < or , repeatedly to select "Picture Del." Each time you press < or ,, the item changes as follows: Wall Paper y Panorama y Jacket Pic y ClipMotion y Slide Show y Picture Del y Char Setup 3 Press (ENTER). 5 Press M or m repeatedly to select a folder for images that you want to set. FolderSelect: Selects the folder that contains the image you want to set. Cyber-shot: If you want to set a picture taken by an optional Sony digital still camera Cyber-shot, select this. OFF: Turns Slide show mode OFF. 6 Press (ENTER). Select "FolderSelect" in step 5. If there are images in folders of a lower layer, repeat step 5 and 6 to select the folder which contains your desired image. An image can be set in up to the 5th layer folder in a "Memory Stick." 7 Press (GRAPHIC). The display enters the Slide show mode, then slide show starts. Notes • You can set the image format as follows: JPEG: 1,600 × 1,200 dots or less BMP, GIF, PNG: 640 × 480 dots or less • You can set the display while playing back or receiving a source only. • You can select up to 100 images for each folder. • The following folders in a "Memory Stick" cannot be displayed. - CONTROL - DCIM - MSSONY - VOICE - HIFI • In step 6, if there is no image data, "No Picture" is shown in the display. • If you take out a "Memory Stick" after setting is complete, display turns to the Clock mode. 4 Press M or m repeatedly to select the mode in which an image you want to delete is located. If you delete all the stored image data, select "ALL" and skip to step 7. 5 Press (ENTER). 6 Press < or , repeatedly to select an image you want to delete and press m. The recycle bin appears at the lower side of the selected image by pressing m. To stop deleting the selected image, press < or , repeatedly to select your desired image, then press M. To delete more than one image, repeat the procedure in step 6. 7 Press (ENTER). 8 Press M or m to select "YES." To cancel, select "NO." 37 continue to next page t
-
 1
1 -
2
-
3
-
4
-
5
-
6
-
7
-
8
-
9
-
10
-
11
-
12
-
13
-
14
-
15
-
16
-
17
-
18
-
19
-
20
-
21
-
22
-
23
-
24
-
25
-
26
-
27
-
28
-
29
-
30
-
31
-
 32
32 -
 33
33 -
 34
34 -
 35
35 -
 36
36 -
 37
37 -
 38
38 -
 39
39 -
 40
40 -
 41
41 -
 42
42 -
43
-
44
-
45
-
46
-
47
-
48
-
49
-
50
-
51
-
52
-
53
-
54
-
55
-
56
-
57
-
58
-
59
-
60
-
61
-
62
-
63
-
64
-
65
-
66
-
67
-
68
-
69
-
70
-
71
-
72
-
73
-
74
-
75
-
76
-
77
-
78
-
79
-
80
-
81
-
82
-
83
-
84
-
85
-
86
-
87
-
88
-
89
-
90
-
91
-
92
-
93
-
94
-
95
-
96
-
97
-
98
-
99
-
100
-
101
-
102
-
103
-
104
-
105
-
106
-
107
-
108
-
109
-
110
-
111
-
112
-
113
-
114
-
115
-
116
-
117
-
118
-
119
-
120
-
121
-
122
-
123
-
124
-
125
-
126
-
127
-
128
-
129
-
130
-
131
-
132
-
133
-
134
-
135
-
136
-
137
-
138
-
139
-
140
-
141
-
142
-
143
-
144
-
145
-
146
-
147
-
148
-
149
-
150
-
151
-
152
-
153
-
154
-
155
-
156
-
157
-
158
-
159
-
160
-
161
-
162
-
163
-
164
-
165
-
166
-
167
-
168
-
169
-
170
 |
 |
