Sony MEX-5DI Operating Instructions - Page 38
Setting the display characters
 |
View all Sony MEX-5DI manuals
Add to My Manuals
Save this manual to your list of manuals |
Page 38 highlights
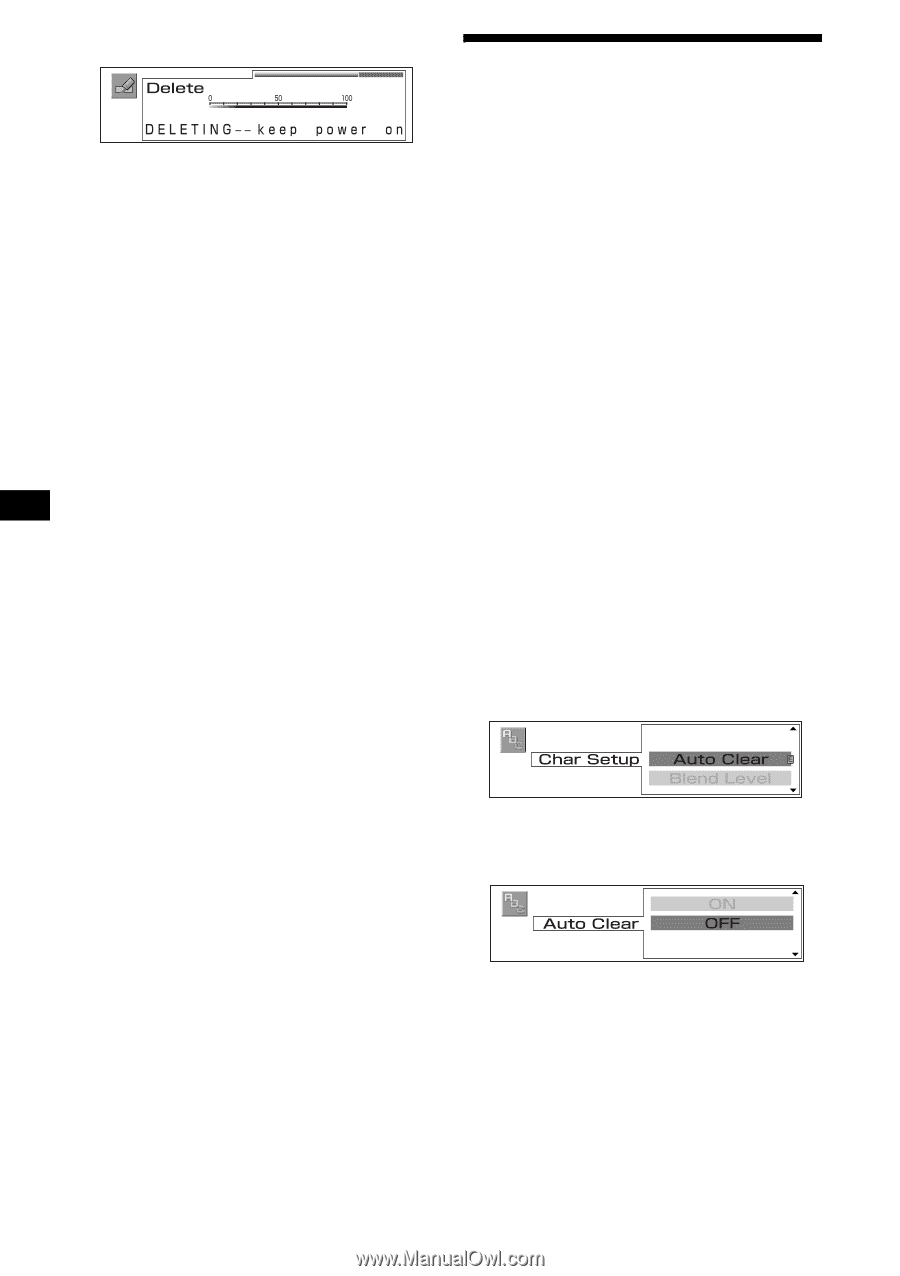
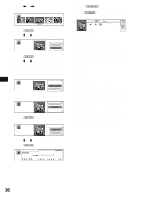
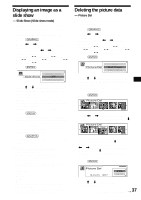
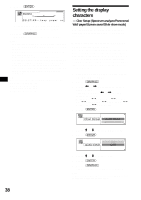
9 Press (ENTER). After deleting is completed, the display returns to the graphic top menu display. 10 Press (GRAPHIC). The display returns to the normal display. Notes • You cannot delete the pre-stored images in this unit. • You can delete the image data while the unit must be kept on. • Make sure that you cannot restore an image once you have deleted it. • Depending on the volume of deleted data, the deleting time differs. Do not turn off the unit while the message in step 9 is displayed. If you turn off the power, the data will not be deleted completely. • If any button is pressed while deleting an image, the delete is canceled and data will not be deleted completely. Tip You can store up to the following number of images: Wall Paper: maximum 100 Panorama: maximum 100 Jacket Pic: maximum 100 ClipMotion: maximum 16 Setting the display characters - Char Setup (Spectrum analyzer/Panorama/ Wall paper/Screen saver/Slide show mode) You can adjust the visibility of the display by changing the translucence ratio of the display characters. Making display characters disappear automatically (Auto Clear) You can make display characters disappear for a moment in Spectrum analyzer/Panorama/Wall paper/Screen saver/Slide show mode. When set to ON, you can display the display characters only when the disc, album, or track is changed or the source or display mode is changed. You can enjoy full images. 1 Playback or receive the source (radio, CD, MS, MD, or AUX). 2 Press (GRAPHIC). 3 Press < or , repeatedly to select "Char Setup." Each time you press < or ,, the item changes as follows: Wall Paper y Panorama y Jacket Pic y ClipMotion y Slide Show y Picture Del y Char Setup 4 Press (ENTER). 5 Press M or m to select "Auto Clear." 6 Press (ENTER). 7 Press M or m to select "ON." 8 Press (ENTER). 9 Press (GRAPHIC). The display returns to the normal display. Note In Standard/Clock mode, you cannot make the display characters disappear automatically. 38
-
 1
1 -
2
-
3
-
4
-
5
-
6
-
7
-
8
-
9
-
10
-
11
-
12
-
13
-
14
-
15
-
16
-
17
-
18
-
19
-
20
-
21
-
22
-
23
-
24
-
25
-
26
-
27
-
28
-
29
-
30
-
31
-
32
-
 33
33 -
 34
34 -
 35
35 -
 36
36 -
 37
37 -
 38
38 -
 39
39 -
 40
40 -
 41
41 -
 42
42 -
 43
43 -
44
-
45
-
46
-
47
-
48
-
49
-
50
-
51
-
52
-
53
-
54
-
55
-
56
-
57
-
58
-
59
-
60
-
61
-
62
-
63
-
64
-
65
-
66
-
67
-
68
-
69
-
70
-
71
-
72
-
73
-
74
-
75
-
76
-
77
-
78
-
79
-
80
-
81
-
82
-
83
-
84
-
85
-
86
-
87
-
88
-
89
-
90
-
91
-
92
-
93
-
94
-
95
-
96
-
97
-
98
-
99
-
100
-
101
-
102
-
103
-
104
-
105
-
106
-
107
-
108
-
109
-
110
-
111
-
112
-
113
-
114
-
115
-
116
-
117
-
118
-
119
-
120
-
121
-
122
-
123
-
124
-
125
-
126
-
127
-
128
-
129
-
130
-
131
-
132
-
133
-
134
-
135
-
136
-
137
-
138
-
139
-
140
-
141
-
142
-
143
-
144
-
145
-
146
-
147
-
148
-
149
-
150
-
151
-
152
-
153
-
154
-
155
-
156
-
157
-
158
-
159
-
160
-
161
-
162
-
163
-
164
-
165
-
166
-
167
-
168
-
169
-
170
 |
 |