Sony MZ-R900DPC Operating Instructions - Page 26
Adding track marks automatically at specified intervals (Auto Time Stamp), Display
 |
View all Sony MZ-R900DPC manuals
Add to My Manuals
Save this manual to your list of manuals |
Page 26 highlights
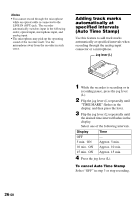
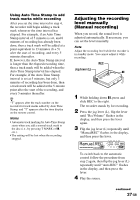
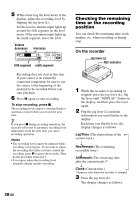
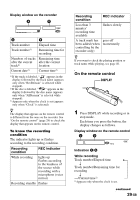
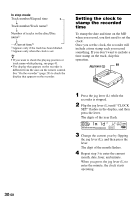
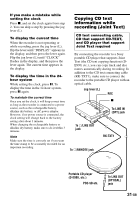
Notes • You cannot record through the microphone while an optical cable is connected to the LINE IN (OPT) jack. The recorder automatically switches input in the following order; optical input, microphone input, and analog input. • The microphone may pick up the operating sound of the recorder itself. Use the microphone away from the recorder in such cases. Adding track marks automatically at specified intervals (Auto Time Stamp) Use this feature to add track marks automatically at specified intervals when recording through the analog input connector or a microphone. Jog lever (L) 26-GB 1 While the recorder is recording or in recording pause, press the jog lever (L). 2 Flip the jog lever (L) repeatedly until " TIME MARK" flashes in the display, and then press the lever. 3 Flip the jog lever (L) repeatedly until the desired time interval flashes in the display. Select one of the following intervals. Display Time OFF - 5 min. ON Approx. 5 min. 10 min. ON Approx. 10 min. 15 min. ON Approx. 15 min. 4 Press the jog lever (L). To cancel Auto Time Stamp Select " OFF" in step 3 or stop recording.
-
 1
1 -
2
-
3
-
4
-
5
-
6
-
7
-
8
-
9
-
10
-
11
-
12
-
13
-
14
-
15
-
16
-
17
-
18
-
19
-
20
-
 21
21 -
 22
22 -
 23
23 -
 24
24 -
 25
25 -
 26
26 -
 27
27 -
 28
28 -
 29
29 -
 30
30 -
 31
31 -
32
-
33
-
34
-
35
-
36
-
37
-
38
-
39
-
40
-
41
-
42
-
43
-
44
-
45
-
46
-
47
-
48
-
49
-
50
-
51
-
52
-
53
-
54
-
55
-
56
-
57
-
58
-
59
-
60
-
61
-
62
-
63
-
64
-
65
-
66
-
67
-
68
-
69
-
70
-
71
-
72
-
73
-
74
-
75
-
76
-
77
-
78
-
79
-
80
-
81
-
82
-
83
-
84
-
85
-
86
-
87
-
88
-
89
-
90
-
91
-
92
-
93
-
94
-
95
-
96
-
97
-
98
-
99
-
100
-
101
-
102
-
103
-
104
-
105
-
106
-
107
-
108
-
109
-
110
-
111
-
112
-
113
-
114
-
115
-
116
-
117
-
118
-
119
-
120
-
121
-
122
-
123
-
124
-
125
-
126
-
127
-
128
-
129
-
130
-
131
-
132
-
133
-
134
-
135
-
136
-
137
-
138
-
139
-
140
-
141
-
142
-
143
-
144
-
145
-
146
-
147
-
148
-
149
-
150
-
151
-
152
-
153
-
154
-
155
-
156
-
157
-
158
-
159
-
160
-
161
-
162
-
163
-
164
-
165
-
166
-
167
-
168
-
169
-
170
-
171
-
172
-
173
-
174
-
175
-
176
-
177
-
178
-
179
-
180
-
181
-
182
-
183
-
184
-
185
-
186
-
187
-
188
-
189
-
190
-
191
-
192
-
193
-
194
-
195
-
196
-
197
-
198
-
199
-
200
-
201
-
202
-
203
-
204
-
205
-
206
-
207
-
208
-
209
-
210
-
211
-
212
 |
 |
