Sony MZ-R900DPC Operating Instructions - Page 30
Setting the clock to stamp the recorded time, Setting the clock to, stamp the recorded
 |
View all Sony MZ-R900DPC manuals
Add to My Manuals
Save this manual to your list of manuals |
Page 30 highlights
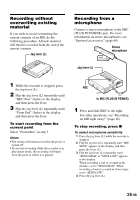
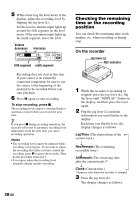
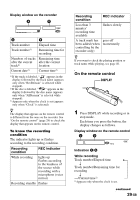
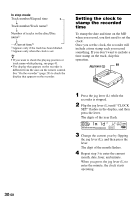
In stop mode Track number/Elapsed time r Track number/Track name1) r Number of tracks in the disc/Disc name1) r - /Current time2) 1)Appears only if the track has been labeled. 2)Appears only when the clock is set. z • If you want to check the playing position or track name while playing, see page 41. • The display that appears on the recorder is different from the ones on the remote control. See " On the recorder" (page 28) to check the display that appears on the recorder. Setting the clock to stamp the recorded time To stamp the date and time on the MD when you record, you first need to set the clock. Once you set the clock, the recorder will include a time stamp each you record something. If you don't want to include a time stamp on the track, skip this operation. Jog lever (L) X 1 Press the jog lever (L) while the recorder is stopped. 2 Flip the jog lever (L) until " CLOCK SET" flashes in the display, and then press the lever. The digits of the year flash. 00y 1m 1d 3 Change the current year by flipping the jog lever (L), and then press the lever. The digit of the month flashes. 4 Repeat step 3 to enter the current month, date, hour, and minute. When you press the jog lever (L) to enter the minute, the clock starts operating. 30-GB
-
 1
1 -
2
-
3
-
4
-
5
-
6
-
7
-
8
-
9
-
10
-
11
-
12
-
13
-
14
-
15
-
16
-
17
-
18
-
19
-
20
-
21
-
22
-
23
-
24
-
 25
25 -
 26
26 -
 27
27 -
 28
28 -
 29
29 -
 30
30 -
 31
31 -
 32
32 -
 33
33 -
 34
34 -
 35
35 -
36
-
37
-
38
-
39
-
40
-
41
-
42
-
43
-
44
-
45
-
46
-
47
-
48
-
49
-
50
-
51
-
52
-
53
-
54
-
55
-
56
-
57
-
58
-
59
-
60
-
61
-
62
-
63
-
64
-
65
-
66
-
67
-
68
-
69
-
70
-
71
-
72
-
73
-
74
-
75
-
76
-
77
-
78
-
79
-
80
-
81
-
82
-
83
-
84
-
85
-
86
-
87
-
88
-
89
-
90
-
91
-
92
-
93
-
94
-
95
-
96
-
97
-
98
-
99
-
100
-
101
-
102
-
103
-
104
-
105
-
106
-
107
-
108
-
109
-
110
-
111
-
112
-
113
-
114
-
115
-
116
-
117
-
118
-
119
-
120
-
121
-
122
-
123
-
124
-
125
-
126
-
127
-
128
-
129
-
130
-
131
-
132
-
133
-
134
-
135
-
136
-
137
-
138
-
139
-
140
-
141
-
142
-
143
-
144
-
145
-
146
-
147
-
148
-
149
-
150
-
151
-
152
-
153
-
154
-
155
-
156
-
157
-
158
-
159
-
160
-
161
-
162
-
163
-
164
-
165
-
166
-
167
-
168
-
169
-
170
-
171
-
172
-
173
-
174
-
175
-
176
-
177
-
178
-
179
-
180
-
181
-
182
-
183
-
184
-
185
-
186
-
187
-
188
-
189
-
190
-
191
-
192
-
193
-
194
-
195
-
196
-
197
-
198
-
199
-
200
-
201
-
202
-
203
-
204
-
205
-
206
-
207
-
208
-
209
-
210
-
211
-
212
 |
 |
