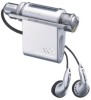
Sony NW-MS70D Operating Instructions - Page 41
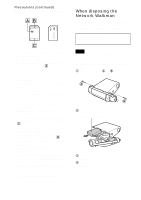
Other functions, Erasing audio file (ERASE)
 |
UPC - 027242604247
View all Sony NW-MS70D manuals
Add to My Manuals
Save this manual to your list of manuals |
Page 41 highlights
Other functions Other functions Erasing audio file (ERASE) You can erase a song stored in the built-in flash memory or "Memory Stick Duo" (not supplied) by track or group (album). Prior to erasing a song, verify the song to be erased. If songs are erased, the SonicStage software recognizes them as songs to be transferred back to the computer when your Network Walkman is connected to the computer that you used for transferring. Therefore, the remaining transfer count increases automatically. Shuttle switch to (.) Pull Press (Confirm) to (>) MENU button Play/Stop button z Tip You can switch to the Group mode by pulling and rotating the Shuttle switch. 1 Press the MENU button. The menu screen is displayed. PLAYMODE> 2 Rotate the Shuttle switch to select "ERASE" and press the Play/Stop button to confirm. ERASE You cannot erase audio file while playing music. 3 Rotate the Shuttle switch to select the title you want to erase and press the Play/Stop button to confirm. ERASE:N If you do not operate it for 10 seconds, the erasing operation will be cancelled automatically. 4 Rotate the Shuttle switch to select "Y." ERASE:Y> 5 Press the Play/Stop button. "Really?" is displayed. 6 Press the Play/Stop button. After "ERASING" is displayed, the song will be erased. When the song is erased, "COMPLETE" is displayed and the display returns to the indication in step 2. 7 Press the MENU button The display returns to the normal screen. To cancel the menu mode Select [RETURN] in the menu screen or press the MENU button. To cancel erasing a song Select "N" in step 4. To erase a song by group Pull and rotate the Shuttle switch to select the group you want to erase in step 3. Notes • You cannot erase a song while playing music. ("ERASE" will not be displayed in the menu screen.) • You cannot erase audio files stored in a "Memory Stick" when the erasure prevention switch of the "Memory Stick" is set to "LOCK." ("MS LOCKED" will be displayed.) • Do not remove "Memory Stick Duo" while "ERASING" is displayed. 41
-
 1
1 -
2
-
3
-
4
-
5
-
6
-
7
-
8
-
9
-
10
-
11
-
12
-
13
-
14
-
15
-
16
-
17
-
18
-
19
-
20
-
21
-
22
-
23
-
24
-
25
-
26
-
27
-
28
-
29
-
30
-
31
-
32
-
33
-
34
-
35
-
 36
36 -
 37
37 -
 38
38 -
 39
39 -
 40
40 -
 41
41 -
 42
42 -
 43
43 -
 44
44 -
 45
45 -
 46
46 -
47
-
48
-
49
-
50
-
51
-
52
-
53
-
54
-
55
-
56
-
57
-
58
-
59
-
60
-
61
-
62
-
63
-
64
 |
 |
