Sony SRPC4 Product Manual (SRMASTER: SRPC4 / SRPC5 Operation Manual) - Page 12
Network Settings, Mounting the File Server, If you forget the IP address
 |
View all Sony SRPC4 manuals
Add to My Manuals
Save this manual to your list of manuals |
Page 12 highlights
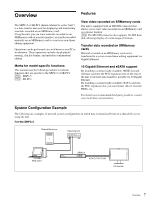
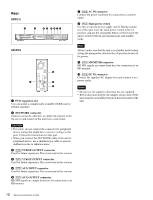
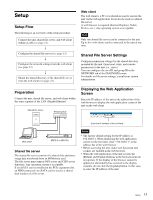
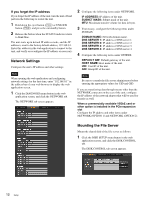
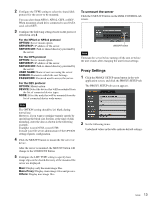
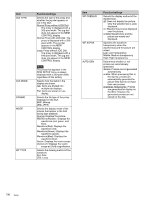
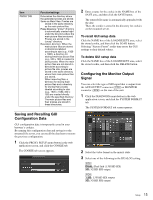
If you forget the IP address If you forget the IP address of the unit, turn the unit off and perform the following to restart the unit. 1 Hold down the eject button ([PC5]) or UNLOCK button ([PC4]), and press the on/standby button. 2 Release the button when the STATUS indicator starts to blink blue. The unit starts up in default IP address mode, and the IP address is reset to the factory default address, 192.168.0.1. Enter this address in the web application to connect to the unit, and verify or reconfigure the IP address as necessary. Network Settings Configure the unit's IP address and other settings. Note When opening the web application and configuring network settings for the first time, enter "192.168.0.1" in the address bar of your web browser to display the web application screen. 1 Click the DIAGNOSIS menu button in the web application screen, and click the NETWORK tab. The NETWORK tab screen appears. 2 Configure the following items under NETWORK. IP ADDRESS: IP address of the unit. SUBNET MASK: Subnet mask of the unit. MTU: Maximum transfer volume for data in bytes. 3 If necessary, configure the following items under DOMAIN. DOMAIN NAME: Network domain name. DNS SERVER 1: IP address of DNS server 1. DNS SERVER 2: IP address of DNS server 2. DNS SERVER 3: IP address of DNS server 3. DNS SERVER 4: IP address of DNS server 4. 4 Configure the following items under OTHERS. DEFAULT GW: Default gateway of the unit. HOST NAME: Host name of the unit. UID: User ID of the unit. GID: Group ID of the unit. Note Be sure to consult the file server administrator before entering the appropriate values for UID and GID. If you are transferring data through means other than the NETWORK connector on the rear of the unit, configure the IP address of the network adaptor that will be used for transfer as well. When a commercially available 10GbE card or other option is installed in the PCIe expansion slot Configure the IP address and other items under NETWORK (OPTION 1) and NETWORK (OPTION 2). Mounting the File Server Mount the shared disk of the file server as follows. 1 Click the DISK SETUP menu button in the web application screen, and click the DISK CONTROL tab. The DISK CONTROL tab screen appears. 12 Setup
-
 1
1 -
2
-
3
-
4
-
5
-
6
-
 7
7 -
 8
8 -
 9
9 -
 10
10 -
 11
11 -
 12
12 -
 13
13 -
 14
14 -
 15
15 -
 16
16 -
 17
17 -
18
-
19
-
20
-
21
-
22
-
23
-
24
-
25
-
26
-
27
-
28
-
29
-
30
-
31
 |
 |