Sony SRPC4 Product Manual (SRMASTER: SRPC4 / SRPC5 Operation Manual) - Page 16
Lookup Table (LUT) Settings, Color Control Function for the Monitor Output
 |
View all Sony SRPC4 manuals
Add to My Manuals
Save this manual to your list of manuals |
Page 16 highlights
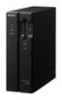
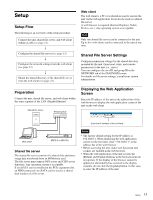
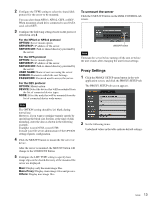
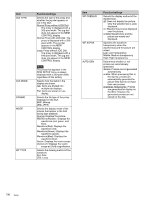
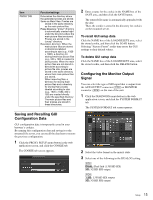
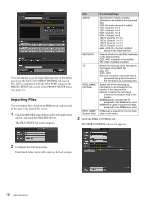
Lookup Table (LUT) Settings It is possible to load lookup table (LUT) files to the LUT banks of the unit using the web application. The eight LUT banks provided in the unit are used to store LUTs that are used for importing, and monitor signal output. LUT files stored in the banks are maintained even after the unit is turned off. The bit depth of LUT files can be applied 8, 10, 12, and 16bit data. Note, however, that the lower four of 16 bits are ignored because of the hardware's 12-bit process. On the contrary, when the bit depth of the input data is 8 or 10, the signal is linearly interpolated into 12-bit data. For details on applicable LUT file formats, see "LUT File Formats Applicable to This Board" in "Appendix". 1 Click the SRPC SETUP menu button, and click the LUT tab. The LUT tab screen appears. 2 Set the following items. Item BANK Function/settings Selects one of the eight banks (BANK 1 to BANK 8). WP check box Check this box when you do not want to overwrite the contents of the selected LUT bank. 3 Click the Browse... button to open the local disk or external media of the web client, then select the LUT file. And then, click the LOAD button. The selected LUT file is loaded to the LUT bank selected in step 2. Clearing the contents of a LUT bank Select the bank whose contents you want to delete, and then click the CLEAR button. Color Control Function for the Monitor Output Color control function for the monitor output can be set using the web application or through control panel operation on the VTR. 1 Click the SRPC SETUP menu button, and click the MONITOR tab. The MONITOR tab screen appears. 2 Set the following items. Underlined values in the table indicate default settings. Item COLOR SPACE LUT RANGE Function/settings Specifies the monitor output signal type. RGB 4:4:4: RGB 4:4:4 signal YCbCr: YcbCr 4:2:2 signal Selects one of the eight banks. off: No LUT is used. BANK1 to BANK8: The LUT in the specified bank is applied to the monitor output. Specifies whether the monitor output signal is extended from Head to Full before the LUT and compressed from Full to Head after the LUT. Pre(HtF) checkbox: Check this box to extend the effective signal range of a monitor output signal with headroom to full range before the LUT. Post(FtH) checkbox: Check this box to compress a full range monitor output signal to the effective signal range of a monitor output signal with headroom after the LUT. 16 Setup
-
 1
1 -
2
-
3
-
4
-
5
-
6
-
7
-
8
-
9
-
10
-
 11
11 -
 12
12 -
 13
13 -
 14
14 -
 15
15 -
 16
16 -
 17
17 -
 18
18 -
 19
19 -
 20
20 -
 21
21 -
22
-
23
-
24
-
25
-
26
-
27
-
28
-
29
-
30
-
31
 |
 |