Sony SRPC4 Product Manual (SRMASTER: SRPC4 / SRPC5 Operation Manual) - Page 20
Import log display, Action when errors occur, To clear the contents of the import log display
 |
View all Sony SRPC4 manuals
Add to My Manuals
Save this manual to your list of manuals |
Page 20 highlights
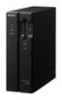
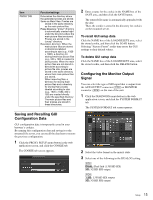
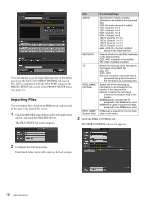
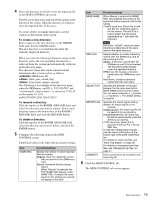
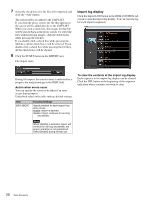
7 Select the check boxes for the files to be imported, and click the "Add" button. The selected files are added to the CLIP LIST. If you click the proxy screen, the file that appears in the screen will be added directly to the CLIP LIST. When you click a check box, the images for that file will be played back in the proxy screen. To select the files without playing images, click the check boxes while pressing the Ctrl key. If you double-click a check box while pressing the Shift key, all the check boxes will be selected. If you double-click a check box while pressing the Ctrl key, all the check boxes will be cleared. 8 Click the START button in the IMPORT area. File import starts. Import log display Click the Import LOG button in the DISK CONTROL tab screen to open the import log display. You can view the log for each import (sequence). During file import, the transfer status is indicated by a progress bar and percentage in the DISK field. Action when errors occur You can specify the action to be taken if an error occurs during import. Underlined values in the table indicate default settings. Item ERR ABORT Function/settings Specify whether to abort import if an error occurs. enable: Import is aborted. disable: Import continues for as long as possible. Note When [disable] is selected, import will continue for as long as possible, but proper operation is not guaranteed. Select [enable] during normal use. To clear the contents of the import log display Each sequence in the import log display can be cleared. Click the DEL button at the beginning of the sequence indication whose contents you want to clear. 20 Basic Operations
-
 1
1 -
2
-
3
-
4
-
5
-
6
-
7
-
8
-
9
-
10
-
11
-
12
-
13
-
14
-
 15
15 -
 16
16 -
 17
17 -
 18
18 -
 19
19 -
 20
20 -
 21
21 -
 22
22 -
 23
23 -
 24
24 -
 25
25 -
26
-
27
-
28
-
29
-
30
-
31
 |
 |