Sony VPL-CS7 User Manual
Sony VPL-CS7 Manual
 |
View all Sony VPL-CS7 manuals
Add to My Manuals
Save this manual to your list of manuals |
Sony VPL-CS7 manual content summary:
- Sony VPL-CS7 | User Manual - Page 1
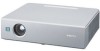
2-148-435-11 (1) Data Projector Operating Instructions VPL-CS7 VPL-ES2 © 2004 Sony Corporation - Sony VPL-CS7 | User Manual - Page 2
this product, you may call: Sony Customer Information Service Center 1-800-222-7669 or http://www.sony.com/ The number below is for FCC related matters only. Declaration of Conformity Trade Name: SONY Model No.: VPL-CS7/VPL-ES2 Responsible Party: Sony Electronics Inc. Address: 16450 W. Bernardo - Sony VPL-CS7 | User Manual - Page 3
als klein chemisch afval (KCA). The socket-outlet should be installed near the equipment and be easily accessible. CAUTION RISK OF EXPLOSION IF BATTERY IS REPLACED BY AN INCORRECT TYPE. DISPOSE OF USED BATTERIES ACCORDING TO THE INSTRUCTIONS. 3 - Sony VPL-CS7 | User Manual - Page 4
4 - Sony VPL-CS7 | User Manual - Page 5
Menu 38 Maintenance Replacing the Lamp 40 Cleaning the Air Filter 42 Others Troubleshooting 43 Messages List 46 Specifications 48 Index 52 Convenient Function Selecting the Menu Language ..........23 Security Lock 24 Other Functions 25 Off & Go Function (VPL-CS7 only 25 Effective - Sony VPL-CS7 | User Manual - Page 6
the projector in a room where floor and walls are not of 6 Precautions light-reflecting material. If the floor and walls are of reflecting material, it is recommended that the carpet and wall paper be changed to a dark color. On preventing internal heat buildup After you turn off the power with - Sony VPL-CS7 | User Manual - Page 7
install the projector in the following situations. These installations may cause a malfunction or damage to the projector. Poorly -up, the temperature sensor will function with the message "High temp.! Lamp off in 1 min." The power will be turned off automatically after one minute. • Leave space of - Sony VPL-CS7 | User Manual - Page 8
may cause color shading or shorten the lamp life excessively. Usage in High Altitude When using the projector at an altitude of 1,500 m or damage. When storing the unit in the soft case, disconnect the AC power cord and all other connecting cables, and store the supplied accessories in a - Sony VPL-CS7 | User Manual - Page 9
This projector is equipped with a highefficiency optical system made possible by adopting Sony's proprietary optical system that is equipped with a newly developed LCD panel. Because the VPL-CS7 utilizes a 185 W UHP lamp, it can reproduce bright images at 1800 ANSI lumen, while the VPL-ES2 utilizes - Sony VPL-CS7 | User Manual - Page 10
• Light weight/small size/simple design This projector has been miniaturized to approx. 2.8 kg (6 lb 3 oz) (VPL-ES2)/ approx. 2.9 kg (6 lb 6 oz) (VPL-CS7) in weight and B5-file size. Its simple yet sophisticated design fits comfortably in your office. Off & Go function (VPL-CS7 only) The cooling fan - Sony VPL-CS7 | User Manual - Page 11
tilt adjuster 0 Indicators POWER SAVING Lights up when the projector is in power saving mode. TEMP (Temperature)/FAN Lights up or flashes under the following conditions: - Lights up when temperature inside the projector becomes unusually high. - Fashes when the fan is broken. LAMP/COVER Lights up or - Sony VPL-CS7 | User Manual - Page 12
you can turn on the projector with the I / 1 key. - Lights in green when the power is turned on. - Flashes in green while the cooling fan runs for about 90 seconds (VPL-ES2)/ for about 70 seconds (VPL-CS7) after the power is turned off with the I / 1 key. For details, see page 21. 3 INPUT key 4 TILT - Sony VPL-CS7 | User Manual - Page 13
Overview Connector Panel VPL-CS7 1 2 3 AUDIO VIDEO S VIDEO INPUT A MONITOR OUT 4 5 VPL-ES2 1 2 3 AUDIO VIDEO S VIDEO INPUT A PR/CR PB/CB Y • VIDEO (phono type): Connects to the composite video output of video equipment. • S VIDEO (mini DIN 4-pin): Connects to the S video output (Y/C - Sony VPL-CS7 | User Manual - Page 14
projector, or the trapezoidal distortion of the image manually. Each time you press this key, the Tilt menu and the V Keystone menu is displayed alternately. Use the arrow key (v/V/b/B) for the adjustment. 14 Location and Function of Controls q; RESET key Resets holder. To replace battery 1 - Sony VPL-CS7 | User Manual - Page 15
Remote Commander operation • Make sure that nothing obstructs the infrared beam between the Remote Commander and the remote control detector on the projector. Direct the Remote Commander toward the remote control detector. • The operation range is limited. The shorter the distance between the Remote - Sony VPL-CS7 | User Manual - Page 16
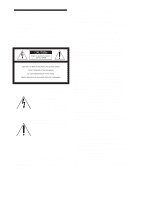
B Projecting the Picture Installing the Projector This section describes how to install the projector. The distance between the lens and the screen varies depending on the size of the screen. Use the following table as a guide. Distance between the screen and the center of the lens Unit: m (feet) - Sony VPL-CS7 | User Manual - Page 17
Projector To connect a computer Ex. VPL-CS7 Left side When you connect the projector, instruction manual. to audio output Computer to monitor output 1HD D-sub 15-pin cable (supplied) 2Stereo audio connecting cable (not supplied) (Use a no-resistance cable) Notes • The projector accepts VGA, SVGA - Sony VPL-CS7 | User Manual - Page 18
output connector Ex. VPL-ES2 Left side Connecting with a VCR This section describes how to connect the projector to a VCR. For more information, refer to the instruction manuals of the equipment you are connecting. To connect to a video or S video output connector Ex. VPL-CS7 Left side AUDIO - Sony VPL-CS7 | User Manual - Page 19
with a Monitor Equipment (VPL-CS7 only) This section describes how to connect the projector to a monitor equipment. For more information, refer to the instruction manuals of the equipment you are connecting. Left side AUDIO VIDEO S VIDEO INPUT A MONITOR OUT Projecting INPUT TILT MENU PUSH - Sony VPL-CS7 | User Manual - Page 20
notebook, or an all-in-one LCD type, you may have to switch the computer to output to the projector by pressing certain keys (e.g., / LCD VGA , / , etc.), or by changing your computer's settings. Notes •If "Auto Input Search" is set to "On," the projector searches for the signals from the connected - Sony VPL-CS7 | User Manual - Page 21
five seconds. 2 Press the I / 1 key again. The powered tilt adjuster is put away in the projector and the lens protector closes. The ON/STANDBY indicator flashes in green and the fan continues to run for about 70 seconds (VPL-CS7)/for about 90 seconds (VPL-ES2) to reduce the internal heat. Also, the - Sony VPL-CS7 | User Manual - Page 22
result in a breakdown of the projector. (VPL-ES2 only) • The internal circuitry of the Off & Go function may cause the fan to continue to operate for a short time even after the I / 1 key is pressed to turn off the power and the ON/STANDBY indicator changes to red. (VPL-CS7 only) For details, see - Sony VPL-CS7 | User Manual - Page 23
is English. To change the menu language, proceed as follows: INPUT TILT MENU PUSH power cord into a wall outlet. 2 Press the I / 1 key to turn on the projector. 3 Press the MENU key. The menu appears. 6 Press the v, V, b or B key to select a language, then press the ENTER key. The menu changes - Sony VPL-CS7 | User Manual - Page 24
ENTER, ENTER, ENTER." Input "ENTER" four times when you use the projector for the first time.) Enter password key. Password required for power-on. Use: Cancel: Image Flip: Off Background: Blue Lamp Mode: Standard High Altitude Mode:Off Security Lock: On Input A Security Lock enabled! If - Sony VPL-CS7 | User Manual - Page 25
Go Function (VPL-CS7 only) If you are leaving the conference room immediately, turn the projector off, the powered tilt adjuster is put away in the projector, and then, after the lens protector closes, you can unplug the AC power cord. After the AC power cord is unplugged, the fan runs for a certain - Sony VPL-CS7 | User Manual - Page 26
This function works when a signal from a computer is input. This function does not work when a video signal is input. 1 Project a normal image, and press the its original size Press the D ZOOM - key. Just pressing the RESET key returns the image back to its original size immediately. To freeze the - Sony VPL-CS7 | User Manual - Page 27
shown as a yellow button. SET SETTING Input A Smar t APA: On Auto Input Search: Off Input-A Signal Sel.: Computer Color System: Auto Power Saving: Off Illumination: On Video NTSC 3.58 Input signal setting indicator Picture adjustment menu Contrast Input signal indicator Shows the selected - Sony VPL-CS7 | User Manual - Page 28
be reset are: • "Contrast," "Brightness," "Color," "Hue," and "Sharpness" in the Adjust Picture... menu. • "Dot Phase," "H Size," and "Shift" in the Adjust Signal... menu About the memory of the settings The settings are automatically stored in the projector memory. If no signal is input If there - Sony VPL-CS7 | User Manual - Page 29
" or "Game," "Living," "Cinema," "Presentation" (VPL-ES2 only) picture mode separately. Adjusts the picture contrast. according to an input signal Adjusts the picture brightness. according to an input signal Adjusts color intensity. according to an input signal Adjusts color tones. The higher - Sony VPL-CS7 | User Manual - Page 30
Setting items Black Level Adj. (VPL-ES2 only) Gamma Mode Color Temp. Functions Initial setting value Using black level adjustment results in a vivid image with clearly defined light and dark areas. Set the black compensation in accordance with the image source. High: Strong balck compensation Low - Sony VPL-CS7 | User Manual - Page 31
from equipment such as a DVD player. according to a picture mode Adjust Signal... Dot Phase Adjusts the dot phase of the LCD panel and the according to an input signal output from a computer. signal Adjust the picture further for finer picture after the picture is adjusted by pressing the - Sony VPL-CS7 | User Manual - Page 32
(See page 38). You can also adjust the preset data through the INPUT SETTING menu. This projector has 20 types of user memories for INPUT-A into which you can save the setting of the adjusted data for an unpreset input signal. When an unpreset signal is input for the first time, a memory number is - Sony VPL-CS7 | User Manual - Page 33
The SET SETTING Menu The SET SETTING menu is used for changing the settings of the projector. SET SETTING Input-A Smar t APA: On Auto Input Search: Off Input-A Signal Sel.: Computer Color System: Auto Power Saving: Off Illumination: On Panel Key Lock: Off Adjustments and Settings Using - Sony VPL-CS7 | User Manual - Page 34
fan keeps running. The power saving mode is canceled when a signal is input or any key is pressed. In power saving mode, any key does not function for the first 60 seconds after the lamp goes out. Selects whether the SONY logo on the top panel of On the projector lights when the projector - Sony VPL-CS7 | User Manual - Page 35
The MENU SETTING Menu The MENU SETTING menu is used for changing the menu displays. MENU SETTING Status: Language: Menu Position: Menu Color: On English Center White Input A A Setting items Status (on-screen display) Language Menu Position Menu Color Functions Initial setting value Sets up - Sony VPL-CS7 | User Manual - Page 36
of the screen when no signal is Blue input to the projector. Select "Black" or "Blue." Normally, set to "Blue." Sets the lamp brightness in the projection. • High: Illuminates the projected image brightly. • Standard: Reduces fan noise and power consumption. The brightness of the projected image - Sony VPL-CS7 | User Manual - Page 37
not correct the trapezoidal distortion perfectly, depending on the room temperature or the screen angle. • When the Image Flip is set to "HV" or "V," the Lamp Mode works with "Standard" setting. The INSTALL SETTING Menu 37 - Sony VPL-CS7 | User Manual - Page 38
the horizontal and vertical frequencies of the input signal and the used time of the lamp. I N F O R M AT I O N fH: fV: Lamp Timer: 48.47kHz 60.00Hz No.23 1024x768 0H Input A Memory number of an input signal Signal type Setting items fH fV Lamp Timer Functions Displays the horizontal frequency - Sony VPL-CS7 | User Manual - Page 39
only) Color Temp. z zz z Volume z zz z z : Adjustable/can be set - : Not adjustable/cannot be set INPUT SETTING menu Item Input signal Video or S video (Y/C) Component Video GBR Computer Dot - - - z Phase H Size - z*1 z*1 z Shift - z*1 z*1 z Scan - - - z Converter - Sony VPL-CS7 | User Manual - Page 40
or dims • "Please replace the LAMP." appears on the screen • The LAMP/COVER indicator lights up The lamp life varies depending on conditions of use. Use LMP-E180 (VPL-CS7) / LMP-E150 (VPL-ES2) Projector Lamp as the replacement lamp. Use of any other lamps than the LMP-E180 or the LMP-E150 may cause - Sony VPL-CS7 | User Manual - Page 41
Turn the projector back over. 8 Connect the power cord. The ON/ STANDBY indicator around the I/1 key lights in red. 9 Press the following keys on the remote commander in the following order for less than five seconds each: RESET, b, B, ENTER. Note Do not put your hands into the lamp replacement spot - Sony VPL-CS7 | User Manual - Page 42
and wash it. 1 Turn off the power and unplug the power cord. 2 Place a protective sheet (cloth) beneath the projector and turn the projector over. 5 Wash the air filter with a mild detergent solution and dry it in a shaded place. 6 Attach the air filter and replace the cover. Notes • If you neglect - Sony VPL-CS7 | User Manual - Page 43
B Others Troubleshooting If the projector appears to be operating erratically, try to diagnose and correct the problem using the following instructions. If the problem persists, consult with qualified Sony personnel. Power Symptom Cause and Remedy The power is not turned on. • The power has - Sony VPL-CS7 | User Manual - Page 44
page 29). • The lamp has burnt or dims. c Replace the lamp with a new one (see page 40). The picture is not clear. • Picture is out of focus. c Adjust the focus (see page 21). • Condensation has occurred on the lens. c Leave the projector for about two hours with the power on . The image extends - Sony VPL-CS7 | User Manual - Page 45
does not open due to a problem. c Consult with qualified Sony personnel. If it is necessary to use the projector in case of emergency, use it in the emergency mode (see page 47). The LAMP/COVER indicator lights up. • The lamp has reached the end of its life. c Replace the lamp (see page 40). • The - Sony VPL-CS7 | User Manual - Page 46
to SVGA (see page 17). Please check Input-A Signal Sel. • You have input RGB signal from the computer when "Input-A Signal Sel." in the SET SETTING menu is set to "Component." c Set "Input-A Signal Sel." correctly (see page 33). Please replace the LAMP. • It is time to replace the lamp. c Replace - Sony VPL-CS7 | User Manual - Page 47
procedure, try to diagnose the problem using the instructions described in "Troubleshooting" on page 43. If the problem persists, read and following procedure thoroughly and then proceed. The projector is equipped with the emergency mode for the lens protector and the powered tilt adjuster. If the - Sony VPL-CS7 | User Manual - Page 48
LCD panel Superhigh-aperture 0.62-inch SVGA panel, 1,440,000 pixels (480,000 pixels × 3) Lens 1.2 times zoom lens (manual) f 18.0 to 21.6 mm/F 2.2 to 2.4 Lamp VPL-CS7: 185 W UHP VPL-ES2: 157 W UHP Projection picture size Range: 40 to 300 inches (diagonal measure) Light output VPL-CS7 - Sony VPL-CS7 | User Manual - Page 49
AC power cord (1) Air filter (for replacement) (1) Operating Instructions (CD-ROM) (1) Quick Reference Manual (1) Security Label (1) Design and specifications are subject to change without notice. Optional accessories Projector Lamp (for replacement) LMP-E180 (for VPL-CS7 only) LMP-E150 (for VPL-ES2 - Sony VPL-CS7 | User Manual - Page 50
V-neg 840 15 VGA VESA 85 Hz 43.269 85.008 H-neg V-neg 832 16 800 × 600 SVGA VESA 56 Hz 35.156 56.250 H-pos, V-pos 1024 17 SVGA VESA 60 Hz 37.879 60.317 H-pos, V-pos 1056 18 SVGA VESA 72 Hz 48.077 72.188 H-pos, V-pos 1040 19 - Sony VPL-CS7 | User Manual - Page 51
is input, the picture may not appear properly. • Memory No. 22* shows the interlace signal. Warning on power connection Use a proper power cord for your local power supply. The United States, Canada Continental Europe UK, Ireland, Japan Australia, New Zealand Plug type Connector type Cord type - Sony VPL-CS7 | User Manual - Page 52
INPUT A connector 13 pin assignment 49 Input-A Signal Sel 33 52 Index Installation examples 16 notes 7 unsuitable conditions 8 unsuitable installation 7 L Lamp Mode 36 Lamp replacement 40 Lamp Pin assignment 49 Power turn on 19 Power Saving 11, 34 Powerd tilt adjuster 20 Precautions 6 - Sony VPL-CS7 | User Manual - Page 53
.........14 Remote control detector 11 Reset resettable items 28 resetting the item 28 S Scan Converter 31 Screen size 16, 48 Security Lock 36 Sharpness 29 Shift 31 Smart APA 33 Specifications 48 Status 35 Supplied accessories 49 T Tilt 36 Troubleshooting 43 V V Keystone 36 Volume 29 - Sony VPL-CS7 | User Manual - Page 54
Sony Corporation
-
 1
1 -
 2
2 -
 3
3 -
 4
4 -
 5
5 -
 6
6 -
 7
7 -
8
-
9
-
10
-
11
-
12
-
13
-
14
-
15
-
16
-
17
-
18
-
19
-
20
-
21
-
22
-
23
-
24
-
25
-
26
-
27
-
28
-
29
-
30
-
31
-
32
-
33
-
34
-
35
-
36
-
37
-
38
-
39
-
40
-
41
-
42
-
43
-
44
-
45
-
46
-
47
-
48
-
49
-
50
-
51
-
52
-
53
-
54
 |
 |
© 2004 Sony Corporation
2-148-435-
11
(1)
Data Projector
Operating Instructions
VPL-CS7
VPL-ES2