Sony VPL-CS7 User Manual - Page 27
Adjustments and Settings Using the Menu, Using the MENU
 |
View all Sony VPL-CS7 manuals
Add to My Manuals
Save this manual to your list of manuals |
Page 27 highlights
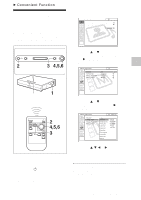
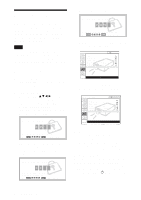
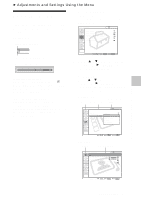
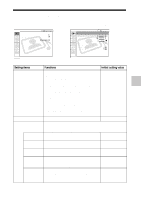
B Adjustments and Settings Using the Menu Using the MENU The projector is equipped with an on-screen menu for making various adjustments and settings. Display items Input signal indicator 1 Press the MENU key. The menu appears. The menu presently selected is shown as a yellow button. SET SETTING Input A Smar t APA: On Auto Input Search: Off Input-A Signal Sel.: Computer Color System: Auto Power Saving: Off Illumination: On Video NTSC 3.58 Input signal setting indicator Picture adjustment menu Contrast Input signal indicator Shows the selected input channel. x is displayed when no signal is input. You can hide this indicator using "Status" in the MENU SETTING menu. Input signal setting indicator For Input A: Shows "Computer," "Component" or "Video GBR." For Video/S Video input: Shows "Auto" or the "Color System" setting in the SET SETTING menu. 2 Use the v or V key to select a menu, then press the B or ENTER key. The selected menu appears. 3 Select an item. Use the v or V key to select the item, then press the B or ENTER key. The setting items are displayed in a popup menu or in a sub menu. Pop-up menu Selected input Menu Setting items signal MENU SETTING Input A Status: On Language: English A Menu Position: Top left Menu Color: Bottom Left Center Top Right Bottom Right Sub menu Menu Setting items PICTURE SETTING ADJUST PICTURE Contrast: Brightness: Gamma Mode: Color Temp: Standard 80 50 Graphics High Input A Adjustments and Settings Using the Menu Using the MENU 27
-
 1
1 -
2
-
3
-
4
-
5
-
6
-
7
-
8
-
9
-
10
-
11
-
12
-
13
-
14
-
15
-
16
-
17
-
18
-
19
-
20
-
21
-
 22
22 -
 23
23 -
 24
24 -
 25
25 -
 26
26 -
 27
27 -
 28
28 -
 29
29 -
 30
30 -
 31
31 -
 32
32 -
33
-
34
-
35
-
36
-
37
-
38
-
39
-
40
-
41
-
42
-
43
-
44
-
45
-
46
-
47
-
48
-
49
-
50
-
51
-
52
-
53
-
54
 |
 |
