Stihl FSA 86 R Instruction Manual - Page 24
Mounting and Removing a Mowing Head
 |
View all Stihl FSA 86 R manuals
Add to My Manuals
Save this manual to your list of manuals |
Page 24 highlights
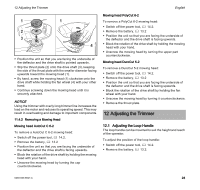
English 11.4 Mounting and Removing a Mowing Head 11.4.1 Mounting a Mowing Head WARNING Use of wire or metal-reinforced line is not authorized and could be extremely dangerous. Use only the cutting attachments recommended in this manual, in combination with the recommended deflector, @ 5.6.4. WARNING A damaged or loose cutting attachment or mowing head may vibrate, crack, break or come off the trimmer which may result in serious or fatal injury or property damage. Make sure the mowing head and cutting attachment are properly tightened and in good condition before starting work, @ 5.6.4. Mowing head AutoCut C 6-2 To mount a AutoCut C 6-2 mowing head: ► Switch off the trimmer, @ 14.2. ► Remove the battery, @ 13.2. 1 3 2 1 ► Position the unit so that you are facing the underside of the deflector and the drive shaft is pointed upwards. ► Slip the mowing head (1) onto the drive shaft (2). ► By hand, screw the cap (3) clockwise onto the drive shaft (2) while holding the mowing head (1) with your other hand. 0000097534_001 0000097546_001 11 Assembling the Trimmer ► Continue screwing down the cap until it is securely attached. Mowing head PolyCut 6-2 To mount a PolyCut 6-2 mowing head: ► Switch off the trimmer, @ 14.2. ► Remove the battery, @ 13.2. 1 3 2 1 ► Position the unit so that you are facing the underside of the deflector and the drive shaft is pointed upwards. ► Slip the mowing head (1) onto the drive shaft (2). ► By hand, screw the upper part (3) clockwise onto the drive shaft while holding the mowing head (1) with your other hand. ► Continue screwing down the upper part until it is securely attached. Mowing head DuroCut 5-2 To mount a DuroCut 5-2 mowing head: ► Switch off the trimmer, @ 14.2. ► Remove the battery, @ 13.2. 22 0458-833-8621-A
-
 1
1 -
2
-
3
-
4
-
5
-
6
-
7
-
8
-
9
-
10
-
11
-
12
-
13
-
14
-
15
-
16
-
17
-
18
-
 19
19 -
 20
20 -
 21
21 -
 22
22 -
 23
23 -
 24
24 -
 25
25 -
 26
26 -
 27
27 -
 28
28 -
 29
29 -
30
-
31
-
32
-
33
-
34
-
35
-
36
-
37
-
38
-
39
-
40
-
41
-
42
-
43
-
44
-
45
-
46
-
47
-
48
-
49
-
50
-
51
-
52
-
53
-
54
-
55
-
56
-
57
-
58
-
59
-
60
-
61
-
62
-
63
-
64
-
65
-
66
-
67
-
68
-
69
-
70
-
71
-
72
-
73
-
74
-
75
-
76
-
77
-
78
-
79
-
80
 |
 |
