Stihl FSA 86 R Instruction Manual - Page 26
Inserting and Removing the Battery
 |
View all Stihl FSA 86 R manuals
Add to My Manuals
Save this manual to your list of manuals |
Page 26 highlights
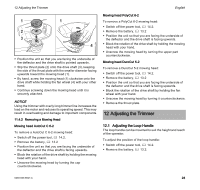
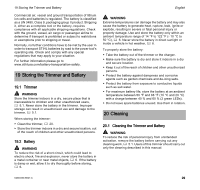
English a 13 Inserting and Removing the Battery To insert the battery: 1 1 2 3 0000097272_001 0000097533_001 ► Loosen the screws (2) that attach the loop handle to the trimmer shaft. ► Slide the loop handle (1) to the desired position, subject to the following limitations: - Always keep the spacer (3) positioned between the loop handle and the control handle. - The distance marked "a" must be less than 11.8 in. (30 cm). ► Tighten the screws until the loop handle is secure and can no longer be moved along the drive tube. 13 Inserting and Removing the Battery 13.1 Inserting the Battery WARNING Never use a malfunctioning, damaged, cracked, leaking or deformed battery, @ 6. Use and store the battery only within an ambient temperature range of 14 °F to 122 °F (- 10 °C to 50 °C), @ 6. WARNING To reduce the risk of unintended activation, never store the battery in the trimmer, @ 19.2. 2 ► Place the trimmer on a level surface. ► Insert the battery (1) into the battery compartment (2) until it stops. The battery is properly inserted when you hear a audible click and the battery is flush with the top of the housing. In this position, there is electrical contact between the battery and the trimmer. Since a new battery is not fully charged, STIHL recommends that you fully charge the battery before using it the first time, @ 9. 13.2 Removing the Battery WARNING To reduce the risk of severe personal injury from unintended activation, always remove the battery before assembling, transporting, adjusting, cleaning, servicing, maintaining or storing the trimmer and any other time it is not in use. WARNING Use care when ejecting the battery to prevent it from falling and causing personal injury or property damage. To remove the battery: ► Release the trigger switch. ► Place the trimmer on a level surface. ► Position your hand behind the battery. 24 0458-833-8621-A
-
 1
1 -
2
-
3
-
4
-
5
-
6
-
7
-
8
-
9
-
10
-
11
-
12
-
13
-
14
-
15
-
16
-
17
-
18
-
19
-
20
-
 21
21 -
 22
22 -
 23
23 -
 24
24 -
 25
25 -
 26
26 -
 27
27 -
 28
28 -
 29
29 -
 30
30 -
 31
31 -
32
-
33
-
34
-
35
-
36
-
37
-
38
-
39
-
40
-
41
-
42
-
43
-
44
-
45
-
46
-
47
-
48
-
49
-
50
-
51
-
52
-
53
-
54
-
55
-
56
-
57
-
58
-
59
-
60
-
61
-
62
-
63
-
64
-
65
-
66
-
67
-
68
-
69
-
70
-
71
-
72
-
73
-
74
-
75
-
76
-
77
-
78
-
79
-
80
 |
 |
