Stihl FSA 86 R Instruction Manual - Page 25
Adjusting the Trimmer
 |
View all Stihl FSA 86 R manuals
Add to My Manuals
Save this manual to your list of manuals |
Page 25 highlights
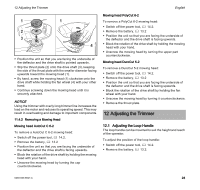
12 Adjusting the Trimmer 1 1 2 3 4 0000097552_001 ► Position the unit so that you are facing the underside of the deflector and the drive shaft is pointed upwards. ► Slip the thrust plate (2) onto the drive shaft (3), keeping the side of the thrust plate with the smaller diameter facing upwards toward the mowing head (1). ► By hand, screw the mowing head (1) clockwise onto the drive shaft while holding the fan wheel (4) with your other hand. ► Continue screwing down the mowing head until it is securely attached. NOTICE Using the trimmer with overly long trimmer line increases the load on the motor and reduces its operating speed. This may result in overheating and damage to important components. 11.4.2 Removing a Mowing Head Mowing head AutoCut C 6-2 To remove a AutoCut C 6-2 mowing head: ► Switch off the power tool, @ 14.2. ► Remove the battery, @ 13.2 ► Position the unit so that you are facing the underside of the deflector and the drive shaft is facing upwards. ► Block the rotation of the drive shaft by holding the mowing head with your hand. ► Unscrew the mowing head by turning the cap counterclockwise. English Mowing head PolyCut 6-2 To remove a PolyCut 6-2 mowing head: ► Switch off the power tool, @ 14.2. ► Remove the battery, @ 13.2 ► Position the unit so that you are facing the underside of the deflector and the drive shaft is facing upwards. ► Block the rotation of the drive shaft by holding the mowing head with your hand. ► Unscrew the mowing head by turning the upper part counterclockwise. Mowing head DuroCut 5-2 To remove a DuroCut 5-2 mowing head: ► Switch off the power tool, @ 14.2. ► Remove the battery, @ 13.2 ► Position the unit so that you are facing the underside of the deflector and the drive shaft is facing upwards. ► Block the rotation of the drive shaft by holding the fan wheel with your hand. ► Unscrew the mowing head by turning it counterclockwise. ► Remove the thrust plate. 12 Adjusting the Trimmer 12.1 Adjusting the Loop Handle The loop handle can be mounted to suit the height and reach of the operator. To adjust the position of the loop handle: ► Switch off the power tool, @ 14.2. ► Remove the battery, @ 13.2. 0458-833-8621-A 23
-
 1
1 -
2
-
3
-
4
-
5
-
6
-
7
-
8
-
9
-
10
-
11
-
12
-
13
-
14
-
15
-
16
-
17
-
18
-
19
-
 20
20 -
 21
21 -
 22
22 -
 23
23 -
 24
24 -
 25
25 -
 26
26 -
 27
27 -
 28
28 -
 29
29 -
 30
30 -
31
-
32
-
33
-
34
-
35
-
36
-
37
-
38
-
39
-
40
-
41
-
42
-
43
-
44
-
45
-
46
-
47
-
48
-
49
-
50
-
51
-
52
-
53
-
54
-
55
-
56
-
57
-
58
-
59
-
60
-
61
-
62
-
63
-
64
-
65
-
66
-
67
-
68
-
69
-
70
-
71
-
72
-
73
-
74
-
75
-
76
-
77
-
78
-
79
-
80
 |
 |
