Stihl FSA 86 R Instruction Manual - Page 27
Switching the Trimmer On and Off
 |
View all Stihl FSA 86 R manuals
Add to My Manuals
Save this manual to your list of manuals |
Page 27 highlights
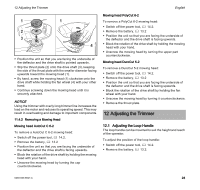
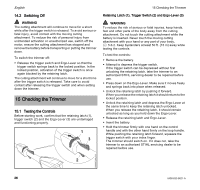
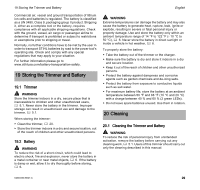
0000097076_001 0000097269_001 14 Switching the Trimmer On and Off 1 1 2 ► Compress the locking levers (1) to eject the battery (2) from the battery compartment. NOTICE Avoid exposing the battery to excessive heat or prolonged periods of direct sunlight. Use or storage outside the recommended ambient temperature range can reduce the performance and/or service life of the battery. English the risk of serious or fatal injury from loss of control, always hold the trimmer with both hands when you are working, @ 5.6.2. Before switching on: ► Make sure other persons are out of the general work area. ► Make sure you have a secure and firm footing. ► Stand upright. ► Always hold and operate the trimmer with one hand firmly on the rear or control handle and the other hand firmly on the loop handle. To switch the trimmer on: 1 3 14 Switching the Trimmer On and Off 2 14.1 Switching On WARNING To reduce the risk of serious or fatal injuries to the operator or bystanders, keep hands, feet and other parts of the body away from the cutting attachment, @ 5.6.2. Do not touch the cutting attachment while the battery is inserted. Never touch the moving cutting attachment with your hand or any part of your body, @ 5.6.4. WARNING Never operate your trimmer if it is modified, damaged, improperly adjusted or maintained, not completely and securely assembled or not functioning properly, @ 5.5. To reduce the risk of personal injury, always wear proper clothing and protective apparel, including proper eye protection, when operating your trimmer, @ 5.4. To reduce ► Unlock the retaining latch (1) by pushing it forward with your thumb. Hold it in this unlocked position. ► While holding the retaining latch, squeeze the trigger switch (2) with your index finger. The cutting attachment will start moving. The motor will not switch on unless the retaining latch is pushed forward and the trigger switch is pressed at the same time. Once the trigger switch is activated, you may release the retaining latch. Holding the Ergo-Lever (3) down keeps the trigger switch unlocked. If you release the trigger switch and Ergo-Lever, you have to unlock the tool again with the retaining latch. 0458-833-8621-A 25
-
 1
1 -
2
-
3
-
4
-
5
-
6
-
7
-
8
-
9
-
10
-
11
-
12
-
13
-
14
-
15
-
16
-
17
-
18
-
19
-
20
-
21
-
 22
22 -
 23
23 -
 24
24 -
 25
25 -
 26
26 -
 27
27 -
 28
28 -
 29
29 -
 30
30 -
 31
31 -
 32
32 -
33
-
34
-
35
-
36
-
37
-
38
-
39
-
40
-
41
-
42
-
43
-
44
-
45
-
46
-
47
-
48
-
49
-
50
-
51
-
52
-
53
-
54
-
55
-
56
-
57
-
58
-
59
-
60
-
61
-
62
-
63
-
64
-
65
-
66
-
67
-
68
-
69
-
70
-
71
-
72
-
73
-
74
-
75
-
76
-
77
-
78
-
79
-
80
 |
 |
