TP-Link AC750 Archer C20i V1 User Guide - Page 123
NTP Server 1 / NTP Server 2
 |
View all TP-Link AC750 manuals
Add to My Manuals
Save this manual to your list of manuals |
Page 123 highlights
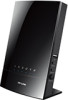
Archer C20i AC750 Wireless Dual Band Router Time - Enter your local time in HH/MM/SS into the right blanks. Get From PC - Enter your PC's current time into the right blanks. NTP Server 1 / NTP Server 2 - Enter the address or domain of the NTP Server 1 or NTP Server 2, and then the router will get the time from the NTP Server preferentially. In addition, the router built-in some common NTP Servers, so it can get time automatically once it connects the Internet. Enable Daylight Saving - Check the box to enable the Daylight Saving function. Start - The time to start the Daylight Saving. Select the month in the first field, the week in the second field, the day in the third field and the time in the last field. End - The time to end the Daylight Saving. Select the month in the first field, the week in the second field, the day in the third field and the time in the last field. To set time manually: 1. Select your local time zone. 2. Enter the Date in Month/Day/Year format. 3. Enter the Time in Hour/Minute/Second format. 4. Click Save. To set time automatically: 1. Select your local time zone. 2. Enter the address or domain of the NTP Server 1 or NTP Server 2. 3. Click the Get GMT button to get system time from Internet if you have connected to the Internet. To set Daylight Saving: 1. Check the box to enable Daylight Saving. 2. Select the start time from the drop-down lists in the Start field. 3. Select the end time from the drop-down lists in the End field. 4. Click the Save button to save the settings. Figure 4-109 Time settings - 112 -
-
 1
1 -
2
-
3
-
4
-
5
-
6
-
7
-
8
-
9
-
10
-
11
-
12
-
13
-
14
-
15
-
16
-
17
-
18
-
19
-
20
-
21
-
22
-
23
-
24
-
25
-
26
-
27
-
28
-
29
-
30
-
31
-
32
-
33
-
34
-
35
-
36
-
37
-
38
-
39
-
40
-
41
-
42
-
43
-
44
-
45
-
46
-
47
-
48
-
49
-
50
-
51
-
52
-
53
-
54
-
55
-
56
-
57
-
58
-
59
-
60
-
61
-
62
-
63
-
64
-
65
-
66
-
67
-
68
-
69
-
70
-
71
-
72
-
73
-
74
-
75
-
76
-
77
-
78
-
79
-
80
-
81
-
82
-
83
-
84
-
85
-
86
-
87
-
88
-
89
-
90
-
91
-
92
-
93
-
94
-
95
-
96
-
97
-
98
-
99
-
100
-
101
-
102
-
103
-
104
-
105
-
106
-
107
-
108
-
109
-
110
-
111
-
112
-
113
-
114
-
115
-
116
-
117
-
 118
118 -
 119
119 -
 120
120 -
 121
121 -
 122
122 -
 123
123 -
 124
124 -
 125
125 -
 126
126 -
 127
127 -
 128
128 -
129
-
130
-
131
-
132
-
133
-
134
-
135
-
136
-
137
-
138
-
139
-
140
-
141
-
142
 |
 |