TP-Link RE590T RE590T V1.0.0 User Guide - Page 25
Set the DHCP server, View the client information, Reserve an IP address
 |
View all TP-Link RE590T manuals
Add to My Manuals
Save this manual to your list of manuals |
Page 25 highlights
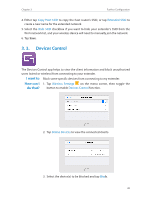
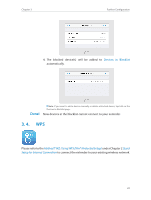
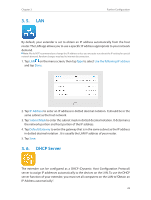
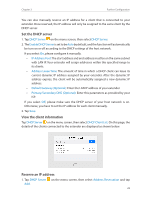
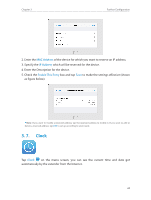
Chapter 3 Further Configuration You can also manually reserve an IP address for a client that is connected to your extender. Once reserved, the IP address will only be assigned to the same client by the DHCP server. Set the DHCP server 1. Tap DHCP Server on the menu screen, then select DHCP Server. 2. The Enable DHCP Server is set to be Auto by default, and the function will automatically be turn on or off according to the DHCP settings of the host network. If you select On, please configure it manually. • IP Address Pool: The start address and end address must be on the same subnet with LAN IP. Your extender will assign addresses within this specified range to its clients. • Address Lease Time: The amount of time in which a DHCP client can lease its current dynamic IP address assigned by your extender. After the dynamic IP address expires, the client will be automatically assigned a new dynamic IP address. • Default Gateway (Optional): Enter the LAN IP address of your extender. • Primary/Secondary DNS (Optional): Enter this parameters as provided by your ISP. If you select Off, please make sure the DHCP server of your host network is on. Otherwise, you have to set the IP address for each client manually. 3. Tap Save. View the client information Tap DHCP Server on the menu screen, then select DHCP Client List. On this page, the details of the clients connected to the extender are displayed as shown below. Reserve an IP address 1. Tap DHCP Server on the menu screen, then select Address Reservation and tap Add. 23
-
 1
1 -
2
-
3
-
4
-
5
-
6
-
7
-
8
-
9
-
10
-
11
-
12
-
13
-
14
-
15
-
16
-
17
-
18
-
19
-
 20
20 -
 21
21 -
 22
22 -
 23
23 -
 24
24 -
 25
25 -
 26
26 -
 27
27 -
 28
28 -
 29
29 -
 30
30 -
31
-
32
-
33
-
34
-
35
-
36
-
37
-
38
-
39
-
40
-
41
 |
 |
