TP-Link TD-VG5612 TD-VG5612 V1 User Guide - Page 118
IPv6 LAN Host, Add IPv6 WAN Host
 |
View all TP-Link TD-VG5612 manuals
Add to My Manuals
Save this manual to your list of manuals |
Page 118 highlights
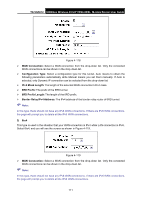
TD-VG5612 300Mbps Wireless N VoIP VDSL/ADSL Modem Router User Guide 3. Select a host from the IPv6 LAN Host drop-down list or choose "Add IPv6 LAN Host". 4. Select a target from the IPv 6 WAN Host drop-sown list or choose "Add IPv 6 WAN Host". 5. Select a schedule from the IPv 6 Sche dule drop-down list or choose "Add IPv 6 Sche dule". 6. In the Action field, select Deny or Allow to deny or allow your entry. 7. In the Status field, select Enabled or Disabled to enable or disable your entry. 8. In the Direction field, select IN or OUT from the drop-down list for the direction. 9. In the Protocol field, here are four options, All, TCP, UDP, and ICMPv6. Select one of them from the drop-down list for the target. 10. Click the Save button to save the settings. Click the Enable / Disable Se lected button to make selected entries enabled or disabled. Click the Delete Selected button to delete selected entries. 4.17.2 IPv6 LAN Host Choose menu "IPv6 Firewall" → "IPv6 LAN Host", and then you can view and set a Host list in the screen as shown in Figure 4-110. Figure 4-110 De scription: Here displays the description of the host and this description is unique. IPv 6 Addre ss Info: Here displays the information about the host. Edit: To modify an existing entry. To add a new entry, please follow the steps below. 1. Click the Add New button, and you will see the screen as shown in Figure 4-111. Figure 4-111 2. Create a unique name for the host (e.g. Host_1) in the Description field. 3. Enter an IPv6 address in the IPv6 Address field. 4. Enter the prefix length of the IPv6 address in the Prefix Length field. 107
-
 1
1 -
2
-
3
-
4
-
5
-
6
-
7
-
8
-
9
-
10
-
11
-
12
-
13
-
14
-
15
-
16
-
17
-
18
-
19
-
20
-
21
-
22
-
23
-
24
-
25
-
26
-
27
-
28
-
29
-
30
-
31
-
32
-
33
-
34
-
35
-
36
-
37
-
38
-
39
-
40
-
41
-
42
-
43
-
44
-
45
-
46
-
47
-
48
-
49
-
50
-
51
-
52
-
53
-
54
-
55
-
56
-
57
-
58
-
59
-
60
-
61
-
62
-
63
-
64
-
65
-
66
-
67
-
68
-
69
-
70
-
71
-
72
-
73
-
74
-
75
-
76
-
77
-
78
-
79
-
80
-
81
-
82
-
83
-
84
-
85
-
86
-
87
-
88
-
89
-
90
-
91
-
92
-
93
-
94
-
95
-
96
-
97
-
98
-
99
-
100
-
101
-
102
-
103
-
104
-
105
-
106
-
107
-
108
-
109
-
110
-
111
-
112
-
 113
113 -
 114
114 -
 115
115 -
 116
116 -
 117
117 -
 118
118 -
 119
119 -
 120
120 -
 121
121 -
 122
122 -
 123
123 -
124
-
125
-
126
-
127
-
128
-
129
-
130
-
131
-
132
-
133
-
134
-
135
-
136
-
137
-
138
-
139
-
140
-
141
-
142
-
143
-
144
-
145
 |
 |
