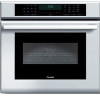
Thermador DM301ES User Manual - Page 12
Setting the Clock, Setting the Lights, Setting the Timer
 |
View all Thermador DM301ES manuals
Add to My Manuals
Save this manual to your list of manuals |
Page 12 highlights
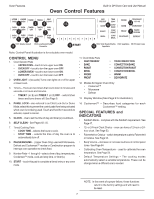
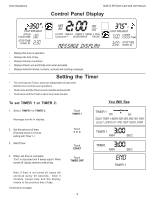
Oven Operations Setting the Timer (Continued from previous page) Built-in DM Oven Care and Use Manual To Cancel an Active Timer: Select TIMER 1 OFF or TIMER 2 OFF. To Set Both TIMER 1 and TIMER 2: • Follow the steps above to set each Timer. The Timer with the least amount of countdown time has display priority. The countdown display for the second timer is shown automatically when the first timer has ended. • The words "TIMER 1" and "TIMER 2" are both displayed along with the number countdown. • The designation, "TIMER 1" or "TIMER 2" with the least remaining countdown time is more brightly lit than the other word. • During the countdown, touch CLOCK or TIMER. Depending on the pad touched, either the time of day or the remaining time is briefly displayed. To Change a Timer: 1. Touch TIMER 1 or TIMER 2. 2. Enter the new desired time. 3. Touch the START pad. Setting the Clock • Always set the clock after installation or after a power failure. To Set the Clock: Once power returns to the oven, the clock displays the time of 1. Touch the CLOCK pad. day when power was turned off or lost. Message scrolls in display: • The Time of Day clock can be set while an automatic timed Enter Time of Day then touch START cooking mode is in operation. 2. Set the current time of day. • If 10 seconds elapse between touching the clock pad or number pads, the oven will beep two times as a reminder. Message scrolls in display: Enter Time of Day then touch START • After 5 more seconds, the clock pad will stop flashing and the 3. Touch START or CLOCK. original time will be displayed. Setting the Lights • Touch OVEN LIGHT pad once to turn light on or off. • The lights do not operate in the Self Clean mode. 10
-
 1
1 -
2
-
3
-
4
-
5
-
6
-
 7
7 -
 8
8 -
 9
9 -
 10
10 -
 11
11 -
 12
12 -
 13
13 -
 14
14 -
 15
15 -
 16
16 -
 17
17 -
18
-
19
-
20
-
21
-
22
-
23
-
24
-
25
-
26
-
27
-
28
-
29
-
30
-
31
-
32
-
33
-
34
-
35
-
36
-
37
-
38
-
39
-
40
-
41
-
42
-
43
-
44
-
45
-
46
-
47
-
48
-
49
-
50
-
51
-
52
-
53
-
54
-
55
-
56
-
57
-
58
-
59
-
60
-
61
-
62
-
63
-
64
 |
 |
