Thermador PRD486JDGU Installation Manual - Page 11
Requirements and Hookup, Step 7: Electrical
 |
View all Thermador PRD486JDGU manuals
Add to My Manuals
Save this manual to your list of manuals |
Page 11 highlights
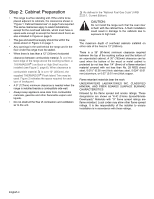
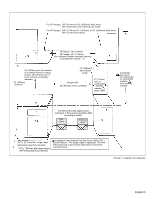
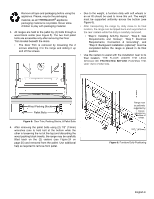
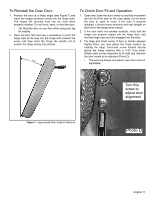
Remove all tape and packaging before using the appliance. Please, recycle the packaging material, as all THERMADOR® appliance packaging material is recyclable. Never allow children to play with packaging material. 3. All ranges are held to the pallet by (4) bolts through a wood block center (see Figure 5). The two front pallet bolts are accessible only after removing the Door Trim located beneath the doors. • The Door Trim is removed by loosening the 2 screws attaching it to the range and sliding it up and off the screws. • Due to the weight, a furniture dolly with soft wheels or an air lift should be used to move this unit. The weight must be supported uniformly across the bottom (see Figure 6). • After transporting the range by dolly close to its final location, the range can be tipped back and supported on the rear casters while the dolly is carefully removed. • "Step 5: Installing Anti-Tip Device", "Step 6: Gas Requirements and Hookup", "Step 7: Electrical Requirements, Connection & Grounding", and "Step 8: Backguard Installation (optional)" must be completed before the range is placed in its final position. • Use the casters to assist with the installation near to its final location. THE FLOOR UNDER THE LEGS SHOULD BE PROTECTED BEFORE PUSHING THE UNIT INTO POSITION. Loosen Screws Wood Packing Blocks Pallet Bolts Figure 5: Door Trim, Packing Blocks, & Pallet Bolts 4. After removing the pallet bolts using (2) 1/2" (13mm) wrenches (one to hold bolt at the bottom while the other is loosening the nut at the top) and discarding the wood packing block inserts, the range may be carefully tilted back on the (2) casters (see Figure 24 on page 25) and removed from the pallet. Use additional help as required to remove from pallet. Range must be uniformly supported by braces provided on bottom of range. 223/4" (578mm) Figure 6: Furniture Dolly Positioning English 9
-
 1
1 -
2
-
3
-
4
-
5
-
 6
6 -
 7
7 -
 8
8 -
 9
9 -
 10
10 -
 11
11 -
 12
12 -
 13
13 -
 14
14 -
 15
15 -
 16
16 -
17
-
18
-
19
-
20
-
21
-
22
-
23
-
24
-
25
-
26
-
27
-
28
-
29
-
30
-
31
-
32
-
33
-
34
-
35
-
36
-
37
-
38
-
39
-
40
-
41
-
42
-
43
-
44
-
45
-
46
-
47
-
48
-
49
-
50
-
51
-
52
-
53
-
54
-
55
-
56
-
57
-
58
-
59
-
60
-
61
-
62
-
63
-
64
-
65
-
66
-
67
-
68
-
69
-
70
-
71
-
72
-
73
-
74
-
75
-
76
-
77
-
78
-
79
-
80
-
81
-
82
-
83
-
84
-
85
-
86
-
87
-
88
-
89
-
90
-
91
-
92
-
93
-
94
-
95
-
96
-
97
 |
 |