Thermador PRD486JDGU Installation Manual - Page 21
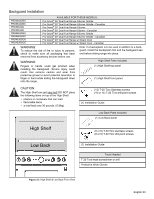
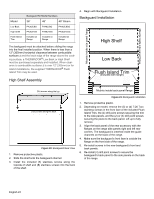
Step 8: Backguard Installation
 |
View all Thermador PRD486JDGU manuals
Add to My Manuals
Save this manual to your list of manuals |
Page 21 highlights
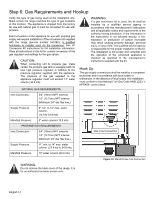
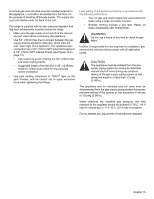
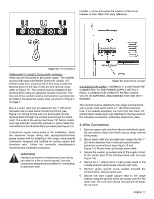
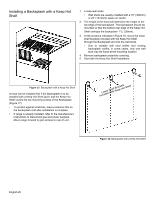
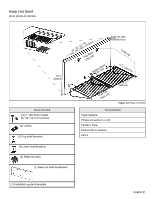
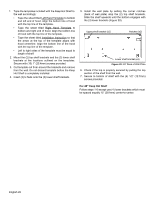
Step 8: Backguard Installation (optional) Installation methods will vary upon need. Before you begin read these instructions carefully. Observe all local codes and ordinances. 1. Locate and lightly mark wall studs. WARNING: To reduce the risk of fire or injury to persons, check to make sure all packaging has been removed from accessory devices before use. • Wall studs are usually installed with a 16" or 24" (406mm or 1372mm) space on center. 2. The height of the hood will determine the height of the top edge of the backsplash. The backsplash should be mounted so that the bottom rear edge of the hood overlaps the backsplash 11/2" (38mm). Backsplash Installation (PA [30,36, 48] JBS) 3. Per each wall stud, use (2) of the provided screws to secure both the top and bottom of the backsplash (see Figure 16). The backsplash must be installed prior to installing an overhead hood given that the hood shell covers the top mounting screws of the backsplash. • Due to variable wall stud widths and varying backsplash widths, in some cases only one wall stud may be found at the mounting location. 4. Remove protective plastic. Parts Included Tools Needed (10) 1" (25.4mm) Phillips screwdriver or screws drill 30", 36", 48" (760mm, 913mm, 1218mm) (1) Backsplash Tape measure 42" (1070mm) (1) Installation Guide Pencil • To protect against scratches, leave protective film on backsplash until after installation is complete. • If range is already installed, refer to the manufacture's instructions to disconnect gas and power supplies. Move range forward to gain access to rear of unit. Wall Studs Space screws evenly across top & bottom Figure 16: Backsplash Installation English 19
-
 1
1 -
2
-
3
-
4
-
5
-
6
-
7
-
8
-
9
-
10
-
11
-
12
-
13
-
14
-
15
-
 16
16 -
 17
17 -
 18
18 -
 19
19 -
 20
20 -
 21
21 -
 22
22 -
 23
23 -
 24
24 -
 25
25 -
 26
26 -
27
-
28
-
29
-
30
-
31
-
32
-
33
-
34
-
35
-
36
-
37
-
38
-
39
-
40
-
41
-
42
-
43
-
44
-
45
-
46
-
47
-
48
-
49
-
50
-
51
-
52
-
53
-
54
-
55
-
56
-
57
-
58
-
59
-
60
-
61
-
62
-
63
-
64
-
65
-
66
-
67
-
68
-
69
-
70
-
71
-
72
-
73
-
74
-
75
-
76
-
77
-
78
-
79
-
80
-
81
-
82
-
83
-
84
-
85
-
86
-
87
-
88
-
89
-
90
-
91
-
92
-
93
-
94
-
95
-
96
-
97
 |
 |