Thermador PRD486JDGU Installation Manual - Page 13
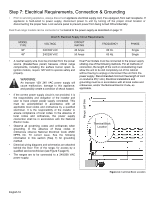
Photo D
 |
View all Thermador PRD486JDGU manuals
Add to My Manuals
Save this manual to your list of manuals |
Page 13 highlights
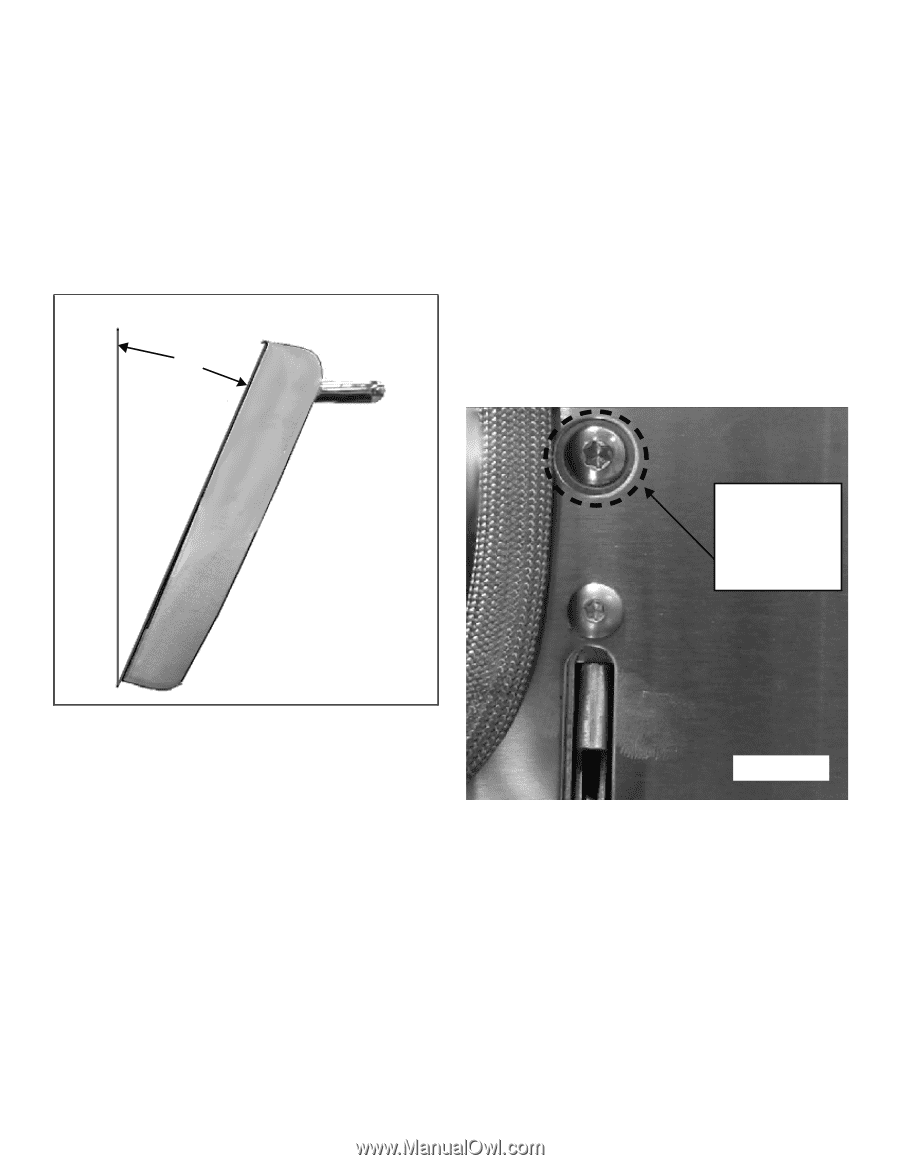
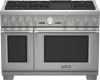
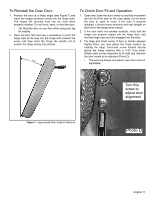
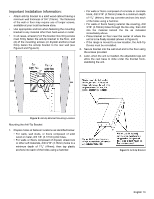
To Reinstall the Oven Door: 1. Position the door at a sharp angle (see Figure 7) and insert the hinges centered evenly into the hinge slots. The hinges will securely hook into the slots when properly installed. Do not force, bend, or twist the door. • Tip: Rest the door on your foot while using your leg for stability. 2. Open the door fully and use a screwdriver to push the hinge clips all the way into the hinge slots (toward the oven) until they meet the hinge. Be careful not to scratch the range during this process. 23° To Check Door Fit and Operation: 1. Open and close the door slowly to test the movement and the fit of the door to the oven cavity. Do not force the door to open or close. If the door is properly installed, it should move smoothly and rest straight on the front of the range when closed. 2. If the door does not operate correctly, verify that the hinges are properly seated into the hinge slots, and that the hinge clips are fully engaged into the slots. 3. For large and small ovens, if door or handle appears slightly tilted, you may adjust the hinge receiver by rotating the large Torx-head screw located directly above the hinge receiver with a T-20 Torx driver. Rotate each screw respective to its side and direction the door needs to be adjusted (Photo D). • The warming drawer and steam oven doors are not adjustable. Turn this screw to adjust door alignment Figure 7: Approximate Door Angle for Removal Photo D English 11
-
 1
1 -
2
-
3
-
4
-
5
-
6
-
7
-
 8
8 -
 9
9 -
 10
10 -
 11
11 -
 12
12 -
 13
13 -
 14
14 -
 15
15 -
 16
16 -
 17
17 -
 18
18 -
19
-
20
-
21
-
22
-
23
-
24
-
25
-
26
-
27
-
28
-
29
-
30
-
31
-
32
-
33
-
34
-
35
-
36
-
37
-
38
-
39
-
40
-
41
-
42
-
43
-
44
-
45
-
46
-
47
-
48
-
49
-
50
-
51
-
52
-
53
-
54
-
55
-
56
-
57
-
58
-
59
-
60
-
61
-
62
-
63
-
64
-
65
-
66
-
67
-
68
-
69
-
70
-
71
-
72
-
73
-
74
-
75
-
76
-
77
-
78
-
79
-
80
-
81
-
82
-
83
-
84
-
85
-
86
-
87
-
88
-
89
-
90
-
91
-
92
-
93
-
94
-
95
-
96
-
97
 |
 |