Thermador PRD486JDGU Installation Manual - Page 25
High Shelf, Low Back - pro grand
 |
View all Thermador PRD486JDGU manuals
Add to My Manuals
Save this manual to your list of manuals |
Page 25 highlights
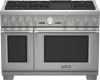
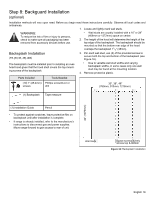
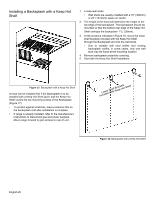
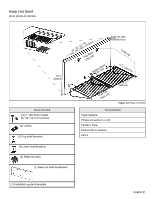
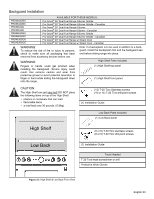
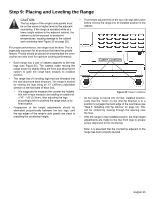
Backguard Installation PRD364JDGU PRD364JDGC PRD366JGU PRD366JGC PRD486JDGU PRD486JDGC PRD48JDSGU PRD48JDSGC AVAILABLE FOR THESE MODELS: Pro Grand® 36" Dual Fuel Range 4 Burner Griddle Pro Grand® 36" Dual Fuel Range 4 Burner Griddle - Canadian Pro Grand® 36" Dual Fuel Range 6 Burner Pro Grand® 36" Dual Fuel Range 6 Burner - Canadian Pro Grand® 48" Dual Fuel Range 6 Burner Griddle Pro Grand® 48" Dual Fuel Range 6 Burner Griddle - Canadian Pro Grand® 48" Dual Fuel Range w/ Steam Oven Pro Grand® 48" Dual Fuel Range w/ Steam Oven - Canadian WARNING: To reduce the risk of fire or injury to persons, check to make sure all packaging has been removed from accessory devices before use. Note: If a backsplash is to be used in addition to a backguard, install the backsplash first and the backguard second before sliding range into place. WARNING: High Shelf Parts Included Fingers or hands could get pinched when installing the backguard. Severe injury could result. Use extreme caution and wear thick protective gloves to avoid potential laceration to finger or hand while sliding the backguard down onto the range. (1) High Shelf top panel (1) High Shelf front panel CAUTION: The High Shelf can get very hot! DO NOT place the following items on top of the High Shelf: • plastics or containers that can melt • flammable items • a total load over 30 pounds (13.6kg) (13) T-20 Torx Stainless screws (16 or 14) T-20 Torx drill point screws (1) Installation Guide Low Back Parts Included (1) Low Back panel High Shelf (9 or 8) T-20 Torx stainless screws (8 or 6) T-20 Torx drill point screws Low Back (1) Installation Guide Tools Needed T-20 Torx head screwdriver or drill Protective Work Gloves Figure 21: High Shelf & Low Back Front View English 23
-
 1
1 -
2
-
3
-
4
-
5
-
6
-
7
-
8
-
9
-
10
-
11
-
12
-
13
-
14
-
15
-
16
-
17
-
18
-
19
-
 20
20 -
 21
21 -
 22
22 -
 23
23 -
 24
24 -
 25
25 -
 26
26 -
 27
27 -
 28
28 -
 29
29 -
 30
30 -
31
-
32
-
33
-
34
-
35
-
36
-
37
-
38
-
39
-
40
-
41
-
42
-
43
-
44
-
45
-
46
-
47
-
48
-
49
-
50
-
51
-
52
-
53
-
54
-
55
-
56
-
57
-
58
-
59
-
60
-
61
-
62
-
63
-
64
-
65
-
66
-
67
-
68
-
69
-
70
-
71
-
72
-
73
-
74
-
75
-
76
-
77
-
78
-
79
-
80
-
81
-
82
-
83
-
84
-
85
-
86
-
87
-
88
-
89
-
90
-
91
-
92
-
93
-
94
-
95
-
96
-
97
 |
 |