Thermador PRD486JDGU Installation Manual - Page 30
Toe Kick Panel optional
 |
View all Thermador PRD486JDGU manuals
Add to My Manuals
Save this manual to your list of manuals |
Page 30 highlights
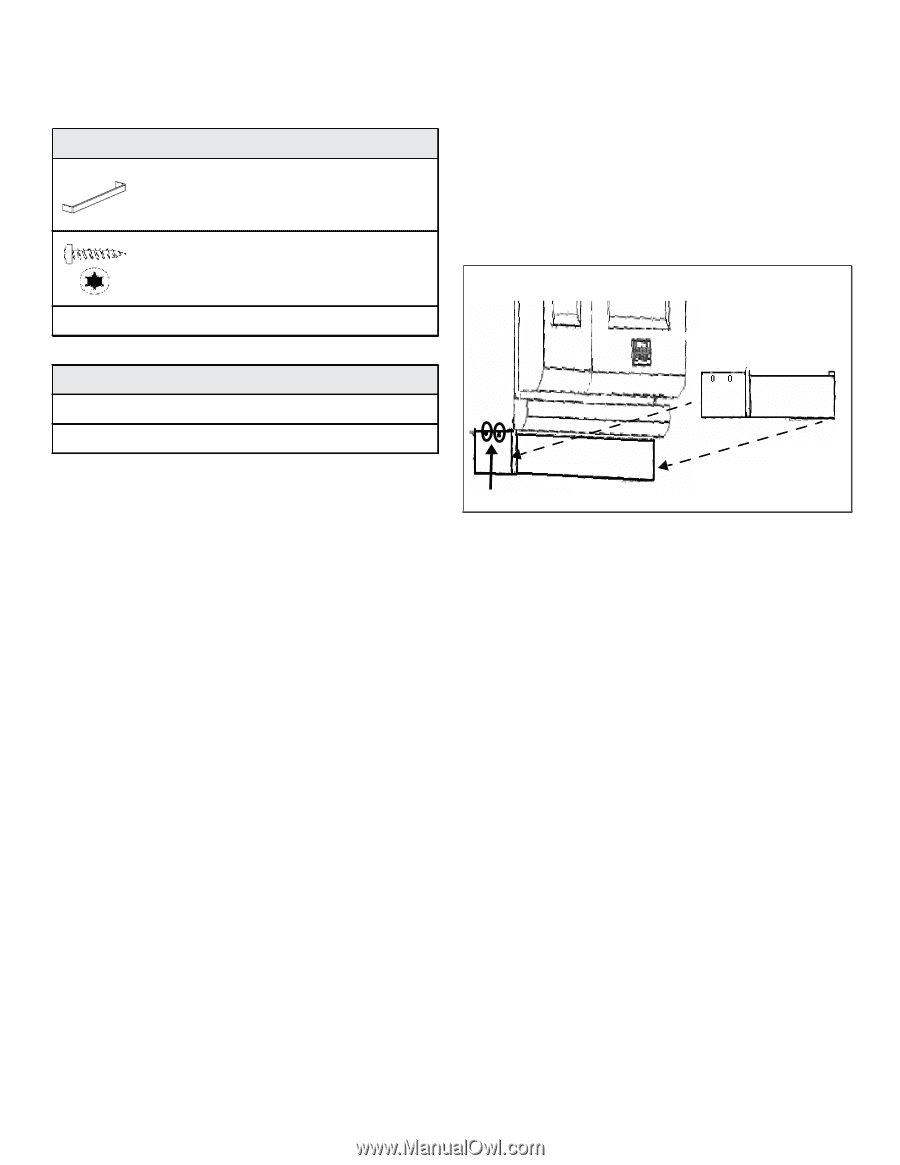
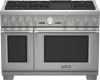
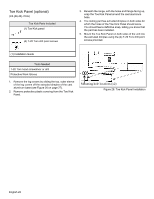
Toe Kick Panel (optional) (PA [36,48] JTKG) Toe Kick Parts Included (1) Toe Kick panel (4) T-20 Torx drill point screws 3. Beneath the range, with the holes and flange facing up, wrap the Toe Kick Panel around the cast aluminum base. 4. The mating part has extruded dimples on both sides for which the holes of the Toe Kick Panel should seize. You should feel a definitive snap, letting you know that the part has been installed. 5. Mount the Toe Kick Panel on both sides of the unit into the extruded dimples using the (4) T-20 Torx drill point screws provided. (1) Installation Guide Tools Needed T-20 Torx head screwdriver or drill Protective Work Gloves 1. Remove the leg covers by sliding the top, outer sleeve of the leg covers off the extruded dimples of the cast aluminum base (see Figure 26 on page 27). 2. Remove protective plastic covering from the Toe Kick Panel. Mounting hole locations (x2) Figure 28: Toe Kick Panel Installation English 28
-
 1
1 -
2
-
3
-
4
-
5
-
6
-
7
-
8
-
9
-
10
-
11
-
12
-
13
-
14
-
15
-
16
-
17
-
18
-
19
-
20
-
21
-
22
-
23
-
24
-
 25
25 -
 26
26 -
 27
27 -
 28
28 -
 29
29 -
 30
30 -
 31
31 -
 32
32 -
 33
33 -
 34
34 -
 35
35 -
36
-
37
-
38
-
39
-
40
-
41
-
42
-
43
-
44
-
45
-
46
-
47
-
48
-
49
-
50
-
51
-
52
-
53
-
54
-
55
-
56
-
57
-
58
-
59
-
60
-
61
-
62
-
63
-
64
-
65
-
66
-
67
-
68
-
69
-
70
-
71
-
72
-
73
-
74
-
75
-
76
-
77
-
78
-
79
-
80
-
81
-
82
-
83
-
84
-
85
-
86
-
87
-
88
-
89
-
90
-
91
-
92
-
93
-
94
-
95
-
96
-
97
 |
 |